A file cabinet allows you to arrange documents tidily and easily accessible. It also safeguards files from loss and environmental damage.
They are helpful to those struggling with storing many files and paperwork.
In this article, we will give you 21 DIY file cabinet plans based on the volumes of your paperwork and storage space.
Also, it includes ideas about refurbishing and repurposing your existing file cabinets.
Let’s find out to learn more!
Table of Contents
- 1. Build A 6-drawer File Cabinet For A Small Space
- 2. DIY File Cabinets & Furniture In One
- 3. Faux Zinc Filing Cabinet Makeover
- 4. Make A Sliding File Cabinet On The Office Desk
- 5. Milk Crate Filing Cabinet
- 6. DIY Filing Cabinet Using Walnut Plywood
- 7. Building a Filing Cabinet By April Wilkerson
- 8. Revamped Pimped Filing Cabinet
- 9. Colorful Striped Diy File cabinet
- 10. DIY Filing Cabinet Out Of Wood
- 11. DIY File Cabinet Renovation
- 12. DIY File Cabinet Plans For The Home
- 13. Simple 2 Drawer Filing Cabinet
- 14. Build A Stackable GTD Filing Cabinet
- 15. File Cabinet Makeover Use Homemade Chalk Paint
- 16. Home Office DIY File Cabinet
- 17. DIY Rustic Filing Cabinet for Farmhouse
- 18. Chalk-Painted File Cabinet Makeover
- 19. DIY Frameless Drawer Cabinet
- 20. Dresser Inspired Filing Cabinet Makeover
- 21. DIY Filing Cabinet Gets An Industrial Makeover
- Conclusion
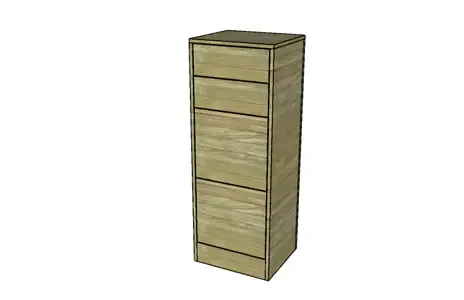
1. Build A 6-drawer File Cabinet For A Small Space
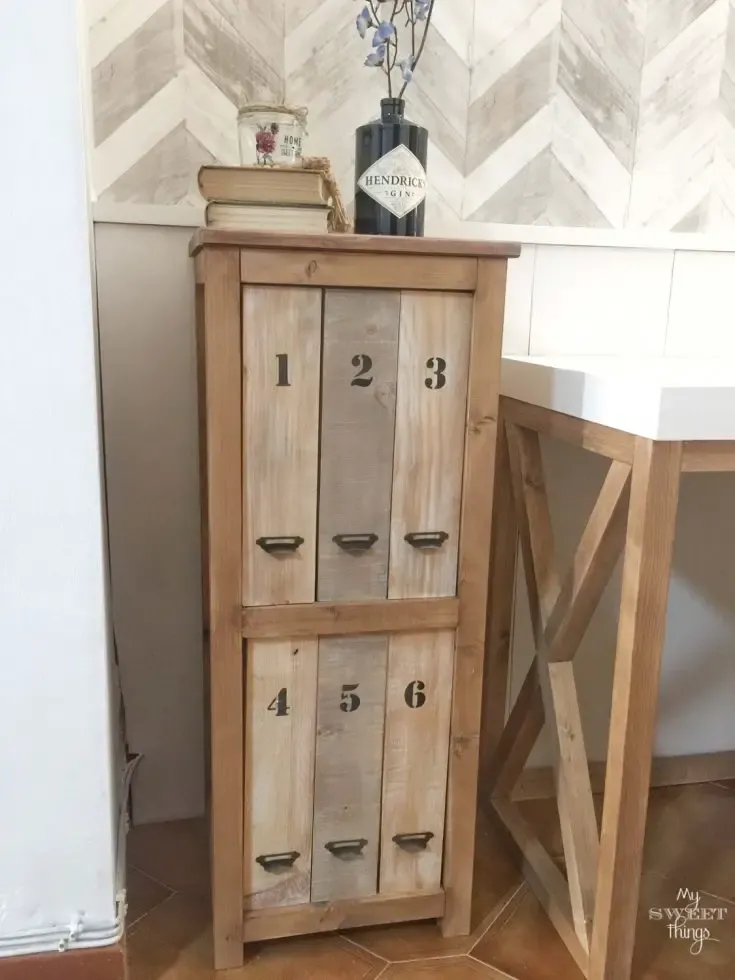
No worries if you have to handle many files in a cramped room. You can build a cabinet with a narrow width and extended height, then divide it into multiple drawers like this.
The cabinet features six drawers, with each one being about 8.5 inches wide and 36 inches high. This dimension fits most standard cardboard files and magazines.
All sides of drawers are sturdy stained scrap wood to ensure their durability and weatherproof over time.
Moreover, screw tackles and label the drawers with specific numbers to easily access and organize your documents.
Project details: sweethings.net
2. DIY File Cabinets & Furniture In One
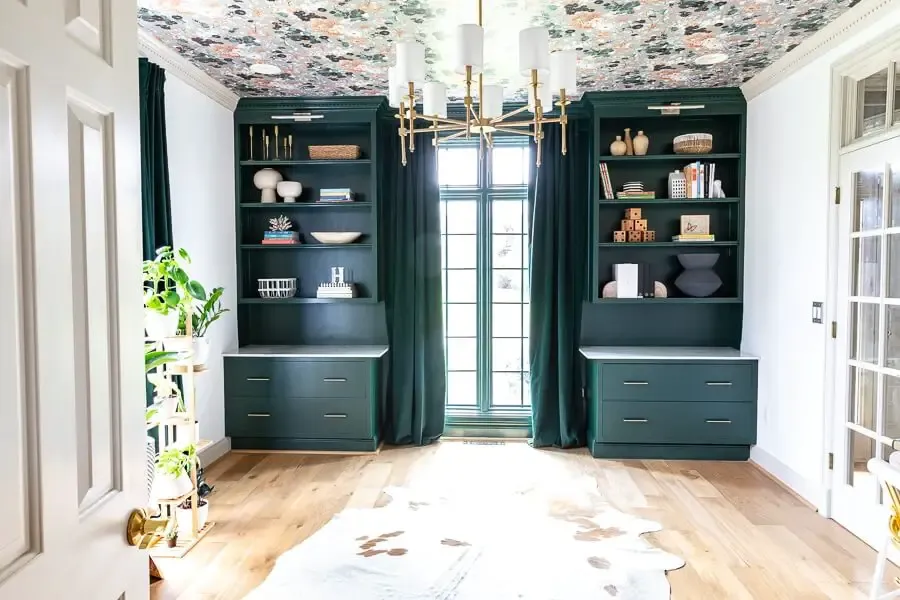
This project is complicated and beyond a file cabinet – we call it furniture.
While there are four large drawers to keep your paperwork, four bookshelves are available above for books, souvenirs, etc. It is possible to use the top of the drawers as a desk.
You can skip this project and check the next DIY file cabinet if you are only a beginner woodworker.
Here’s highlight some points about this project:
- Use a plywood blade to cut clearer and more precise pieces.
- Attach parts with pocket screws and glue for double insurance.
- Always “check for squareness” while building a box. You can measure all corners on the diagonal and ensure the measurements match.
- Apply primer and coats of latex paint matching the current curtains. As such, your file cabinet looks harmonious as furniture.
- Finally, add shims to level the cabinet and screw it to the wall’s studs. Otherwise, the big and heavy construction can tip over.
Project details: jenwoodhouse.com
3. Faux Zinc Filing Cabinet Makeover
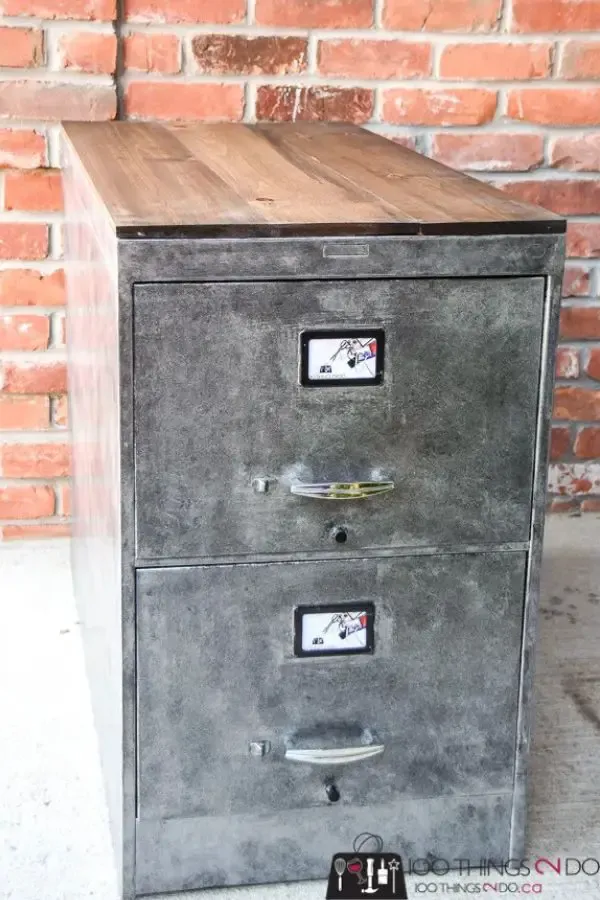
This plan is not a newly-created DIY project but a makeover – to be exact.
Thus, the first step is to find an old metal filing cabinet and a wooden board around your house or buy one online.
Don’t worry! We don’t need to perform complex woodworking skills here. You just have to cut the wood board into the exact dimensions of the top surface of the metal cabinet.
Gluing the wood board on top helps consolidate the cabinet, and it doubles a tabletop to place a vase or a statue, for example.
You can also do the faux zinc treatment using black, metallic silver, and cheesecloth. The cabinet looks sturdy, like real metal stuff.
It comes with 2 big drawers and doesn’t take a large footprint. So you can put it in your bedroom if you have to work there.
Project details: 100things2do.ca
4. Make A Sliding File Cabinet On The Office Desk
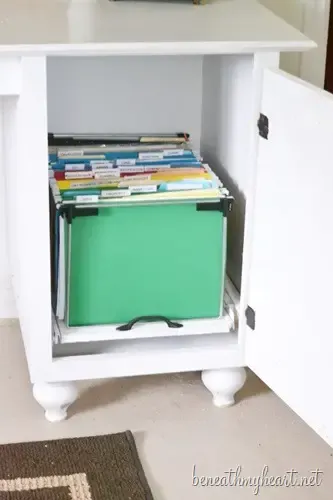
Having a cabinet attached to the office desk is a good idea. But it’s a pain in the neck to squat for a long time, getting your head into the cabinet just to find a document.
It is when this sliding cabinet plan comes to the rescue!
You can complete this task with ready-to-buy things: two Lowe’s drawer slides, a piece of plywood, a drawer pull, and a 10-dollar file holder.
Just screw 2 drawer slides on 2 sides and rolling them out when you need to find something. All are accessible within your sweet spots.
Also, it’s advisable to install a drawer in the base so that you can easily pull it out.
Project details: beneathmyheart.net
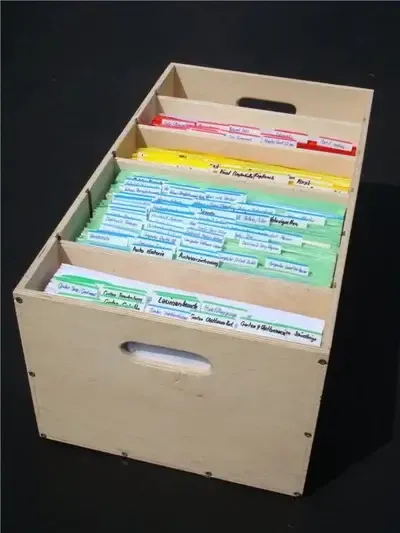
5. Milk Crate Filing Cabinet
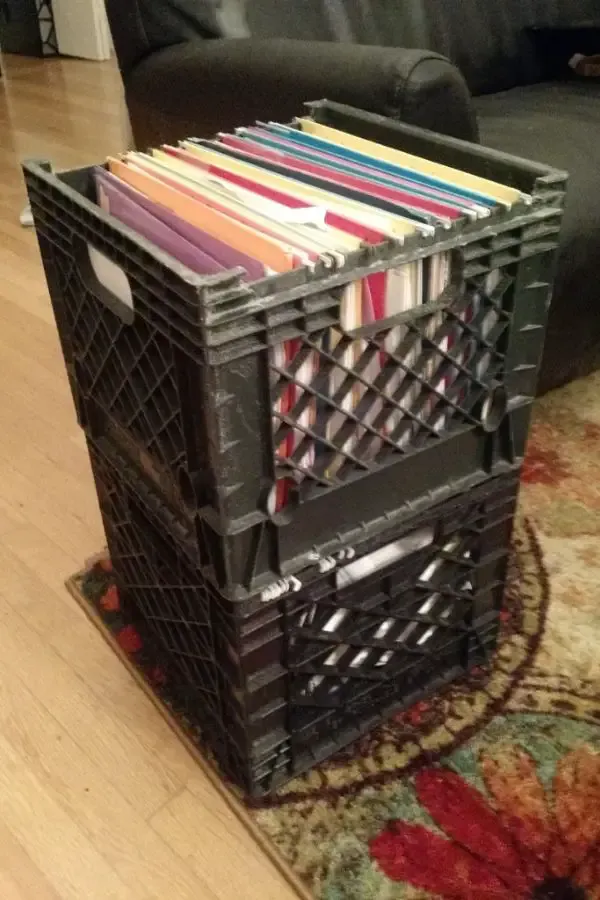
The look of crate file cabinets does not impress us much. Nonetheless, the plan is worth introducing to those who want to keep the woodworking tasks as few as possible.
You can recycle your milk crates or just buy two of them. The cut-out construction of those crates will prevent moisture accumulation that can destroy your paper documents.
But some plastic outcroppings or bits of plastic need to be removed to ensure they won’t accidentally tear off the paper.
The big holes in the crates enable you to move it around, too. It’s a plus in case you want to change your workplace constantly.
Project details: instructables.com
6. DIY Filing Cabinet Using Walnut Plywood

Neat, precise, and beautiful are what we like about this file cabinet.
Walnut wood is used to build this filing cabinet, it’s great for hardness, color as well as grain.
In terms of construction, the cabinet has a rectangular frame outside and two smaller drawers inside.
There is also a small cutout on the front side so you can easily pull the drawer in and out. Moreover, you can apply to stain it with any color you want.
Project details: makesomething.com
7. Building a Filing Cabinet By April Wilkerson
This plan involves building an elegant file cabinet that matches your computer desk. The main idea is to create a construction with three drawers: two big ones for files and a small one for notebooks, pens, electronic stuff, etc.
A small tip is to stain all plywood parts first before installing them so you do not have to work in a confined space later.
Then, the steps to follow are to create the external 3-sided frame first, install the three drawer boxes, screw the sliders to attach the drawers into the frame and add the handles on the front side of the drawers.
Furthermore, you should not attach the cabinet to the desk but add 4 wheels on the bottom to easily transport the cabinet around.
8. Revamped Pimped Filing Cabinet
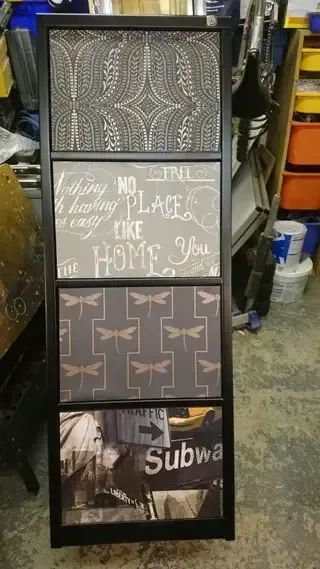
A quick way to refresh the look of your old cabinet is by using some funky wallpapers. You can choose papers having the same theme or be creative with random ones.
A small note to make the new paper coverage perfect is to polish and prime the old cabinet’s surface carefully in advance.
It is also up to you to cover the whole sides or just the fronts. If it is the latter choice, you can paint the uncovered parts with satin colors matching the paper.
Project details: instructables.com
9. Colorful Striped Diy File cabinet
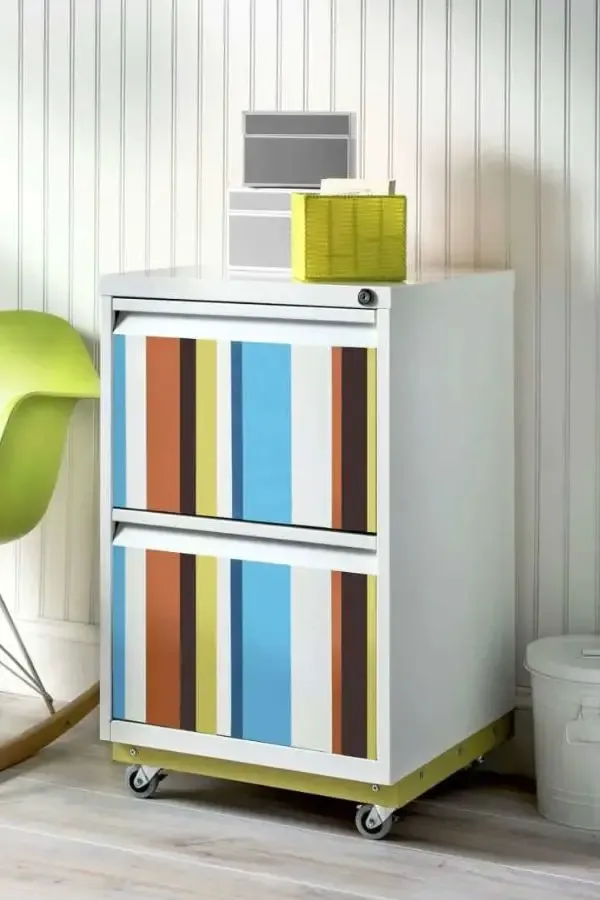
This file cabinet is very easy, indeed. You will buy a ready-made cabinet from the thrift store or re-decorate your old one.
Maybe the best part of this touch-up is the caster, which will lift off a real burden regarding portability.
And this project also lets your creativity run wild to prepare your preferred paint colors to achieve a colorful design.
You can paint the stripes in random widths or based on the volumes of files and paperwork arranged inside the drawers. A helpful tip is to apply butcher paper where you do not want to paint.
Project details: diycandy.com
10. DIY Filing Cabinet Out Of Wood
Suppose you have a floating desk at home, you will like the idea of filing cabinets working as support legs under the desk.
The project includes a cutting list for you to follow and prepare the cut parts. You just screw pocket holes to form the frame and drawers, paint them in white, then attach the sliders at the planned height.
There are helpful techniques you can learn from this plan such as iron-on edge banding and reinforced corners.
The earlier covers the exposed edges, giving a solid appearance and durability. While the latter refers to triangles sitting at the corners to increase lateral support.
Such reinforcement allows the cabinets to support the desk above.
11. DIY File Cabinet Renovation
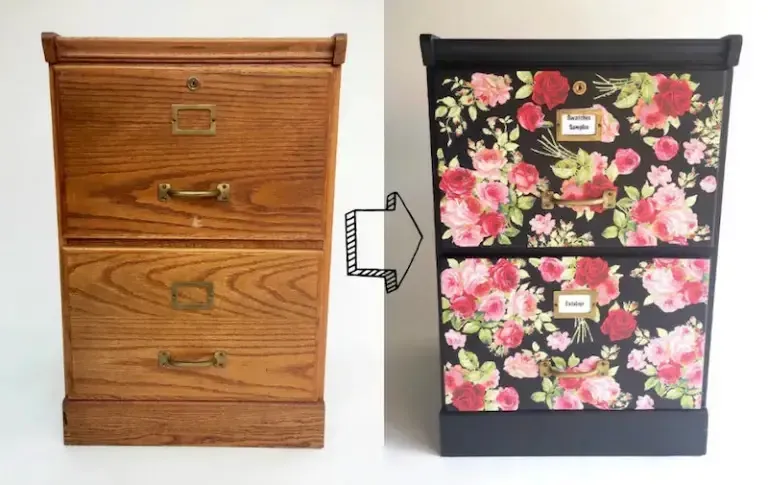
Skip building the cabinet from the ground up if you already have one at home. This project is to change its boring wood paint into lovely scrapbook paper.
The basic steps include cleaning and preparing your cabinet and applying coverage primer and paint. If you choose the black chalk like in the plan, you do not need a primer.
Next, trim the paper to fit the drawers’ fronts and apply the mod podge technique. So instead of normal glue, you use the mod podge solution as a glue, sealer, and finish in one.
We suggest applying multiple podge coats under and above the scrapbook paper to seal and protect it from humidity and scratches.
Project details: modpodgerocksblog.com
12. DIY File Cabinet Plans For The Home
Here’s a filing cabinet with detailed guidance and dimensions for you to easily follow. The depth would stay the same at 15 ¾ inches.
Nonetheless, the length and width of the cabinet can be flexible per your needs. We would suggest designing different sizes to take advantage of the space for different kinds of documents.
In the plan, there are two middle big drawers for electronic stuff and large folders, while other small ones are ideal for storing small notebooks, pens, rules, and other office supplies.
So far, so good. We suggest installing additional handles to make opening and closing the drawers more convenient.
Project details: designsbystudioc.com
13. Simple 2 Drawer Filing Cabinet
The author gave an idea of building a 2-drawer cabinet that is 26 ½ inches high and 17 inches wide, quite spacious for large files and other stuff.
The big drawers are 10 inches wide and around 16 ½ inches long, so feel free to throw any files into them.
Heads-up: this plan is not something for novices or hobbyists to practice, as the project requires tools like table saw and advanced cuts like grooves. But if you can finish it, the cabinet will be just as good as a store-bought one.
14. Build A Stackable GTD Filing Cabinet
It’s easy to make this filing construction. On the two sides, there are grinding slots where you can insert compartments and instantly turn the cabinet into multiple areas for specific files and paperwork.
The compartments are separate and flexibly fit into any slots, which makes the cabinet smart and economical in space. We also attach a felt in each corner so that it won’t scratch the floor.
Of course, using casters will be more portable. But when you want to add more length to the cabinet since there are more files to store, disassembling the casters will cost more time and effort.
Project details: instructables.com
15. File Cabinet Makeover Use Homemade Chalk Paint
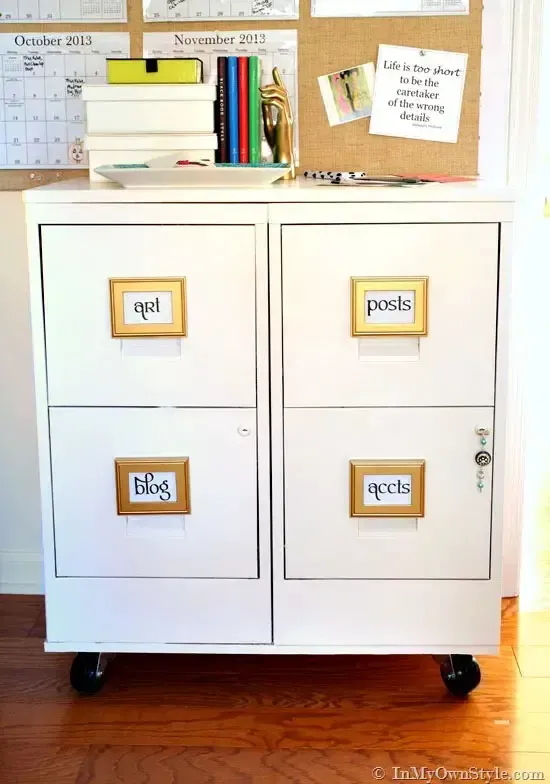
Interestingly enough, you will make this four-drawer cabinet from two separate wardrobes. This idea is great if you want a big cabinet yet need help finding a ready-made size.
Simply prepare two flat pieces equal to the total width of the cabinets – one on the top, where you can place some decorating items and another at the bottom, where you attach four mobile wheels.
We also recommend repainting to create a consistent and matching look for the two separate compartments.
Also, you will add small gold frames to attach labels the contents for each drawer.
Make such a few changes, and you can complete the work.
Project details: inmyownstyle.com
16. Home Office DIY File Cabinet
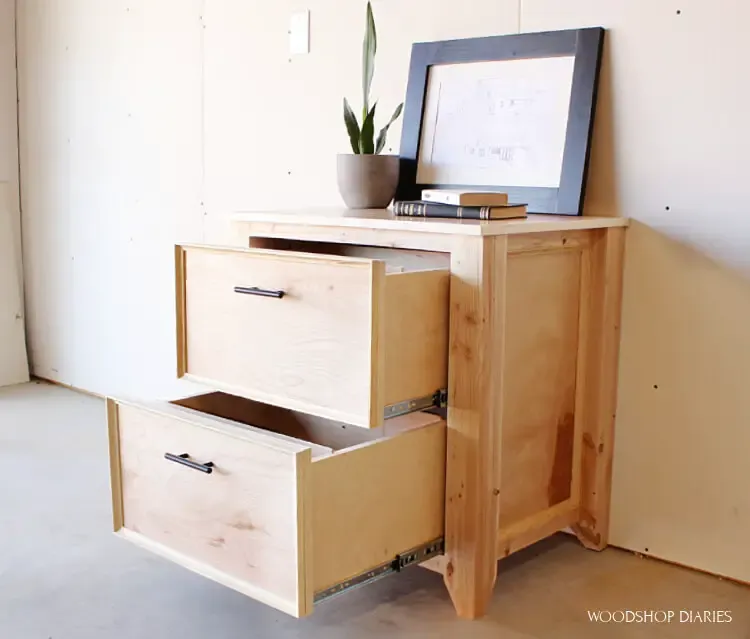
The plan is usable as a filing cabinet, a nice printer desk, or even a side nightstand. Such convenience is credited to all large and spacious parts – the whole dimension is 30 x 22 x 30 ¾ inches.
First, you will focus on building four strong legs. For each leg, you can trim down two 2x4s to 32 inches long and glue them up.
When the glue is dry, continue cutting down to three inches of square posts and ¼ inches off each edge.
Afterward, you drill pocket holes to attach the plywood panel into a sturdy frame and move to install the drawer sliders and attach top of the cabinet.
You should add 16-inch ball bearing and 1 ½-inch inset to the sliders to make sure they sit securely on the thick legs.
Drawers are the next to build and attach them into the sliders to complete the project.
Project details: woodshopdiaries.com
17. DIY Rustic Filing Cabinet for Farmhouse
At a glance, you will love the cabinet’s 2-drawer rustic design, from the espresso coverage, and some stained spots on the final finish, to X classic patterns in the front sides.
Simple as it might look, this cabinet is suitable for experienced woodworkers. It uses rabbet joints to assemble drawers rather than the common pocket holes. However, those joints are stronger yet require precise cuts.
Also, a mid-wax classic grade is ideal for creating a soft, beautiful brown coverage for the cabinet.
18. Chalk-Painted File Cabinet Makeover
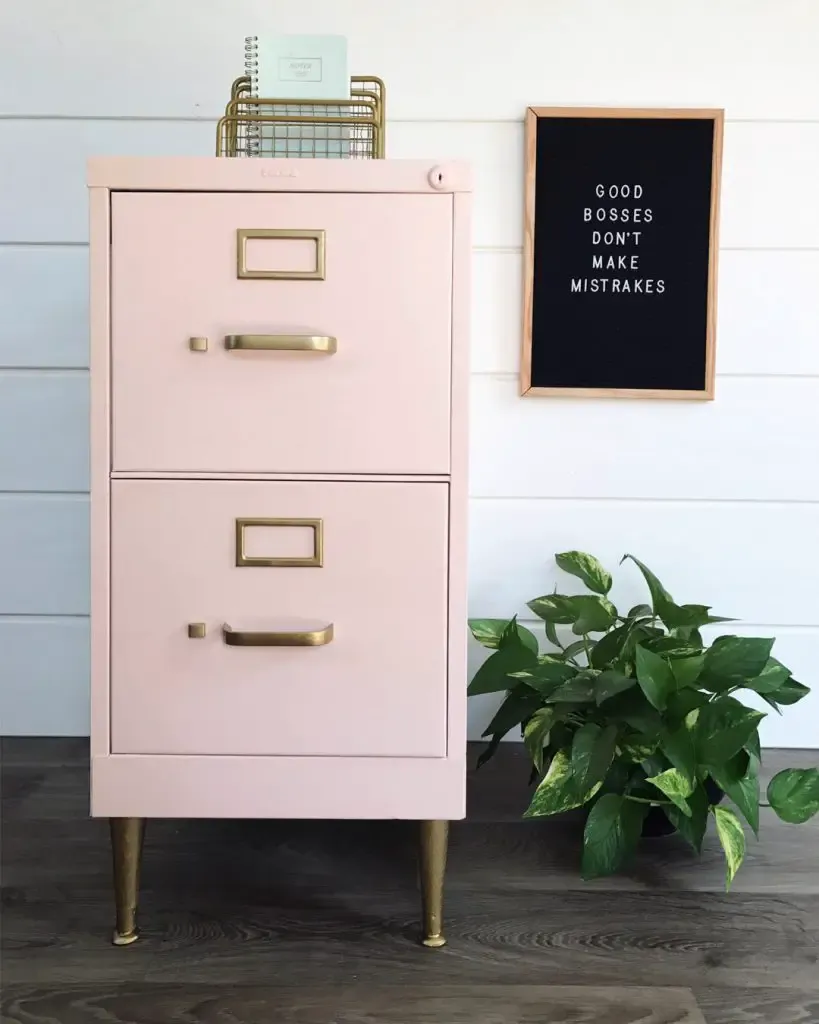
Continuing with the makeover series, we introduce you to the chalk-painted file cabinet re-decoration.
The theme is luxury; thus, you will keep the cabinet in pink and gold.
In addition, you can buy four additional table legs at around a few bucks for each and spray them in gold.
The legs match well with the cabinet’s pink coverage and golden hardware. New lovely and trendy look, indeed.
Project details: allthingsthrifty.com
19. DIY Frameless Drawer Cabinet
A frameless cabinet creates a compact impression, so we recommend it if you have a small living space.
To do so, you need to use pocket holes inside and from under. Some brad nails also help to enhance and conceal the hole marks.
Overall, the cabinet has three drawers; you can turn any of them into file storage by installing ready-made file hangers.
20. Dresser Inspired Filing Cabinet Makeover
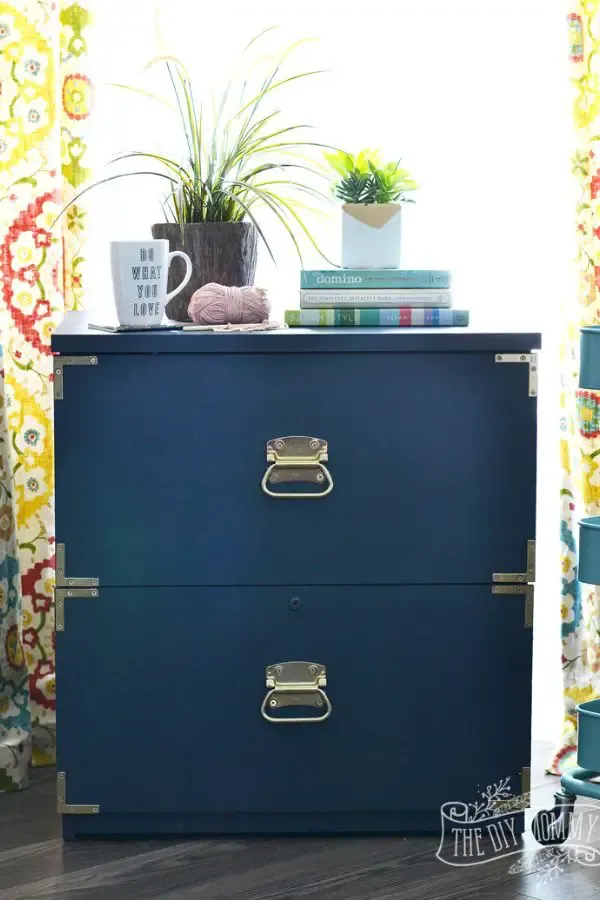
For this project, the instructor repainted the old wooden cabinet with the Fat Paint Navy State of Mind chalk paint mixed with pops of brass hardware. The outcome is a deep teal dresser. Very impressive.
You can see those latches outside. They not only render the cabinet more sturdy but also add a rustic touch to the project.
Project details: thediymommy.com
21. DIY Filing Cabinet Gets An Industrial Makeover
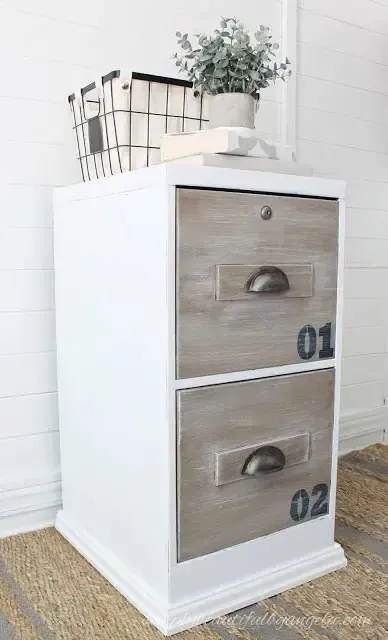
In any chance that your decor is minimal with mainly white walls, this cabinet is ideal. Its sides are in white paint; meanwhile, the fronts have a natural wood look.
An interesting method to create lifelike wood prints is with dark wax and a rag. Apply the wax and wipe it off immediately.
Once the wax is dry, you can also brush it and add molding to give it a fancy look. Finally, label the drawers with numbers as a modern touch.
Project details: simplybeautifulbyangela.com
Conclusion
There are so many DIY file cabinet plans to try on, so you do not need to hesitate any longer.
We like those cabinets with multiple usages, like a piece of decor furniture, desk, or drawers at a time. We hope you might also love these plans.
You should start with newly-built cabinets first – detailed instructions are available for every plan in the list.
Then, do a makeover with paper or paint once in a while to refresh your room.
We are looking forward to your new DIY designs!


