Are you having trouble deciding on the perfect pattern for your first-ever pyrography project?
Most people consider wood burning as a profession hard to get into. To help you out in picking up this art as a hobby, we have gathered 30 free wood burning patterns that are also easy to make, but some of them will have more challenges.
Just follow the guides that we prepared as closely as possible, and your first success will arrive.
Table of Contents
- 30 Free Wood Burning Patterns
- 1. Quilt Block Wooden Coasters With Pyrography
- 2. Burned IKEA Cork Trivets
- 3. Mandala Flower Pyrography
- 4. Color Block Wall Art
- 5. Wood Burned Spoons
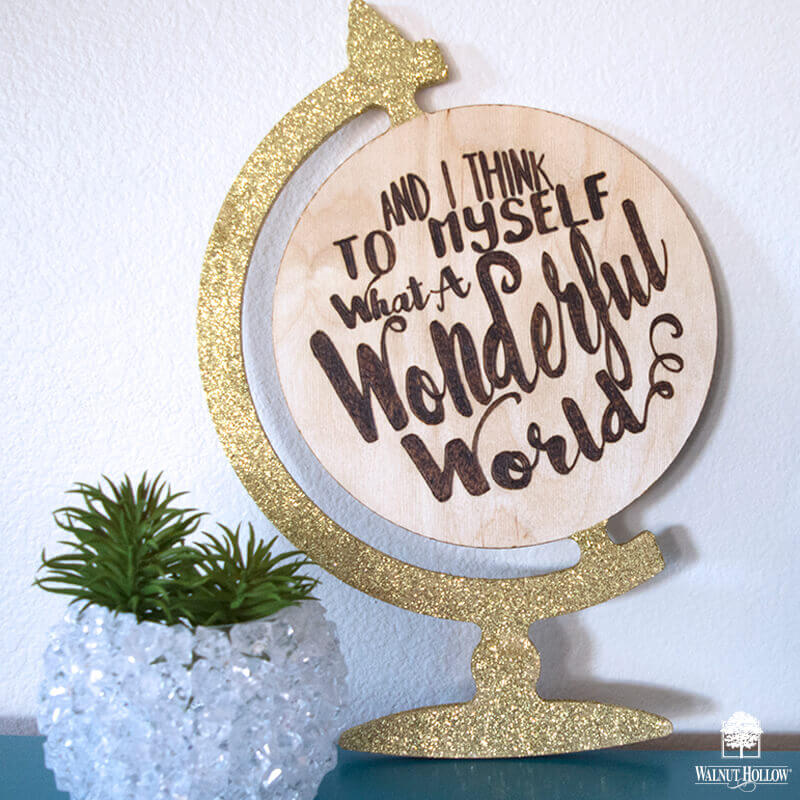
- 6. DIY Wood Burned Sign
- 7. Wood Burned Ornaments
- 8. Wood Burned Flourishes
- 9. Etched Snowflake Ornaments
- 10. Monogrammed Cutting Board
- 11. Farmhouse Style Christmas Ornament
- 12. Wood Burned Leaf Magnets
- 13. Hawk Owl Pyrography
- 14. Wood Burned Boxes
- 15. Wood Burned Photo Frames
- 16. DIY Walnut Hollow Clock
- 17. Wood Burning Hand Letters
- 18. DIY Namaste Sign
- 19. Valentine Hearts Plaque
- 20. Etched Wooden Spoons
- 21. Wood Burned DIY Picture Frame
- 22. Wood Burned Blocks
- 23. Bengal Tiger Pyrography
- 24. Wood Burned Wall Art
- 25. DIY Rustic Wood Sign
- 26. Wood Burned Floral Coasters
- 27. Wood Burned Mandalas
- 28. Legend of Zelda Box
- 29. Wood Burning Butterfly Dreams Art
- 30. Vista House Pyrography
- Conclusion
30 Free Wood Burning Patterns
1. Quilt Block Wooden Coasters With Pyrography
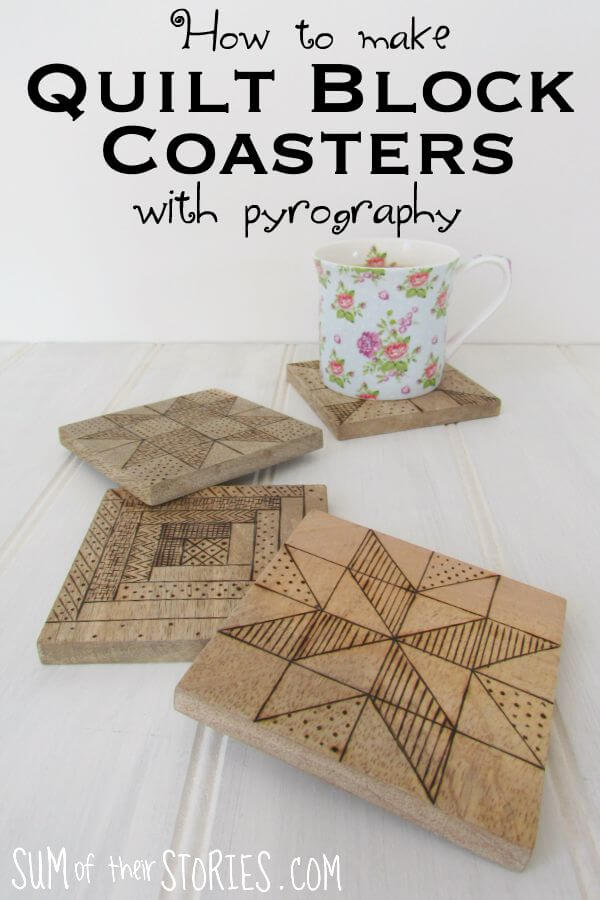
If you happen to have some wooden coasters lying around, you can try out this quilt block design. It has a 16-square base, different from the usual 9-square design that most pyrography projects use.
You don’t need anything fancy for this plan, just some rulers, pencils, some wooden coasters, and a pyrography tool.
As the pattern makes use of the new 16-square design, having some 4-inch square wooden coasters will make it easier for you to measure and divide the corners.
Project details: sumoftheirstories.com
2. Burned IKEA Cork Trivets
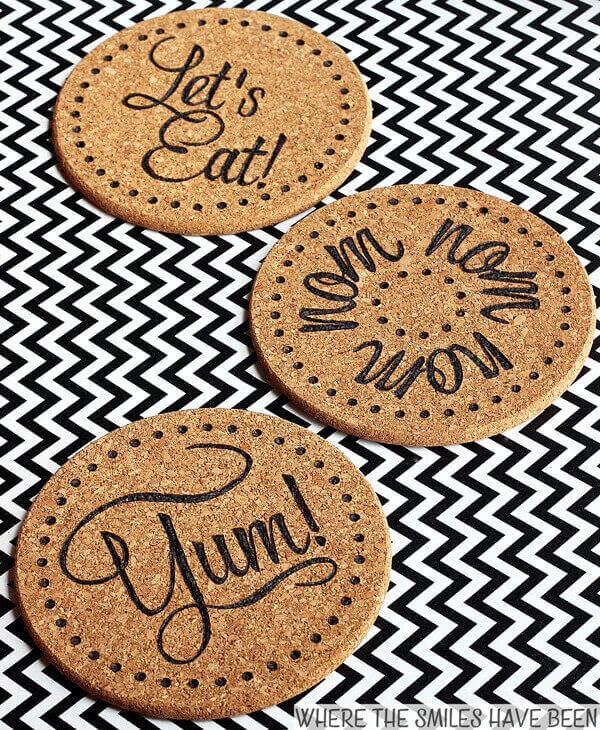
Cork trivets are among the most challenging to decorate properly. You regularly place hot dishes on them, after all. With this Burned IKEA Cork Trivets plan, you can rest assured that the patterns will surely stick.
You will need at least three packs of 7 inches cork trivets from IKEA. Also, you must have some contact paper stencil, a silhouette cameo, a marker, and a wood burner on hand.
It’s best if the wood burner has interchangeable tips and adjustable heat levels.
Project details: wherethesmileshavebeen.com
3. Mandala Flower Pyrography
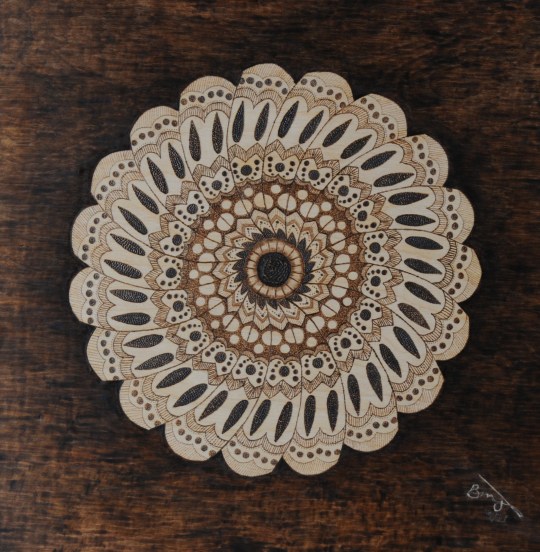
There is no denying that the mandala flower pyrography design is among the most striking to look at. It is also one of the hardest to pull off, requiring the artist to spend hours upon hours to finish.
To make this pattern, you need the help of three tips, including the writing tip, the ball tip, and the shading tip. You also must have a 10×10 piece of wood ready.
Project details: pyrographymadeeasy.com
4. Color Block Wall Art
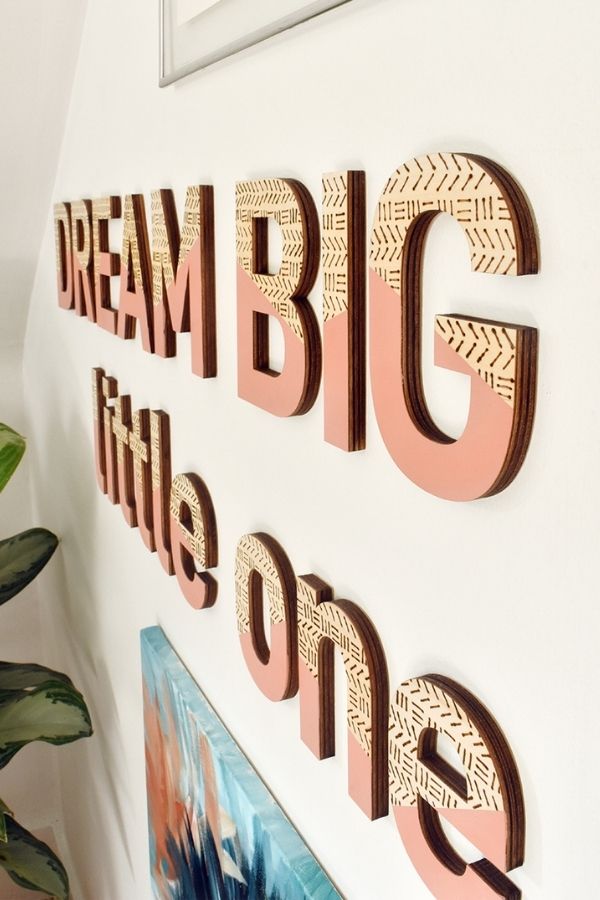
Wall art is something that we are all familiar with. However, few people have thought of putting their own spin on this kind of project. That is why I want to introduce you to the Color Block Wall Art.
To create this pattern, you need to prepare some tape, any type of wooden letter, a foam paintbrush, and a pencil. Of course, a wood-burning tool is a must.
Project details: design-fixation.com
5. Wood Burned Spoons
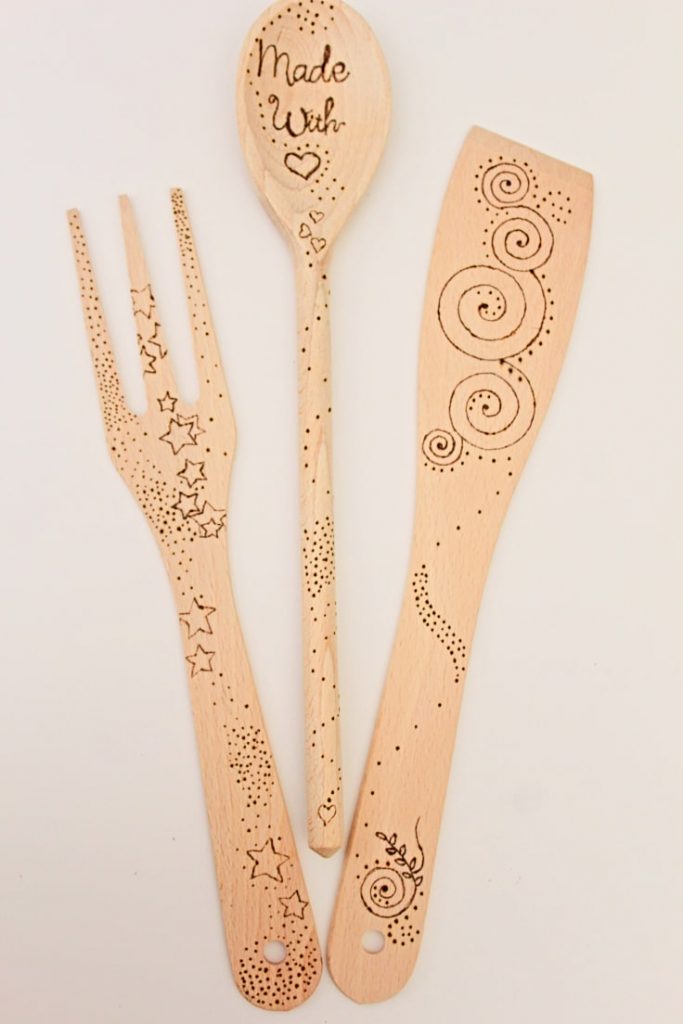
We use spoons on a daily basis, so it’s not an overestimation to say that they are our most trusted tools. With this project, you can personalize them to your liking.
You start off by painting the design onto the spoons. Then, you use a wood-burning tool to trace this design. The heat will destroy all the paint, so the pattern will be etched on forever.
Project details: theseamanmom.com
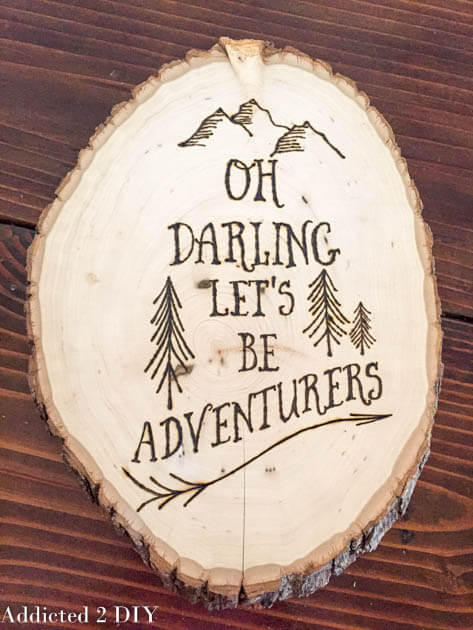
6. DIY Wood Burned Sign
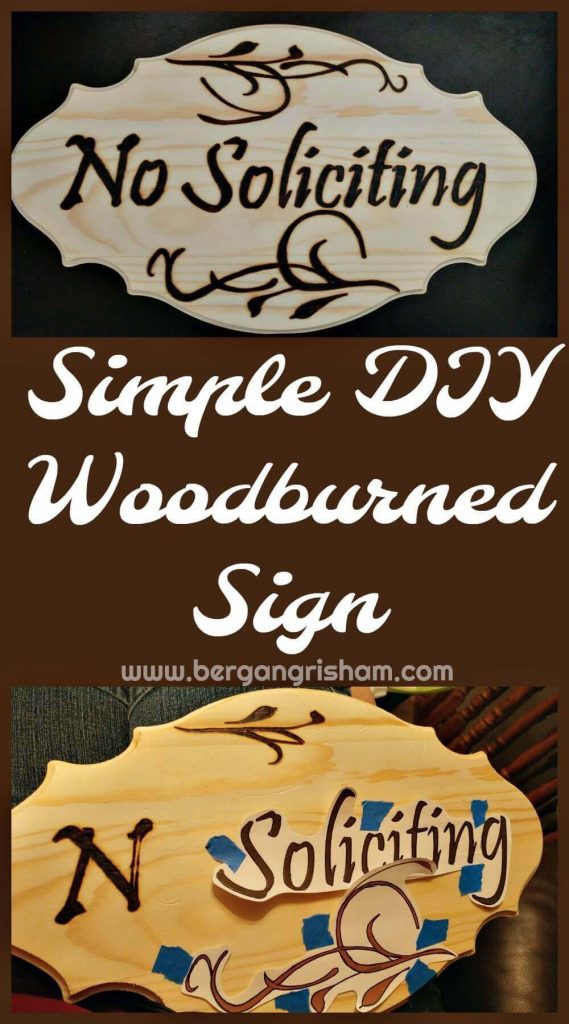
Most of the time, a sign is the first thing that a guest sees when he or she enters your house. This plan will help you customize your size, granting it a unique look with personality.
You only need some basic things, such as a ballpoint pen, tape, scissors, paper, a printer, ink, and some sanding sponges. Naturally, you also need a great piece of wood to act as the base of the sign.
Project details: bergangrisham.com
7. Wood Burned Ornaments
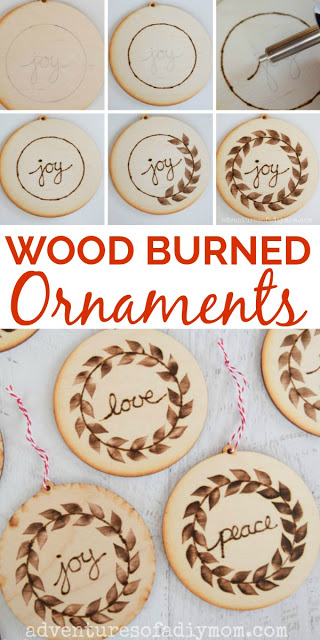
If you are bored with the regular ornaments, you can try to spice things up with these.
They will add quite a rustic feeling to decorating your living quarter, great for holidays as Christmas, and they are fairly easy to make. This is also a cool gift for friends and family.
You don’t need anything too fancy to create these ornaments. Get some pre-cut wooden ornaments from any souvenir shops, a pencil, and something round enough to trace on.
Project details: adventuresofadiymom.com
8. Wood Burned Flourishes
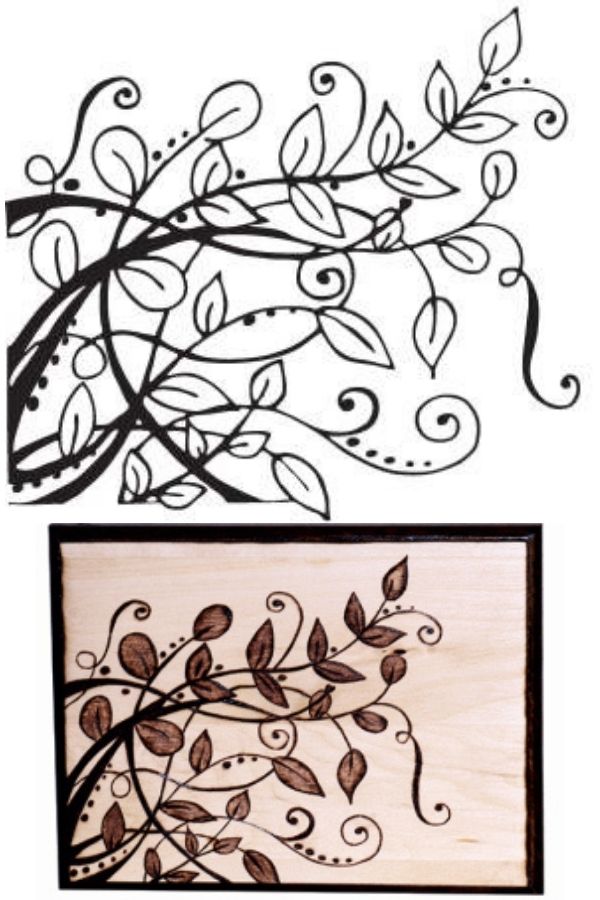
This plan offers you a contemporary design to trace so that you can get used to controlling a wood-burning tip. It is hard enough to pose a challenge yet easy enough to do it if you try properly.
As you can clearly see, the most challenging part about this project is the difference between the branches. You must use the universal point for the thicker and major branches.
On the other hand, the thinner branches, leaves’ outlines, and scroll lines require the cone point.
Project details: walnuthollowcrafts.wordpress.com/
9. Etched Snowflake Ornaments
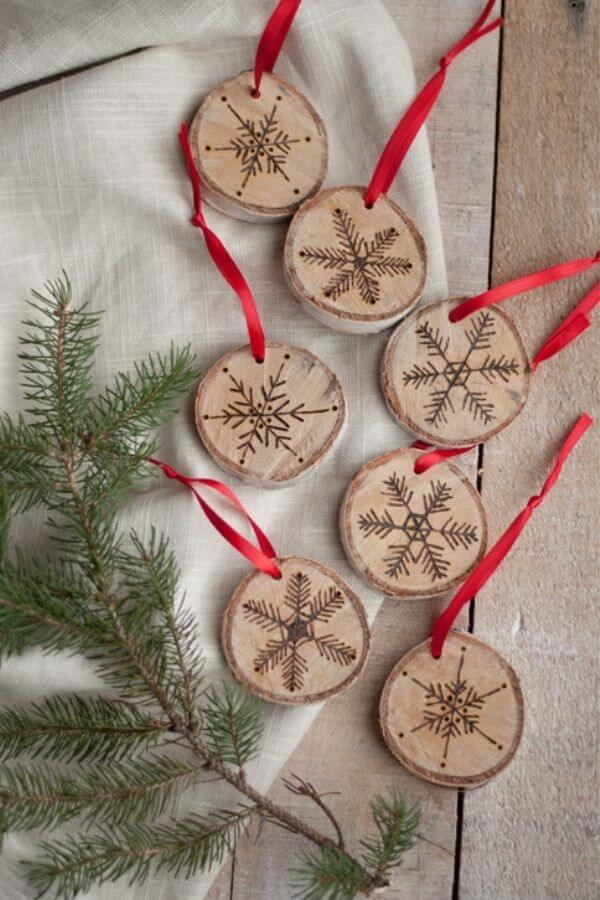
With its unique color, birch wood slices make for some of the most interesting accessories for the holidays. This project will enhance their appeal even more, giving them a woodsy and rustic holiday feel.
You need no more than some birch branches, a bow saw, and an etching tool. If you want to hang your work, you can make drill a hole and use some ribbon or even natural twines.
Project details: designmom.com
10. Monogrammed Cutting Board
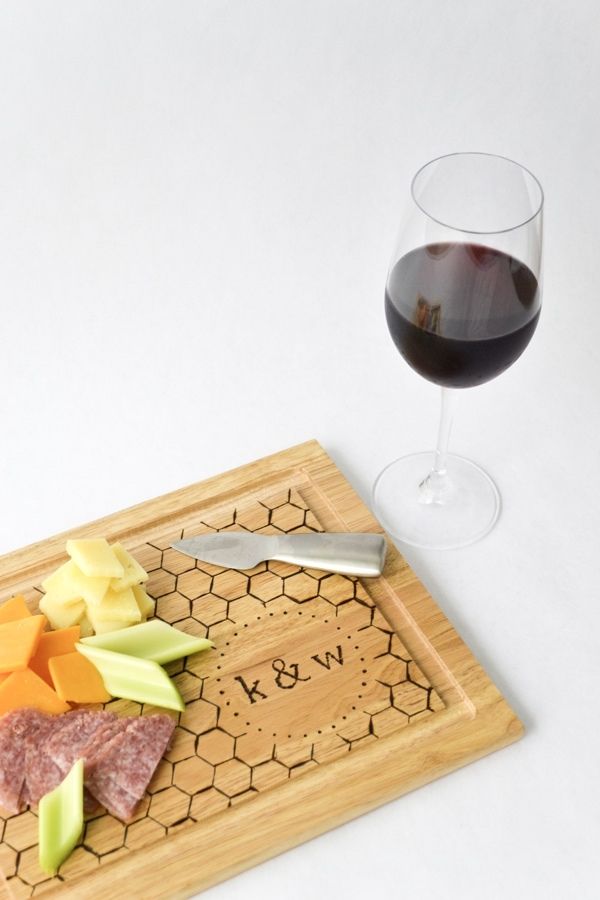
It’s hard to find a cutting board with any type of pattern since the paint can easily wash away.
This design will be using a honeycomb pattern, as it can create a complex look. Print the pattern onto a regular paper piece, trim it according to your board’s size.
Finally, use graphite paper to trace this pattern onto the board. All you need to do is guide the wood-burning pen according to the trace
Project details: ruffledblog.com
11. Farmhouse Style Christmas Ornament

If you are not that confident in your drawing ability, you can try to make these ornaments first to test the water. After all, the patterns are pre-made on the stamp, so there is no need to draw anything.
That is why you only need to prepare some blank bulk birch ornaments, a creative versa tool, and a stamp. Remember to be careful while stamping the pattern in center of the ornament.
Project details: ourcraftymom.com
12. Wood Burned Leaf Magnets
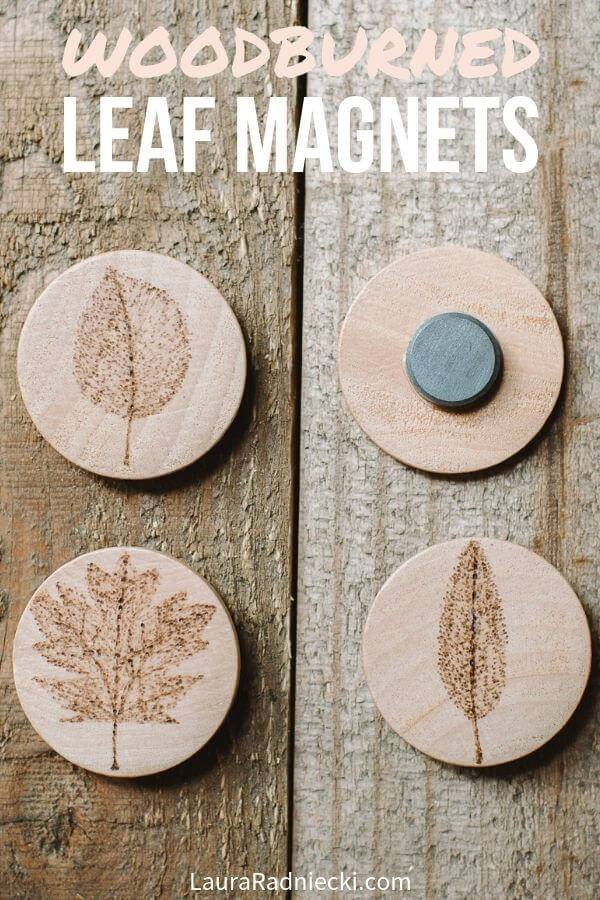
As we are trying to burn shapes of leaves onto small wood pieces, we need to be as precise as possible. So you should use the pen with the smallest and finest point.
The supply requirement is not that complicated. The wooden circles, the wood-burning tool, the Mod Podge, the foam brush, and the magnets are necessary. Other things like glue or sealer are purely optional.
The finishing touch is to attach some magnets onto the back of the woods that can be attached to practically anything. This also is a great handmade gift idea for friends.
Project details: lauraradniecki.com
13. Hawk Owl Pyrography
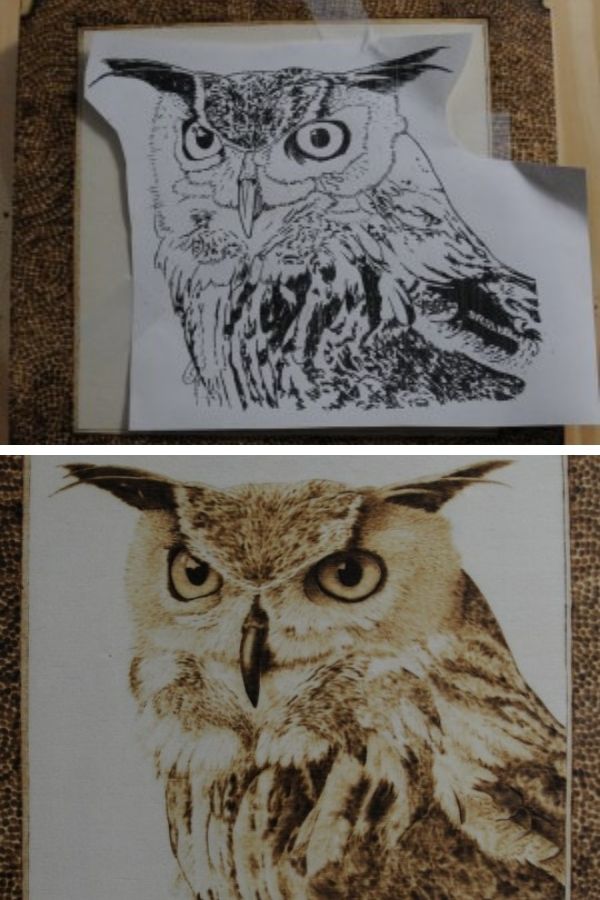
After you have become familiar with the way wood-burning works, you will want some challenges. A prime example of such challenges is this Hawk Owl project.
As it is a test of your skills, you should not use add-on tools like foam brushes or Mod Podge.
The only gear allowed is a wood-burning tool that can change between writing and shading tips, as well as a 6×6 inch wood piece.wood piece.
You can download this pyrography pattern to print off on the light weight paper for easy control.
Project details: pyrographymadeeasy.com
14. Wood Burned Boxes
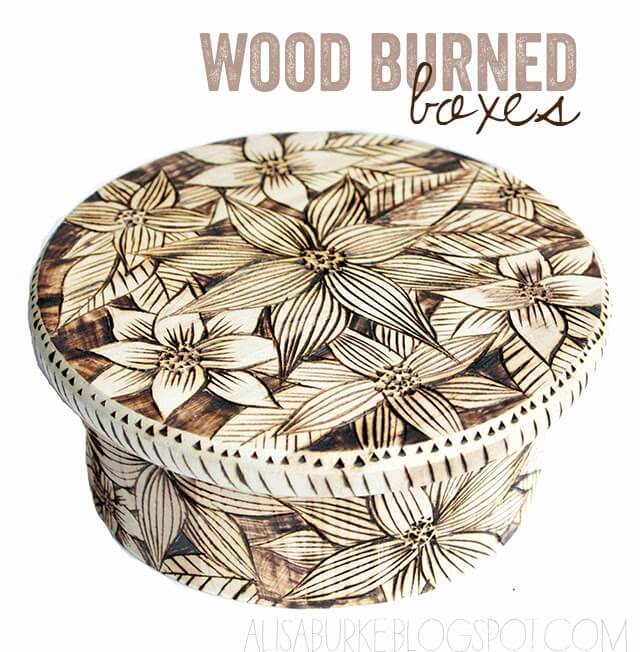
If you are having issues trying to find a good gift for a close friend, this wood-burned box idea will satisfy you.
You don’t need to spend too much effort, as the main ingredient, the wooden balsa boxes, are readily available in any craft store.
After getting these boxes, you use your wood-burning tool to fill their surface entirely with patterns of your choice.
Project details: alisaburke.blogspot.com
15. Wood Burned Photo Frames
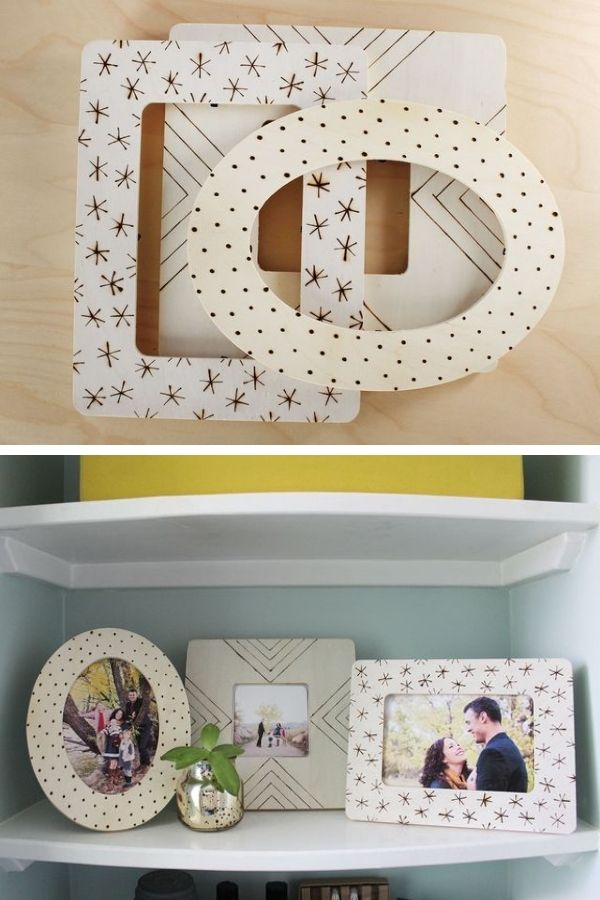
These wood-burned photo frames are perfect combinations of modern designs with a rustic craft. They will perfectly showcase your family photos while complementing your living space.
The main materials are natural wooden frames, which you can easily get from your local hobbyist store. You also need a metal ruler and a pencil to ensure that the patterns are correct.
Project details: abeautifulmess.com
16. DIY Walnut Hollow Clock
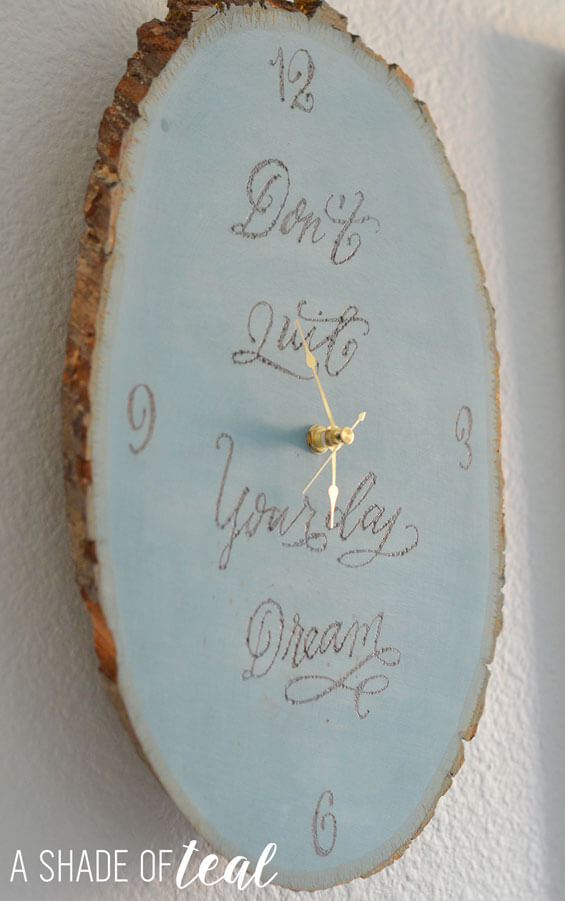
Most households have at least one clock to check the time. So, why don’t you try to turn an otherwise useless piece of Basswood into an indispensable tool?
First, you must prepare the art of your choosing by printing and cutting them off. You then shade the back and trace them over to the wood piece.
The final step is to burn the art into the wood by your wood burner. It will take a while, so be patient.
Project details: ashadeofteal.com
17. Wood Burning Hand Letters
The hand letters trend is quite big at the moment, but it takes quite a while to master. This wood-burning project gives you a shortcut to enjoy the results without having to invest too much effort.
To work on this project, you must have a flow point tip, as it flows smoothly on curved lines. Print the letters that you want to tape onto your workpiece, and trace them with the wood-burning tool.
Project details: walnuthollowcrafts.wordpress.com
18. DIY Namaste Sign
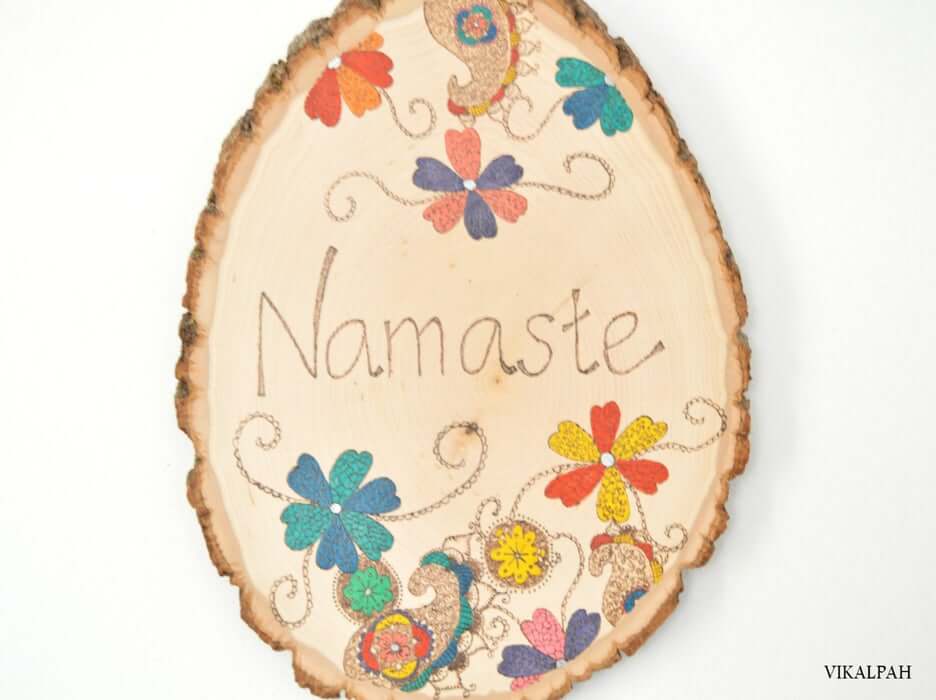
The result of this project is a beautiful welcome sign that can signal your own personality. It also provides a rustic and natural look to increase the appeal of your home.
You don’t need to prepare anything other than a wood plank, preferably Basswood. Other gears like pencils, erasers, rulers, and the wood-burning tool must already be available in your workshop.
Project details: instructables.com
19. Valentine Hearts Plaque

If you are still racking your brain to find a proper Valentine gift, try this project out.
While fairly affordable, I’m fairly confident that it will impress your partner. It can also let you test different texture styles and pen tips out.
You will need more materials with this project, like ball tip, knife tip, writing tip, 12×12 inch piece of wood, and the three types of shading tip. A white charcoal pencil is also vital and stays away from colored pencils.
Project details: pyrographymadeeasy.com
20. Etched Wooden Spoons

With these etched wooden spoons, you can save a lot of money and still manage to prepare a meaningful gift.
The main material is incredibly easy to find and affordable. After all, a pack of high-quality wooden spoons is easily found in any convenience store.
After getting the etching tool burning, you can doodle anything pyrographic patterns you like anywhere you want on the spoons to design exceptional patterns of your own.
Project details: designmom.com
21. Wood Burned DIY Picture Frame

It is not an overstatement to say that this project is among the easiest wood-burning patterns for beginners. You don’t even have to use the pointy-end, only the slanted edge of the burning tool.
You also need nothing other than some plain old wooden picture frame that can be easily found in any craft store. If you want to be fancy, you can use some walnut wood stain to brush the final product.
Project details: craftylittlegnome.com
22. Wood Burned Blocks
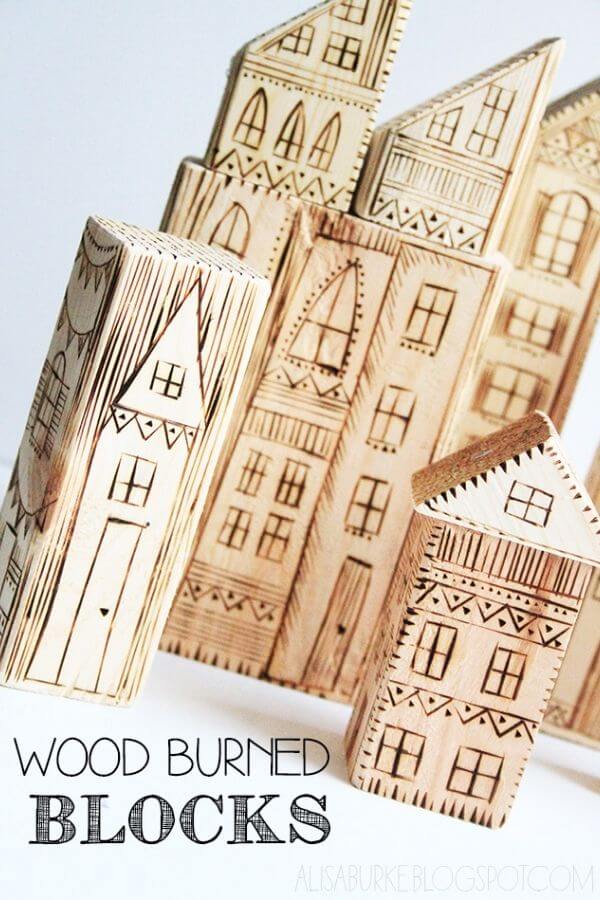
Children love to stack things together, be it lego blocks, boxes, etc. With this project, you can quickly whiff up some unique blocks that your child can play around with.
You can reuse some wood scraps acquired from other woodworking projects, as they tend to have different shapes.
Project details: alisaburke.blogspot.com
23. Bengal Tiger Pyrography
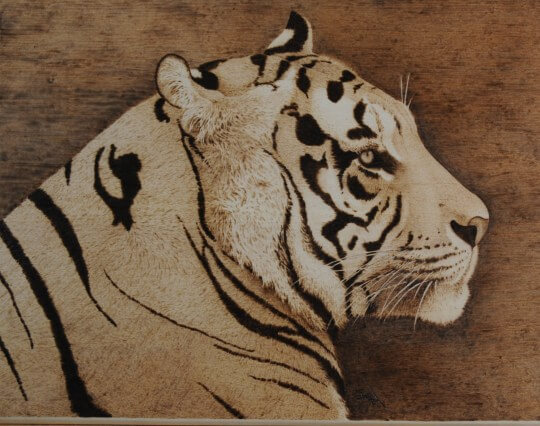
The Bengal Tiger pattern can pose an interesting challenge for people confident in their mastery over pyrography.
All the details are hard to get right, from the shaggy white mane to the black stripes.
Aside from the usual writing and shading tips, you need an X-acto knife. This knife makes it much easier to reveal the white whiskers. Otherwise, this process will take forever to complete.
Project details: pyrographymadeeasy.com
24. Wood Burned Wall Art
With this project, you only need to spend a few hours to obtain an impressively fabulous wall decoration.
There is no need for designing nor drawing, as you are tracing a pre-made design. You can prepare some sandpaper just in case.
Project details: addicted2diy.com
25. DIY Rustic Wood Sign
The sign makes up 90% of the first impression a guest will have regarding your gallery wall. As such, it cannot be too boring; otherwise, it won’t be able to showcase your personality properly.
With just a medium-sized slice of birch wood, a wood-burning tool, and a design template, you can create a much more appealing sign.
The best pattern choices are chalkboard arts, as they can translate perfectly into black and white.
You don’t even have to stick to the provided templates and make your own designs.
Project details: homebeautifully.com
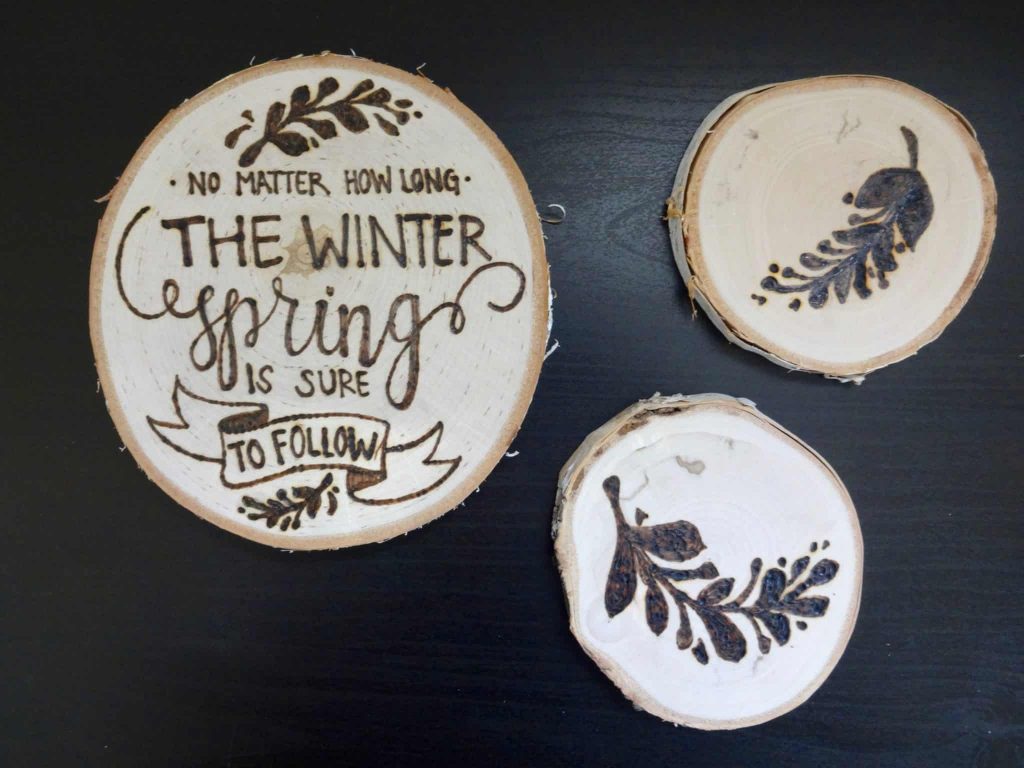
26. Wood Burned Floral Coasters
It is hard to argue against the fact that this project is one of the simple on this list. After all, the whole supply list consists of only three materials.
To be more specific, you need some urethane sealers, a wood-burning pen, and any type of wooden slice.
After you have sanded the coasters, trace the design that you like onto them with the help of the burning pen. Finally, give them some stain if you feel like being fancy.
Project details: gardentherapy.ca
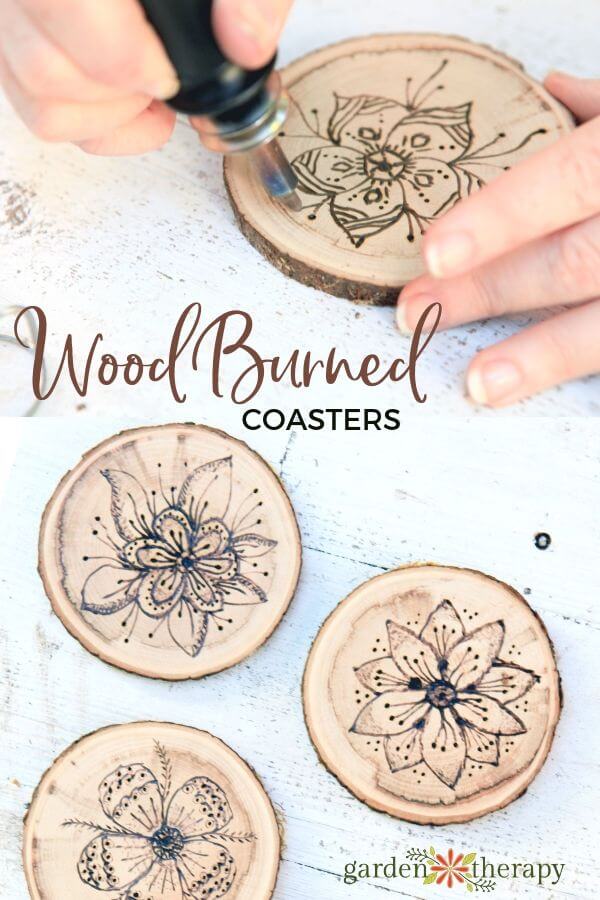
27. Wood Burned Mandalas
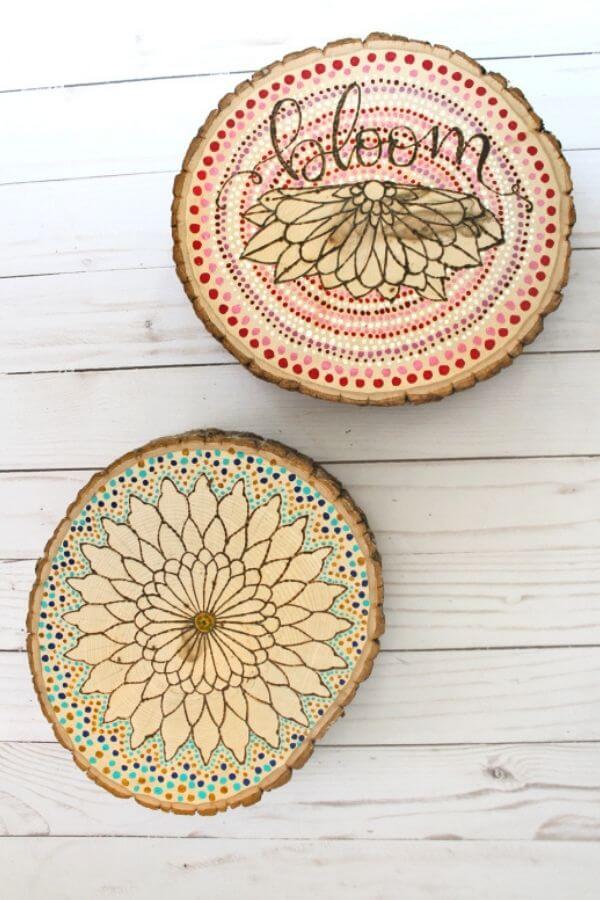
As we all know, mandalas are among the most complicated designs for pyrography.
That is why this project is for more advanced woodworkers who have mastered their skills.
You start off by drawing the mandala design of your choice onto a piece of paper to trace onto the wood. You can draw only half of it and rotate the paper to trace the other half to save some time.
Project details: walnuthollowcrafts.wordpress.com
28. Legend of Zelda Box
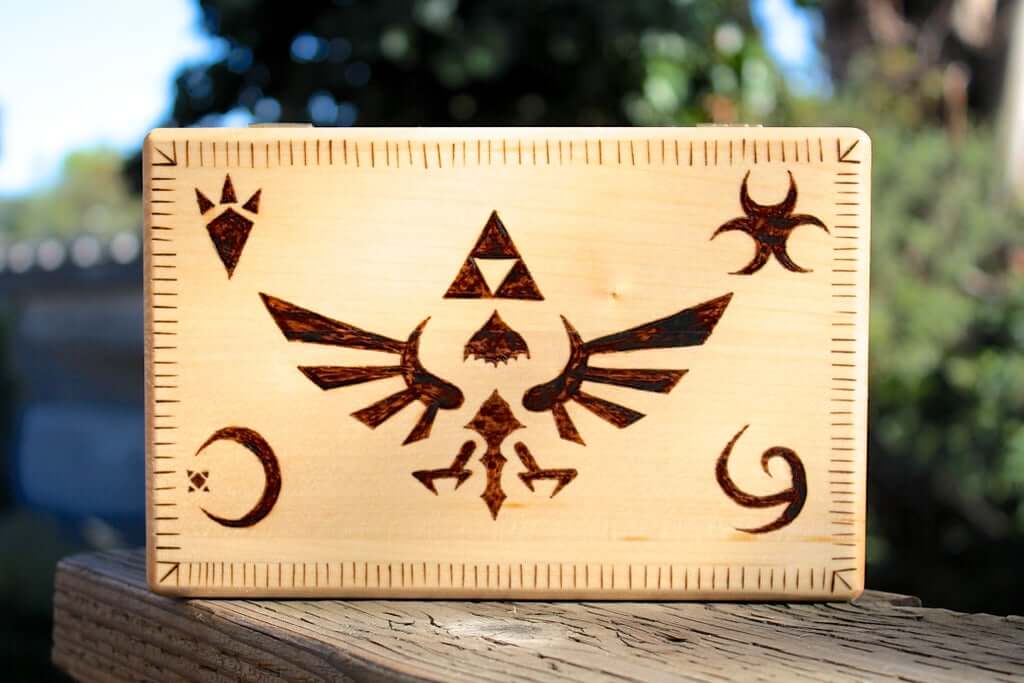
With this project, game nerds can obtain a piece of furniture that is both artsy and nerdy.
If you are not a fan of the Legend of Zelda franchise, you can print any other pattern.
You can get a wooden box from the local lumber yard; the best choice should be hinged Basswood.
Project details: instructables.com
29. Wood Burning Butterfly Dreams Art

Despite its cute look, this project is among the hardest and most complicated on this whole list. Even the preparation steps reflect its complex nature.
As this pattern is quite complex, we recommend printing it and coating its back with graphite. Then, you trace this pattern onto the wood with a 2B pencil and follow these traces with your wood-burning tool.
Keep its heat as low as possible, as darkening is always easier than whitening. If you want to enhance the color, make many passes in quick succession.
Utilize the pull-away stroke to create the leaves as well as flowers. Place the pen tip’s end on the butterfly wing’s outer edge for the optimal position.
Project details: kitkraft.com
30. Vista House Pyrography
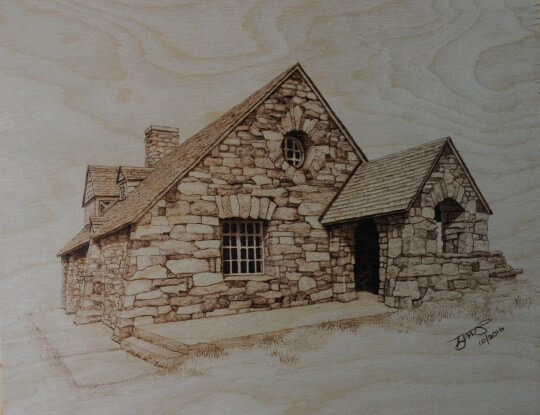
This Vista House pattern lets you practice a lot on how to create good contrasts with shadows. As you may know, wood burning does not offer colors, so it’s hard to achieve correct contrast.
It is more of a training project, so you don’t need to prepare a fancy supply list. Just get an 8×10 wood piece and a wood burner that can change flexibly between shading and writing tips.
You should use a rounded heel tip to burning thin straight lines easier, but it’s not a requirement.
Project details: pyrographymadeeasy.com
Conclusion
We hope that at least one of these wood burning patterns can inspire you to make your own wood-burning project.
Each pattern has its own unique set of strengths and weaknesses as well as simple and complicated.
You can pick the project based on your current skill level and challenge the harder ones later.
Keep in mind that the key of DIY crafting is to have some fun along the process.


![How To Start A Woodworking Business [Ultimate Guide]](https://handykeen.b-cdn.net/wp-content/uploads/2021/10/woodworking-business-1-300x200.jpg "How To Start A Woodworking Business [Ultimate Guide]")
