If you are planning to get a new shelf for your lovely home; why don’t you take it up a notch and create one on your own?
Not only will you save money, but you can also be creative with your customized plans based on your requirements and taste.
Our list of 65 DIY wood shelves will give you more ideas, helping you build a shelving unit on your own. Whatever your space is wide or narrow, you can also find a suitable plan.
Also, no worries if you are not experienced at woodworking. Many simple plans are available for your reference.
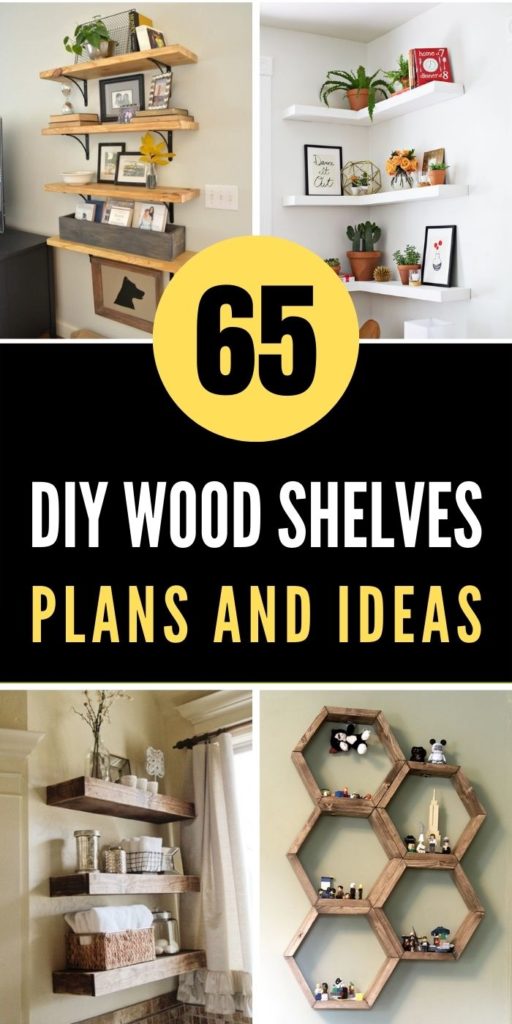
Table of Contents
- 1. DIY Wood Wall Shelves
- 2. DIY Copper Peg Shelves
- 3. Simple Custom Hanging Shelves
- 4. DIY Sawhorse Bookcase
- 5. Showcase Shelves: DIY Bed Built-ins
- 6. DIY Garage Storage Favorite Plans
- 7. DIY Easy Rope Shelf
- 8. Reclaimed Wood & Galvanized Pipe Shelves
- 9. DIY Floating Shelves Using The Kreg Jig
- 10. Rustic Industrial Pantry Bookshelf
- 11. Henry Bookshelf By Ana White
- 12. LED Wall Cube Shelves
- 13. Simple DIY Ledge Shelf
- 14. Giant Wooden Peg Board DIY
- 15. DIY Tea/Vinegar Stain BookShelf
- 16. Industrial Rustic Shelf By Sylvie Liv
- 17. DIY Simple Pallet Shelves
- 18. Hexagon Honeycomb Shelves
- 19. DIY A-Frame Ladder Shelves
- 20. DIY Industrial Pipe Shelves
- 21. DIY Shelves with Belt Straps
- 22. DIY Suspended Bookshelves By Family Handyman
- 23. DIY Spherical Waffle Shelves
- 24. DIY Circle Wood Shelf
- 25. DIY Floating Corner Shelves
- 26. DIY Tetris Shelves
- 27. DIY Live Edge Floating Shelves
- 28. Knock-Off Pottery Barn Floating Shelves
- 29. DIY Farmhouse Shelves
- 30. DIY Necklace Shelves By Instructables
- 31. Kentwood Bookshelf By Ana White
- 32. Industrial Bookcase By Rogue Engineer
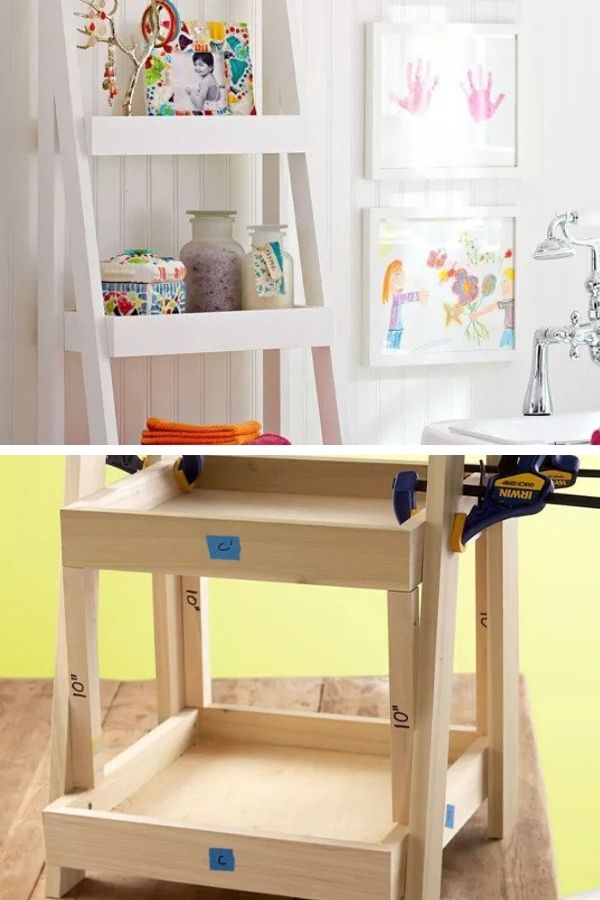
- 33. DIY Bathroom Storage Shelves
- 34. Bathroom Shelf By Shanty 2 Chic
- 35. Upcycled Floating Shelf
- 36. DIY Garage Shelves Plans
- 37. DIY Closet Shelving The Lazy Girl Way
- 38. Kee Klamp Shelving
- 39. Easy Small Closet Shelves
- 40. DIY Hanging Rope Shelf with Driftwood
- 41. Easy DIY Floating Shelves
- 42. Rustic Pallet Shelf With Scrap Wood
- 43. From A Tray To A Shelf
- 44. Shutter Shelf DIY
- 45. DIY Color Changing Raw Wood LED Shelf
- 46. DIY Wood Shelving Wall
- 47. DIY Closet Shelves & Rods
- 48. DIY Honeycomb Hexagon Shelves
- 49. Easy DIY Hanging Rope Shelf
- 50. DIY Floating Shelves By Scrappygeek
- 51. DIY Outdoor Serving Station
- 52. DIY Industrial Pipe Shelves By The Design Twins
- 53. DIY A Boat Shelf By Instructables
- 54. DIY Closet Shelves – Craft Closet Organization
- 55. DIY Industrial Shelves By Beneath My Heart
- 56. DIY Ladder Shelf By Lowes
- 57. Basement Closet Shelving Idea
- 58. Reclaimed Wood Kitchen Shelves
- 59. DIY Honeycomb Shelves
- 60. Simple Corner Wall Shelving
- 61. DIY Bookcase / Librero
- 62. Stylish and Easy Corner Bookshelf
- 63. Open Shelving – DIY Wood Shelf
- 64. Modern Pegboard Shelving System
- 65. DIY Rustic Wood Shelves By At Home With The Baker
- Conclusion
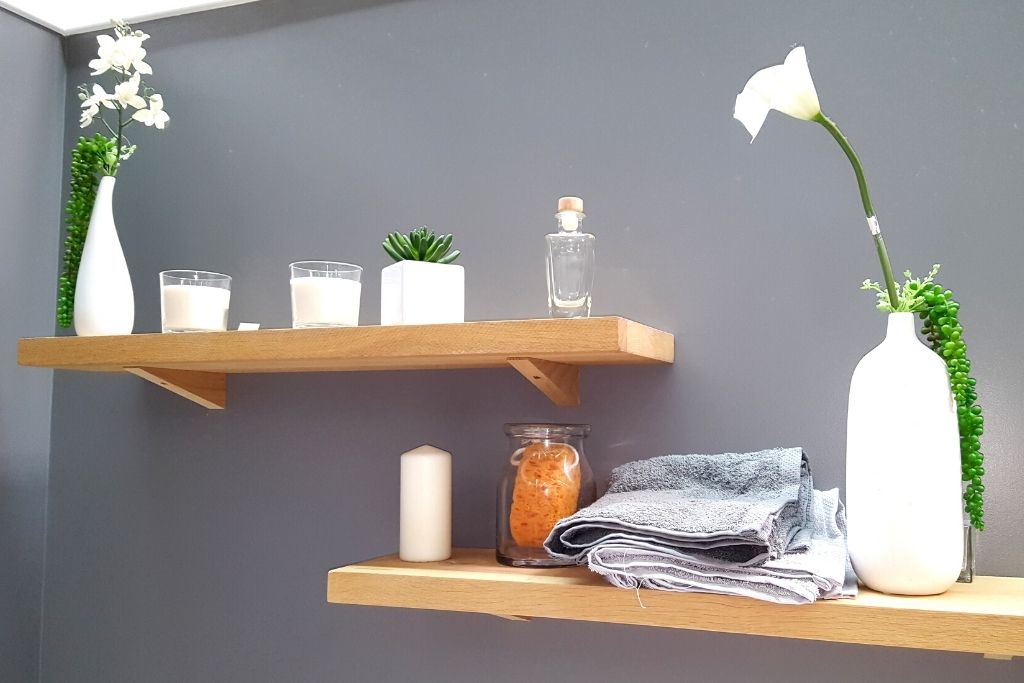
1. DIY Wood Wall Shelves
With this wood wall shelves idea, you can make a cozy corner for the room and encourage yourself to read more.
You will need to prepare a pine board of 2x6x8 inches and cut it to a piece of 5 1/4 inches wide.
Also, remember to remove the rounded edge and saw marks before you cut a 45-degree angle on both ends. This board will be the front board.
Continue with cutting another two boards of 4 ½ inches wide and set a 45-degree angle on those two pieces so that the boards will fit perfectly into the front board. Glue and nail the pieces together and on the wall.
Project details: themerrythought.com
2. DIY Copper Peg Shelves
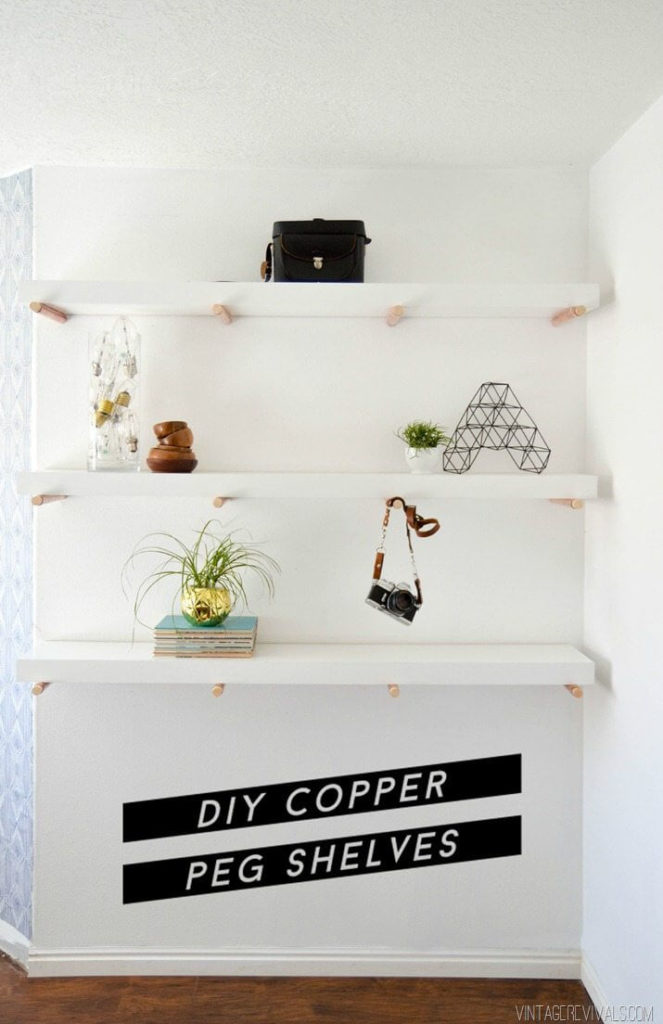
You will need copper pipes, wooden dowels, screws, wall anchors, and several MDF pieces.
These Copper Peg Shelves include three 10×60-inch boards so that you will need 12 pipes. Nonetheless, you can use more pipes to improve the sturdiness.
The key is to drill the screws firmly into the wall and to the end of the dowels. You should clamp the drill around one end of the screw and drive ½ of it into a pre-drilled hole.
Project details: vintagerevivals.com
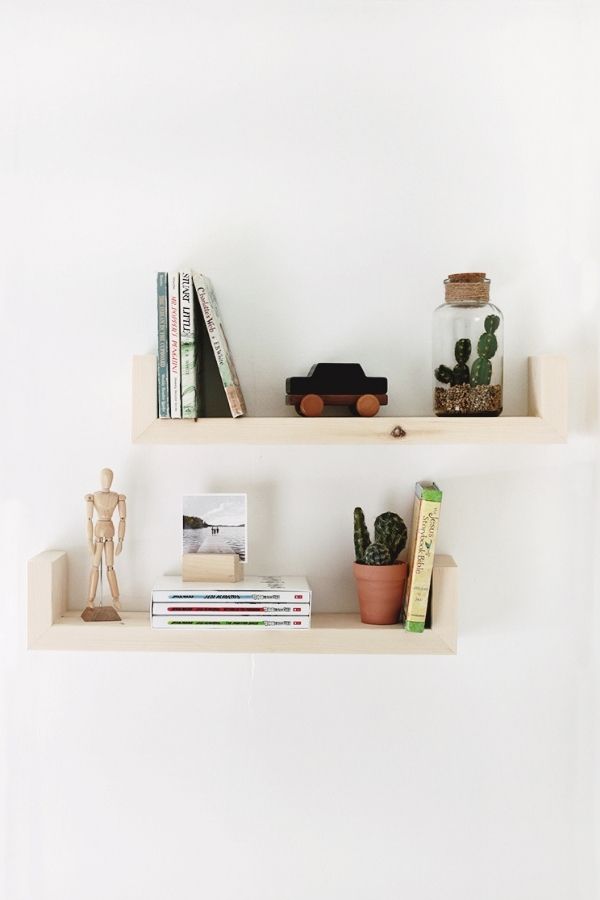
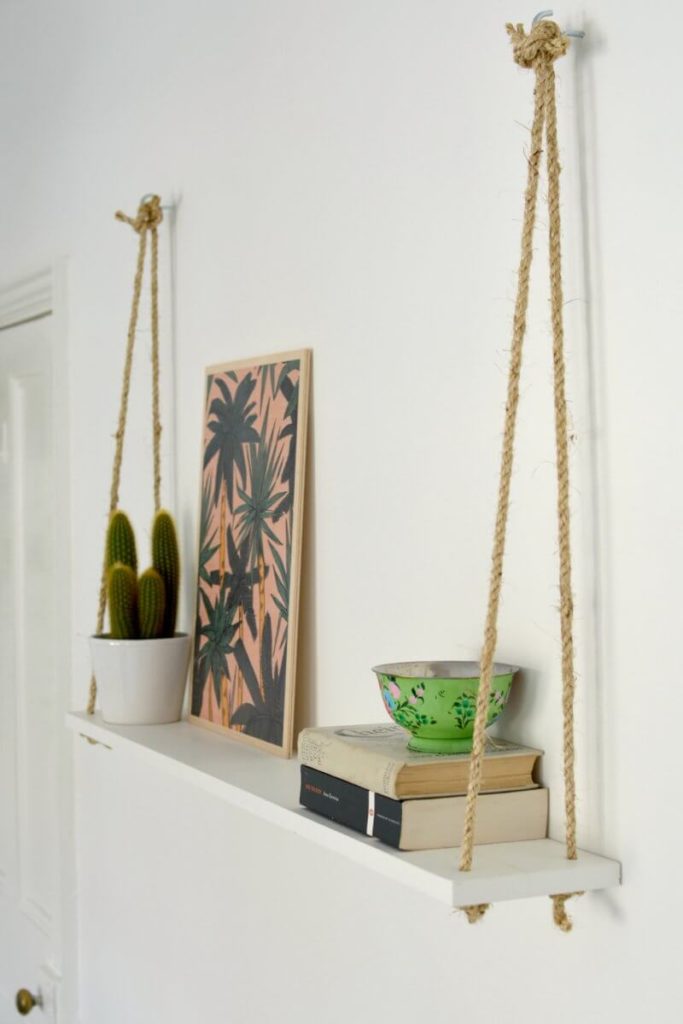
3. Simple Custom Hanging Shelves
Here is a guide to creating a 24 x 4x 1/4-inch hanging shelf. Prepare basswood and thick rope. Then, drill four ¼-inch holes, which are 1/2 inch inward from the pieces’ corners.
Cut the rope into two equal strands and have them go through the holes. You can use tape at the end of the strands to slide them more easily.
Complete the wooding task by nailing knobs and hanger bolts on the wall to hang the shelf.
Project details: instructables.com
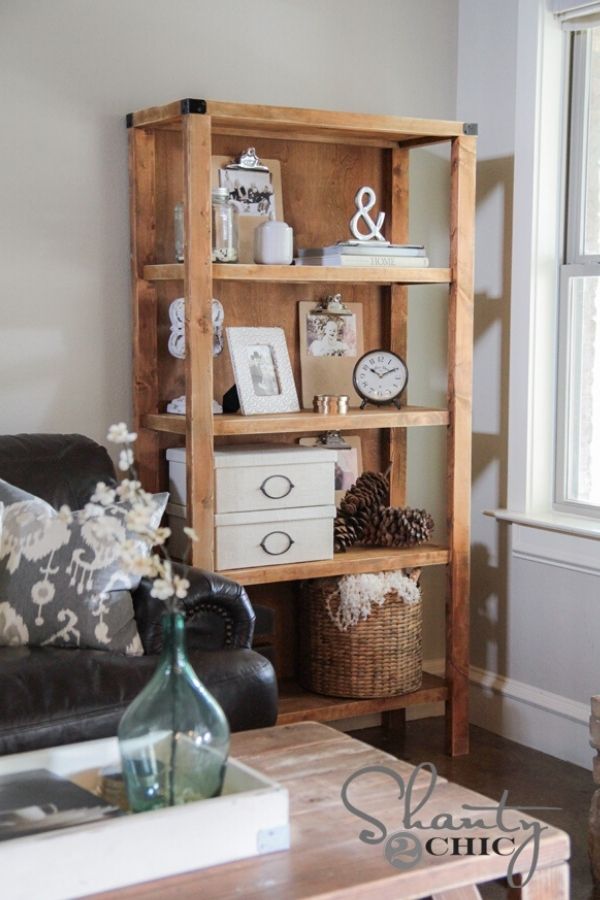
4. DIY Sawhorse Bookcase
This bookshelf looks like a ladder. You can put large boards between the steps to hold books, pots plants, toys, etc.
Use a miter saw to cut up to two 1×4-inch boards and space the side rails to build ladders. Also, cut out shelf pieces and rungs based on the number of steps you want to have. There are eight rungs, four-shelf pieces, and one more piece on the top in the plan.
Put two pieces next together between two rails so they will equally fit between the rails. Next, attach all parts with a dab of glue, brad nails, and sawhorse brackets.
Project details: shanty-2-chic.com
5. Showcase Shelves: DIY Bed Built-ins
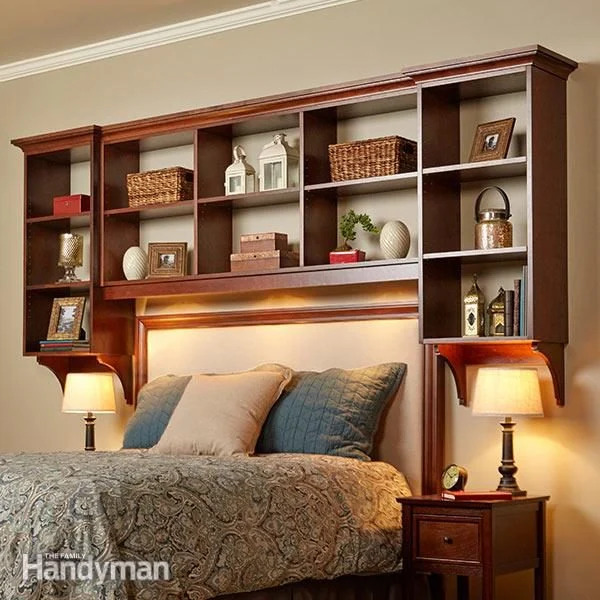
If you have a small bedroom but with plenty of stuff such as books, lamps, alarm clocks, photos etc., this idea is perfect for you.
Follow the instructions to create one-by-one shelf units and assemble them with pilot holes and screws. We would suggest using a right-angle jig to hold the unit while driving the screws steadily.
Since there are many shelf blocks, it requires at least intermediate woodworking experience to drill holes and mount all parts properly on the wall.
Project details: familyhandyman.com
6. DIY Garage Storage Favorite Plans
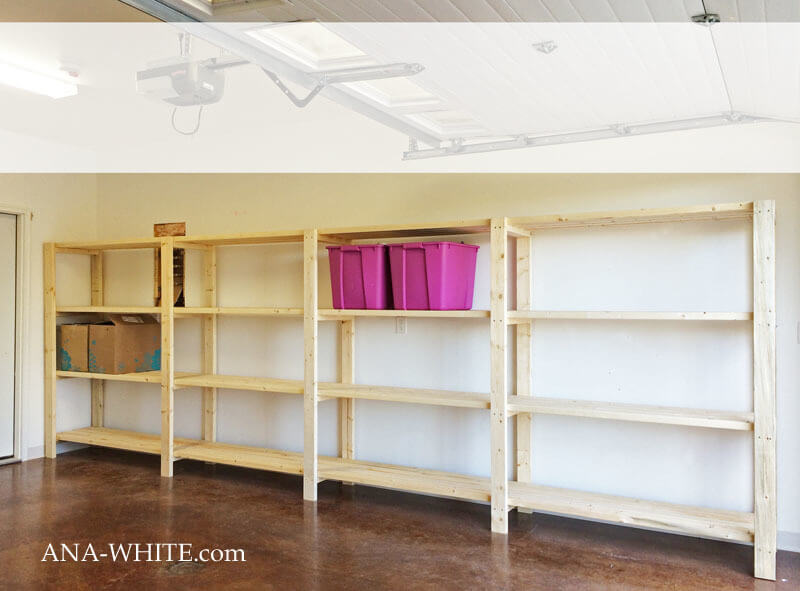
There are several plans shared in the article, but we like the idea of DIY Garage Storage – Free Standing the most. It is suitable for flat concrete garage walls and floors.
An easy way to form the shelf blocks is to build leg sets for every three or four feet of shelving, together with an additional set for the end. Attach 2×4 on the top and the final shelves are 17×72 inches.
Also, you can custom your shelf with any height, and long or short if you want.
Project details: ana-white.com
7. DIY Easy Rope Shelf
With this project, you will need to some basic tools and materials include a length of wood to your preferences, a rope, two large hook screws, and a drill.
Accordingly, drill four 0.39-inch (10 millimeters) holes on the wood – comfortable enough to feed the rope through, while the roll will still not slide too much. Drill another two holes on the wall to screw the hooks and hang the rope over.
Project details: burkatron.com
8. Reclaimed Wood & Galvanized Pipe Shelves
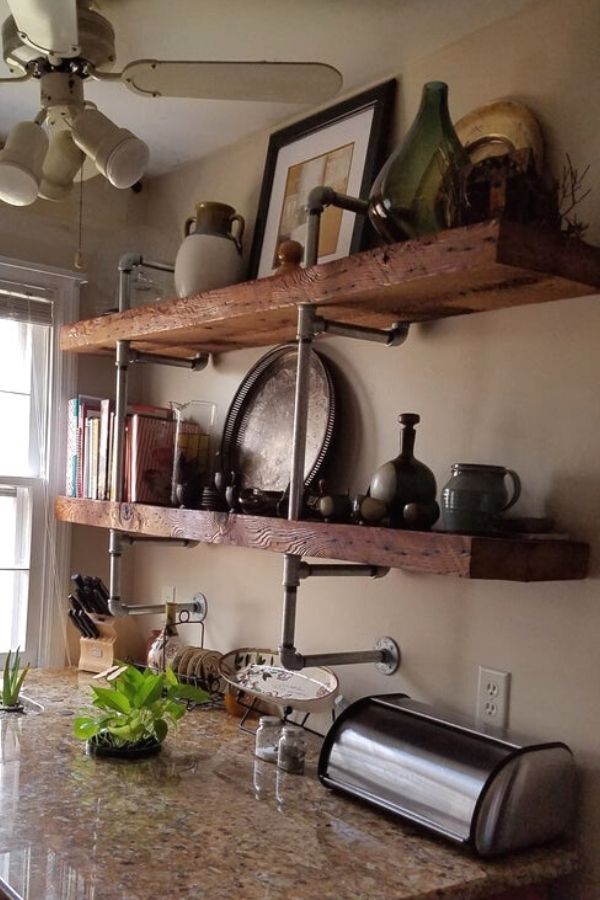
Pipe shelves are a fantastic idea to recycle the old reclaimed wood and provide a convenient space in your kitchen.
Cut the wood into two equal pieces and smooth the ends with the wire brush and drill. That way, you can knock down the wood fiber quickly and maintain the grain finish. It would be even better to apply teak oil onto the wood to prevent moisture in the kitchen.
Drill some pilot holes with a ⅞-inch spade bit halfway through so that you can assemble the pipe on the wall at your hand’s reach. Place the shelves on the bracket and thread them on the two pipes.
Project details: instructables.com
9. DIY Floating Shelves Using The Kreg Jig
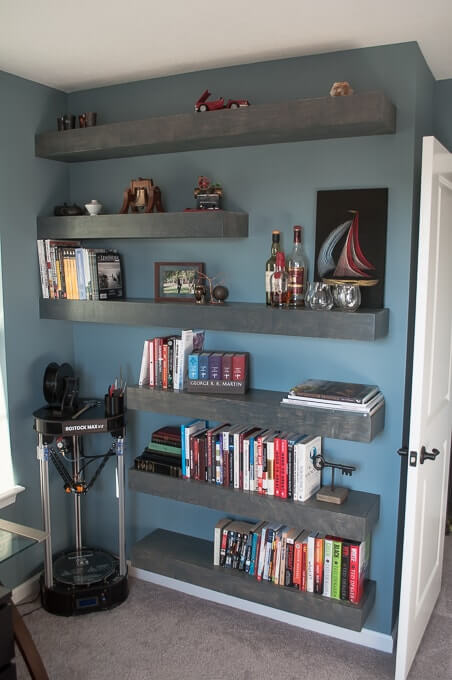
Building a full bookcase might be expensive and time-consuming. Thus, we introduce this floating project that only features the bottom sides screwed into the wall. It’s a simple but effective way to make the most of your limited space.
There are six 2×4 shelves that are 12 inches apart from one another and 9 inches from the floor and ceiling.
The three first shelves are 2/3 of the top shelf, and the 5th shelf is shorter to create some spaces for tall decorations.
Each shelf has one back board screwed into the wall by pilot holes. Then, you must attach internal support pieces into the backboard to improve the strength of the shelf, using Kreg Jig technique. Install the front board and paint the shelves to complete the project
Project details: christeneholderhome.com
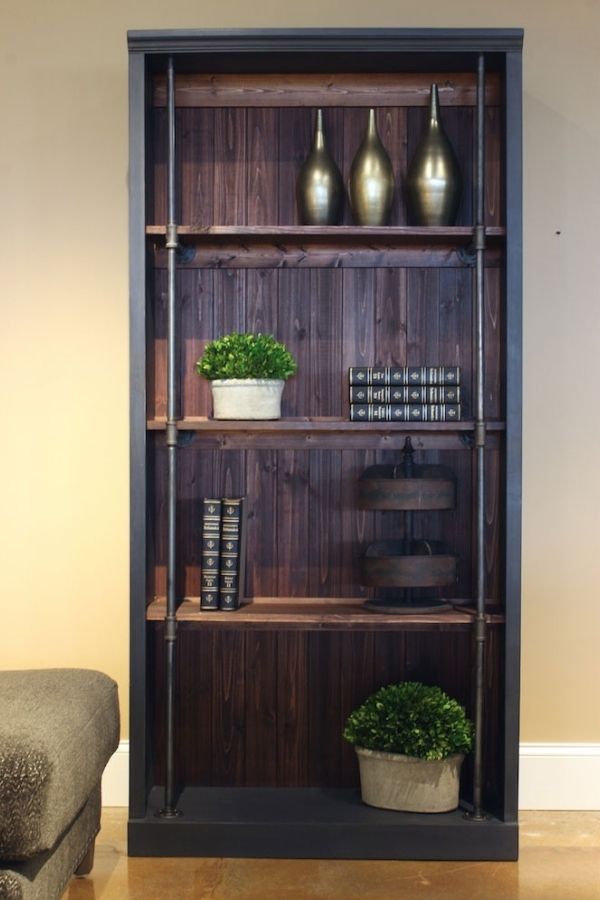
10. Rustic Industrial Pantry Bookshelf

As its name suggests, the bookshelf looks like a pantry shelf that helps save spaces for kitchenware storage.
To make one yourself, you need two boards of 2x10x48 inches and another four boards of 2x10x36 inches. Drill the pocket holes and drill all parts together.
There are two interesting creations of this plan: metal slats that fit along the diagonal of the shelf and mobile wheels that move the shelf around.
Project details: learn.kregtool.com
11. Henry Bookshelf By Ana White
The shelf measures 15x36x72 inches, meaning it would be ideal for filling up the blank space at the corner of your living room.
It is built from two face frames and the shelves in between. You can consider using a Kreg Jig to strengthen the connection of the parts and hide all ugly screw holes.
Importantly, all shelf trim placements of the back frame must exactly match the front frame so that your shelves will be square.
Project details: ana-white.com
12. LED Wall Cube Shelves
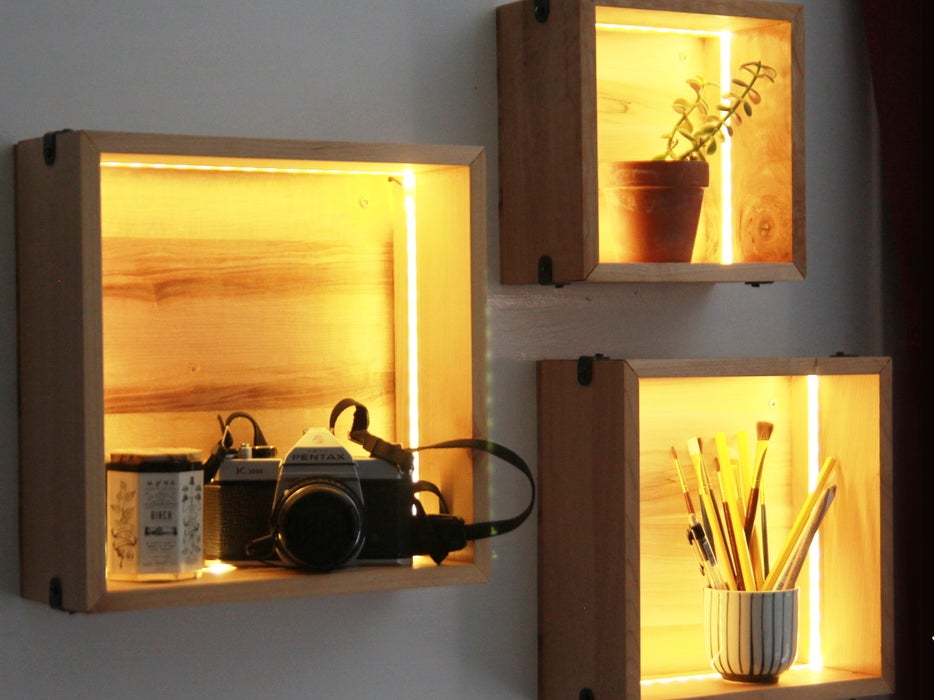
The idea is simple: You create a cube-shaped shelf, installing lighting strips on all sides to highlight the object, and attach it to the wall.
After you cut all sides of the shelf and form a square box and attach them to the board. Then find some LED strips to feed through its corner and fit them inside the groove.
You can use the rubber part of your pencil to push the light into a more accessible position.
Don’t forget to install a small switch on the board corner to turn on and off the light as you wish.
Project details: instructables.com
13. Simple DIY Ledge Shelf
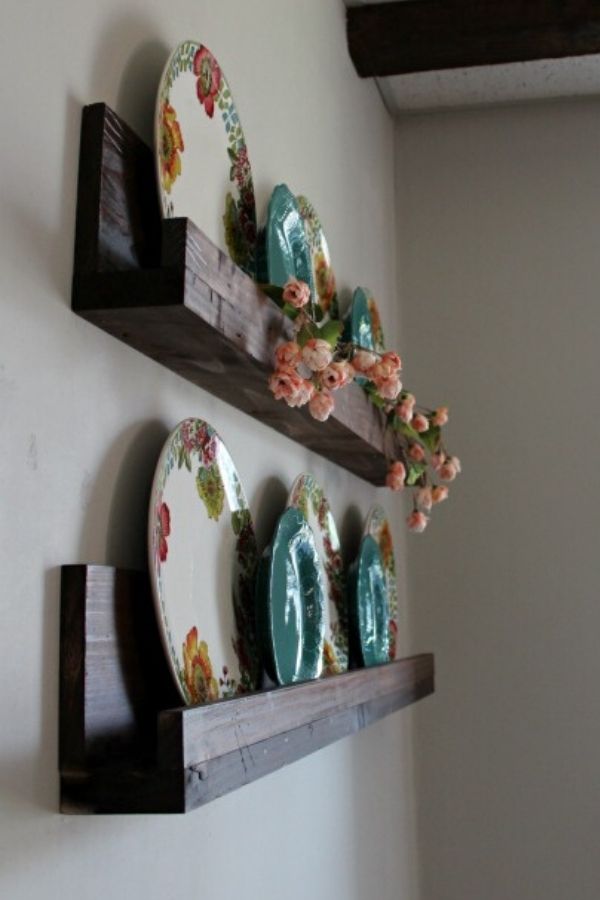
If you want to display a book collection or a dish collection, the shelf will undoubtedly serve you well and add beauty to your room.
This plan is crafted with three 48-inch boards; however, the width and the height are different. They are 1×6, 1×2, 2×4 inches accordingly.
Screw the boards together from the bottom and apply your favorite stain color to match your decor the best. Wait for the paint to dry before you can directly screw the back piece into the wall.
Project details: christinamariablog.com
14. Giant Wooden Peg Board DIY
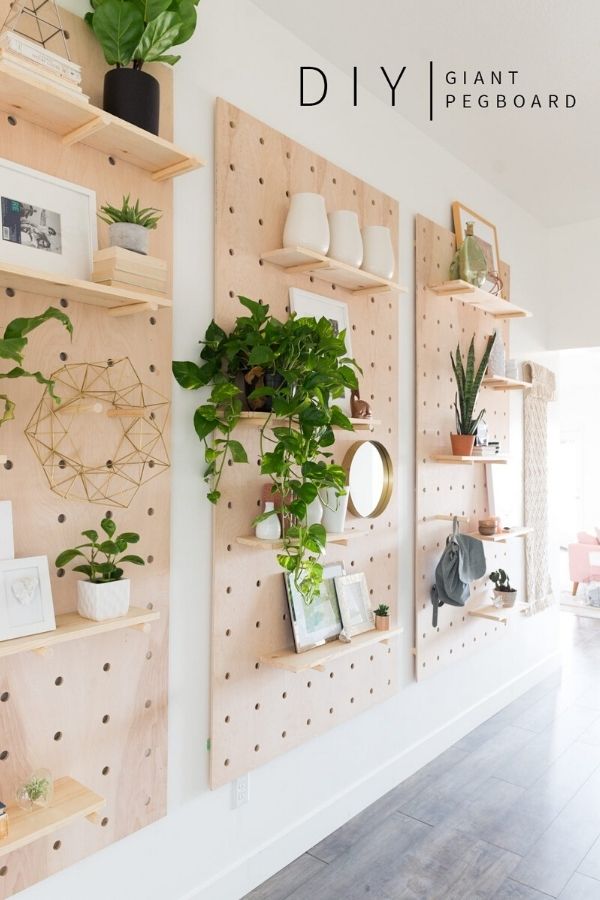
Based on the blank space on your wall, you can decide on the dimension of the pegboard.
With this project, you can customize and interchangeable wooden pegs to decor with your favorite. You can also use them as shelves, showcase art or store more other items.
For this tutorial, you use a 1/2x48x96-inch board to drill the holes six inches apart from one another. The tip to making perfect holes is to keep your drill at a 90-degree angle.
The next step is to cut the support boards and attach them to a suitable height so you can easily reach them and take the books down for reading. The quality finishing nails or head cabinet screws will help during the installation.
Project details: vintagerevivals.com
15. DIY Tea/Vinegar Stain BookShelf
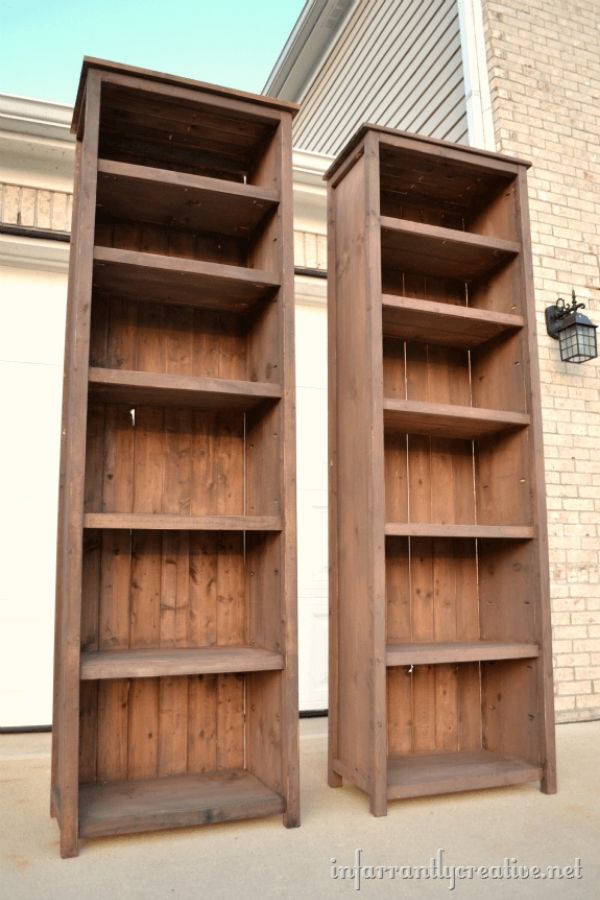
The bookcase is a perfect addition to your house decor collection. This BookShelf is around 24 inches wide and 84 inches tall, so there is plenty of storage space available.
The special feature is the color coating – a combination of tea and vinegar stain. In the end, it turns into an ashy gray color, bringing you a rustic yet chic-looking shelf.
Project details: infarrantlycreative.net
16. Industrial Rustic Shelf By Sylvie Liv
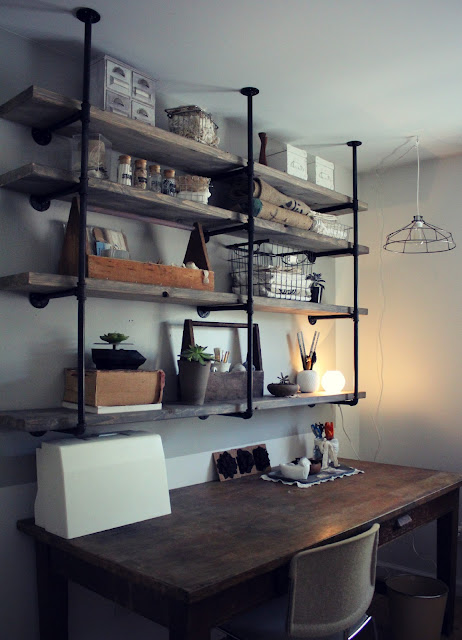
Get started by measuring your available space and calculate the number of pipes, boards, and screws needed.
Like this plan, find 24 pipes in four dimensions: three 1/2×8-inch pipes, twelve 1/2×10-inch pipes, six 1/2×12-inch pipes, and three six 1/2×16-inch pipes.
Assemble those pipes to create a frame for the shelves. You will want to apply a light coat of black spraying paint to fight against rust. Secure them on the studs and add the boards.
Project details: sylvieliv.blogspot.com
17. DIY Simple Pallet Shelves
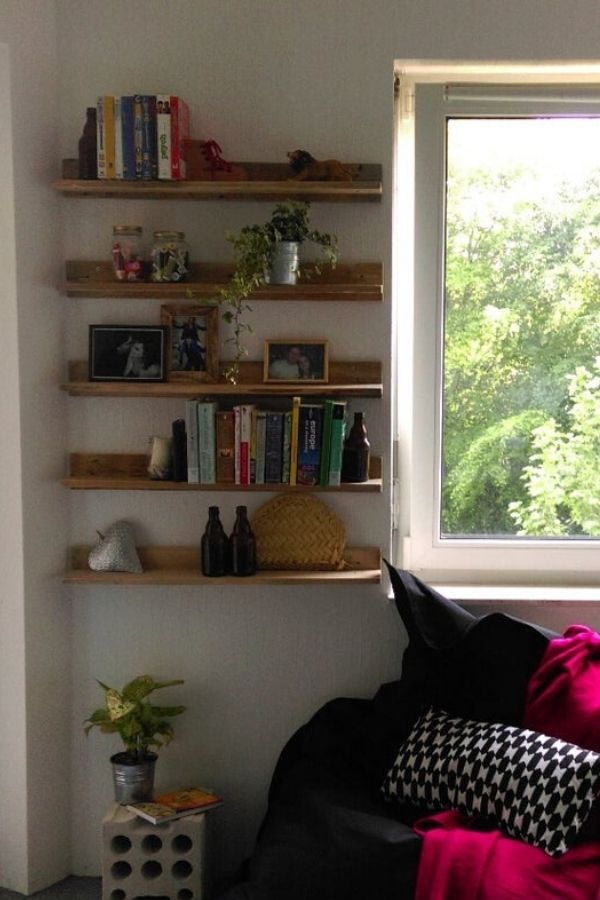
Here comes a simple plan: five pallets, wood slats, 25 screws (5 per shelf), and ten anchors (2 per shelf.)
Use two slats and mark one slate about 0.7 inches from the bottom and another slate 1.5 inches from each side, where you will drill holes through the boards. Take the two slates and screw them at least ⅓ the whole weight’s length.
The more screws, the more sturdy the shelf will become to hold lots of weight on it.
Drill another two holes on the wall lining up with the slats’ holes and install anchors within. You should allow 5.9 inches between shelves to make room for your books.
Project details: instructables.com
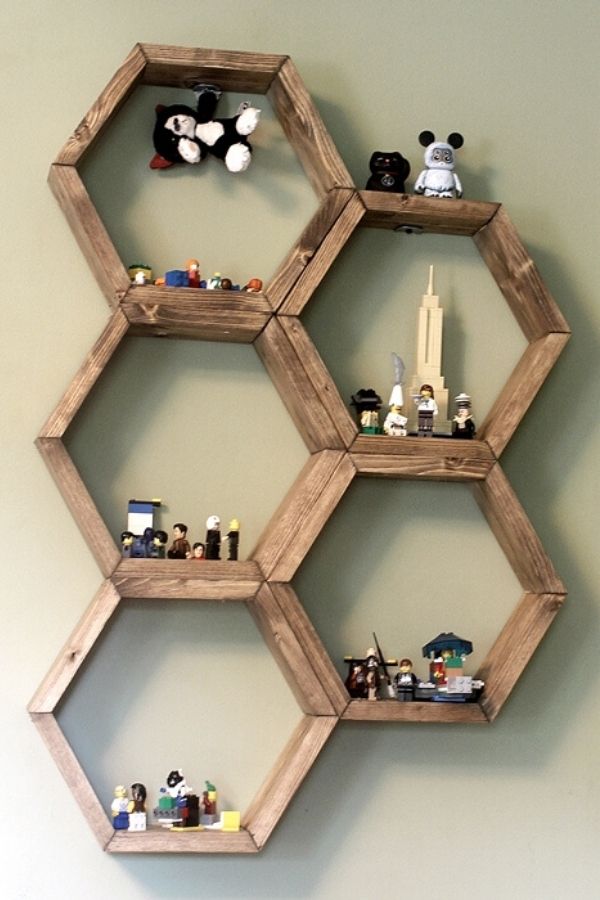
18. Hexagon Honeycomb Shelves
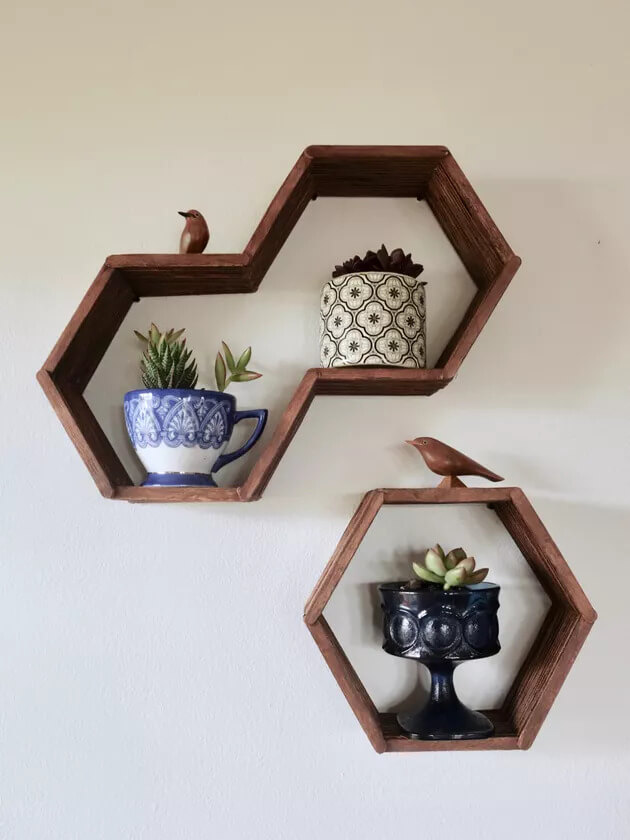
A hexagon shelf is unique and ideal for decorating your wall. All you need are a hexagon template of three inches deep, 102 4.5×1-inch popsicle sticks, wood stain, hot glue gun, and craft brushes.
Lay the template down and dab glue on both ends of three sticks and overlap them at the corner until you form a hexagon foundation. The tip is to glue the first three separate sides and move forward with the other three.
Project details: ehow.com
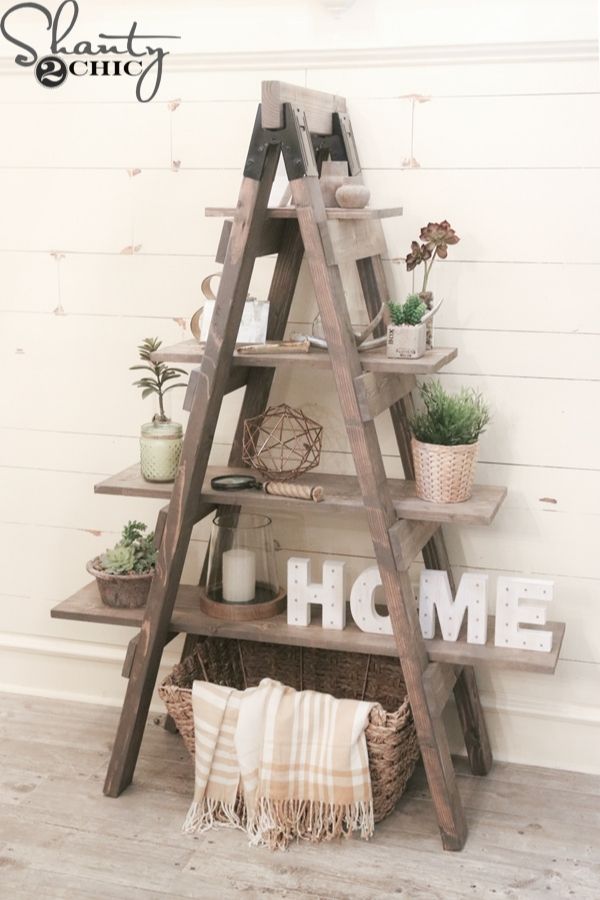
19. DIY A-Frame Ladder Shelves
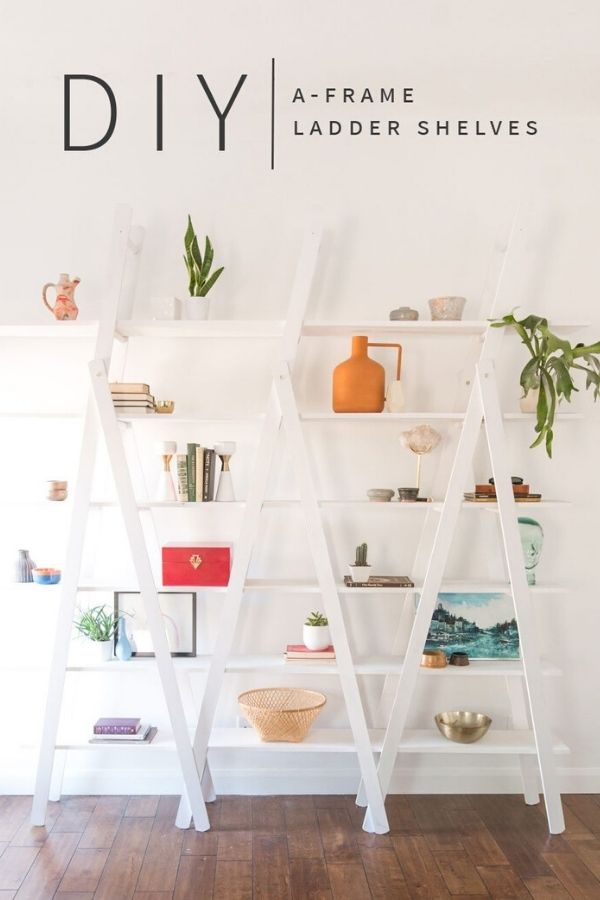
These ladder shelves are creative in that there are three A-frame ladders connected together. That way, you can save wood pieces and storage spaces while having plenty of shelves.
To do so, you need to create three long sides of 104 inches and another three short sides of 88 inches.
Measure down a space of 14.25 inches between the rungs, meaning you will have seven rungs on the long boards and five rungs on the short ones. Screw the rungs on the sides and assemble the shelves.
Project details: vintagerevivals.com
20. DIY Industrial Pipe Shelves
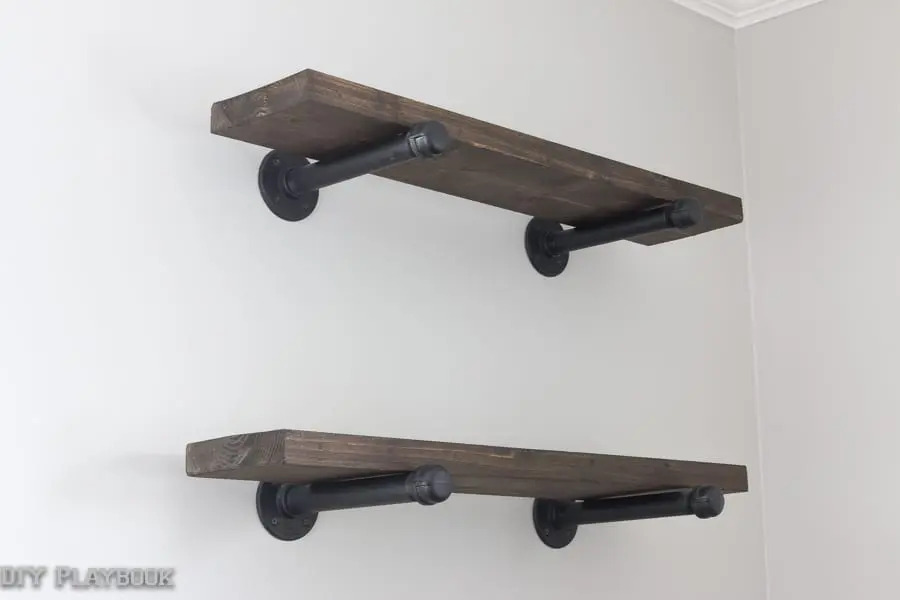
These industrial pipe shelves are excellent in terms of both appearance and performance.
You need four 1-inch-round pipes cut to an equal size which is equivalent to the width of your shelf board. After cutting, you should wash an oil coat off the pipes and sand all roughed parts.
Attach four anchors onto the flanges and secure them to the wall, in which you will screw the pipe and the caps. When all are done, you will place the shelf on the top to complete the project.
Project details: thediyplaybook.com
21. DIY Shelves with Belt Straps
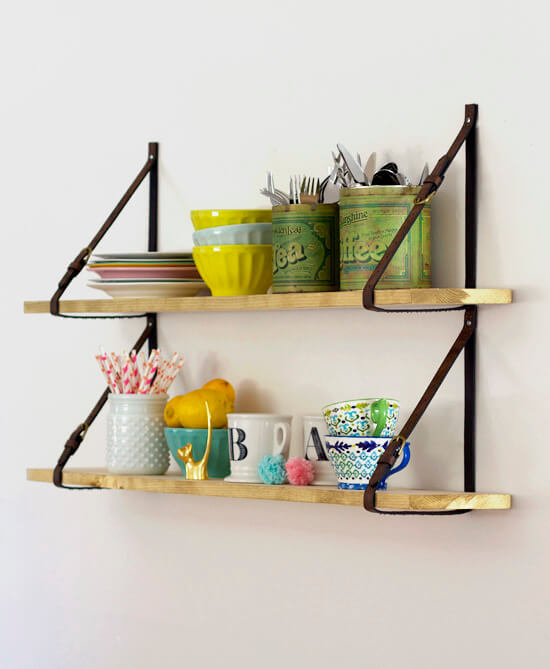
If you have outdated leather straps, you can consider creating a hanging shelf rather than through it away. We introduce an example of using two 1-inch wide belts, a 36-inch longboard, and two drywall anchors.
Paint the anchors with similar colors as your straps so the unit will look more uniform and neat.
Cut the belts in half: one part has two screws onto the wall lining up, and the other will be attached to the first one by anchors.
Then, simply slide the board through, and you can admire your handi woodworking!
Project details: athomeinlove.com
22. DIY Suspended Bookshelves By Family Handyman
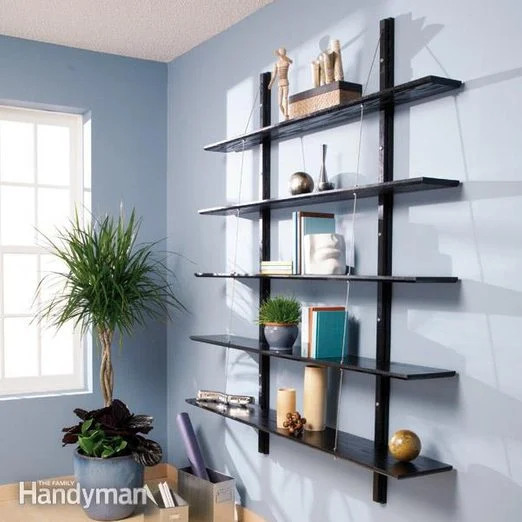
Although the bookcase looks vulnerable with some thin shelf boards, it turns out to be extra strong thanks to the back support edges installed with blocks and screws and the front aircraft cable. You can even climb on the shelf.
You need to cut and pre-finish all parts of the shelf. Then drill ⅛-inch holes straight down to the boards. They need to be kept securely in place so that you can thread the cable running through the collars and shelves.
Project details: familyhandyman.com
23. DIY Spherical Waffle Shelves
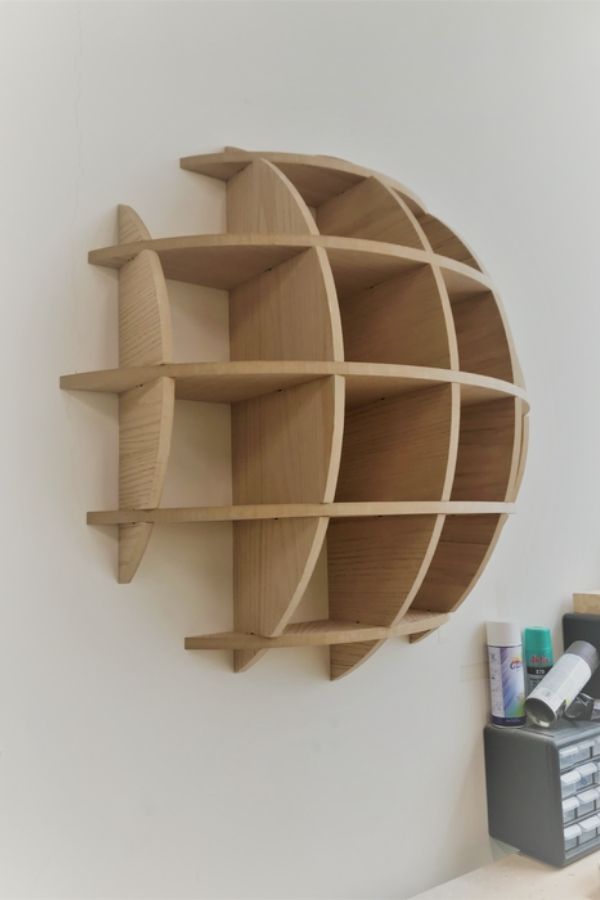
The bookshelf looks like a waffle, and you can place your books within. It necessitates design skills because you must create a 3D template and understand how those 3D sides are put together.
A sphere having a diameter of 39 inches will be modeled before being processed into a rectangular in an extrude cut – around ⅔ of the sphere diameter. Print the sphere with slicing software so that you can cut the sphere into shelves’ sizes ready to use.
Cut the shelves according to the sample. The tricky process is to cut the offset increments in the same sizes as the boards to fit together without glue perfectly. Fix the whole structure onto the wall with screws in the end.
Project details: instructables.com
24. DIY Circle Wood Shelf
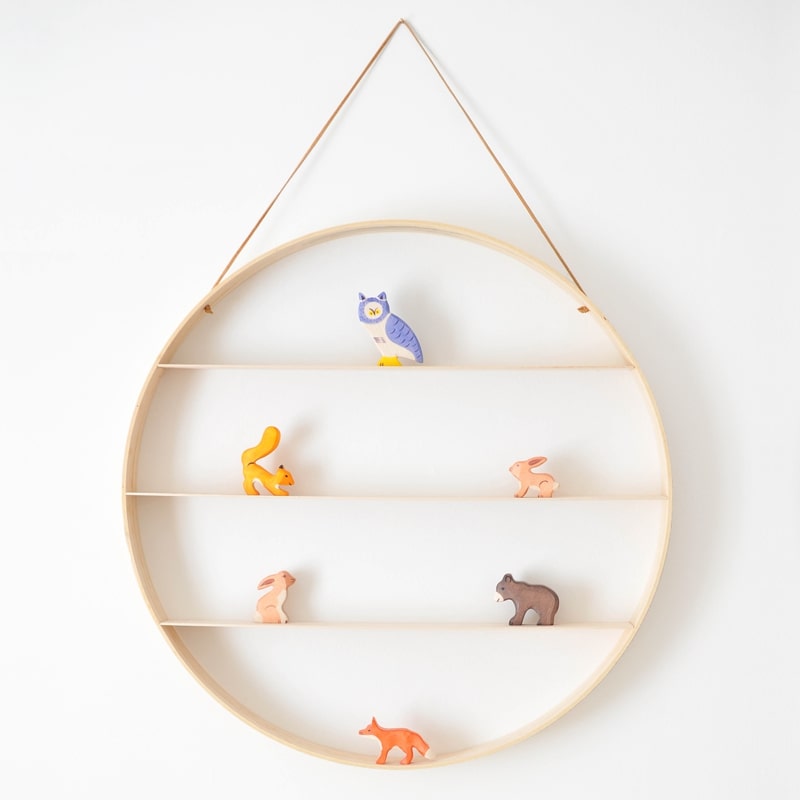
It is ideal for displaying lightweight toys since this construction is formed from three thin 23-inch round quilting hoops.
You can glue them together and use clamps to keep them in place until the glue dries. Remember to sand all leftover glue to improve the look.
Next, cut three basswood sheets to size and vertically glue the sides to the inside hoop.
Drill two small holes on the two upper sides of the hoops, where you will string a leather lace to hang the shelf on the wall.
Project details: newblooming.com
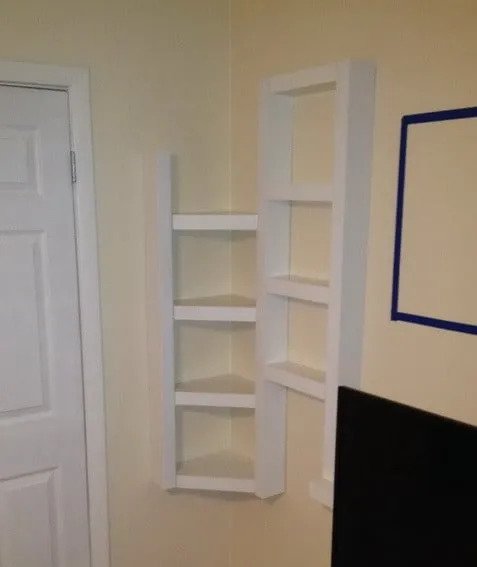
25. DIY Floating Corner Shelves
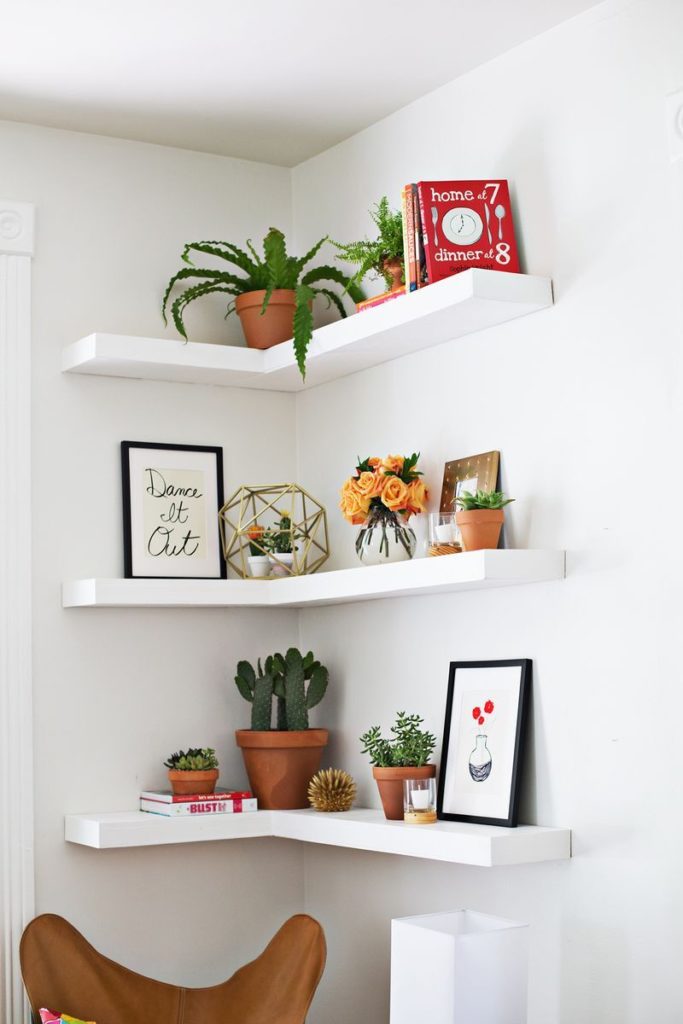
Having a corner shelf not only declutters your room space but also creates interesting decor. Each shelf features two parts built separately before they are installed together and into the wall into an ‘L’ shape.
The first part includes one 46×1.5×1.5-inch backboard, three support pieces of 6.5×1.5 inches. The second part features one 26.5×1.5×1.5-inch backboard, two support pieces of 6.5×1.5 inches.
Assemble the pieces together to form right-angled sides that will fit into the corner of your wall. Paint the shelves white to lighten up the room. And you are done!
Project details: abeautifulmess.com
26. DIY Tetris Shelves
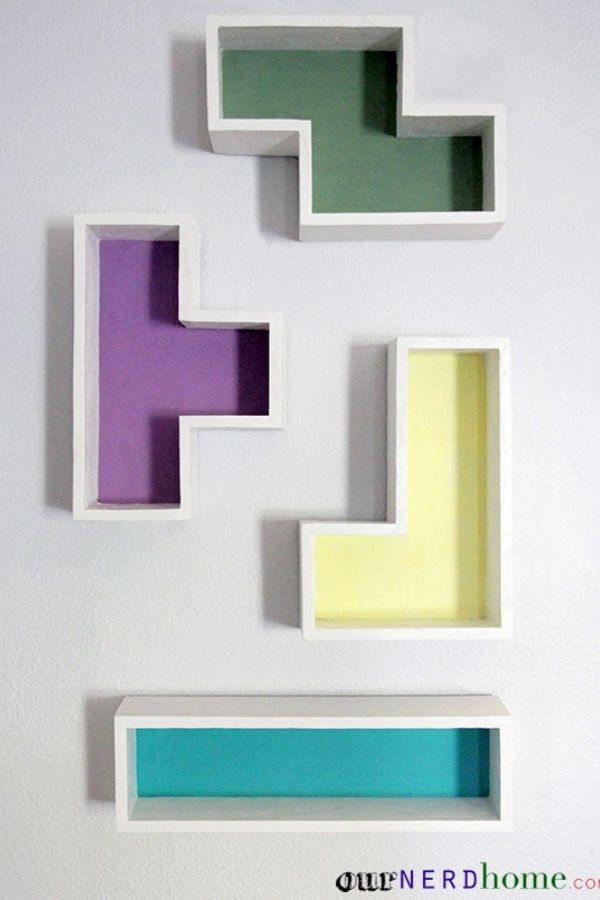
This one reminds us of the childhood online game. You can make the bookshelves in different Tetris shapes and with different colors.
Buy large plywood which is 1/2 inch deep and cut it into rectangular or square grids according to your favorite sets of Tetris. Since the plywood is thin, you can form the shape only with regular finishing nails and wood glue.
Wait for the glue to dry before painting the internal piece with different colors and mounting it on the wall.
Project details: ournerdhome.com
27. DIY Live Edge Floating Shelves
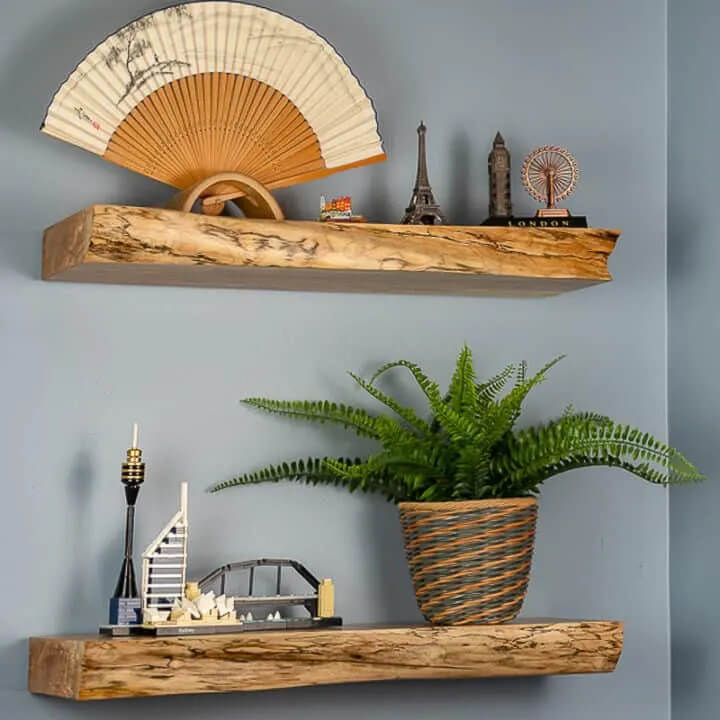
It is the material – the live edge wood that makes this wood shelves plan special. The wood retains a natural edge along its internal side, having beautiful wood grain. You can sand off it a bit but only with a soft sanding block.
The project above uses the wood of 48 inches long and six inches wide in several spots.
Also, buy brackets at least one inch shorter than the width of board to avoid an exposure look. Drill a hole through the board to install the brackets and attach the anchors on the sides.
Project details: thehandymansdaughter.com
28. Knock-Off Pottery Barn Floating Shelves
To bring this plan to life, you will need three whiteboard boards of different sizes (1×4, 1×8, 1×10 inches) and a pipe board of 2×2 inches – along with wood glue, screws, and nails.
Cut and assemble the parts to form a box of 60 inches. A tip is to put a blue bead on the side pieces and nail them onto the wall. The bottom pieces and the front pieces go after.
Finally, stain all sides, and the shelves are ready to use.
Project details: mamadarestodiy.com
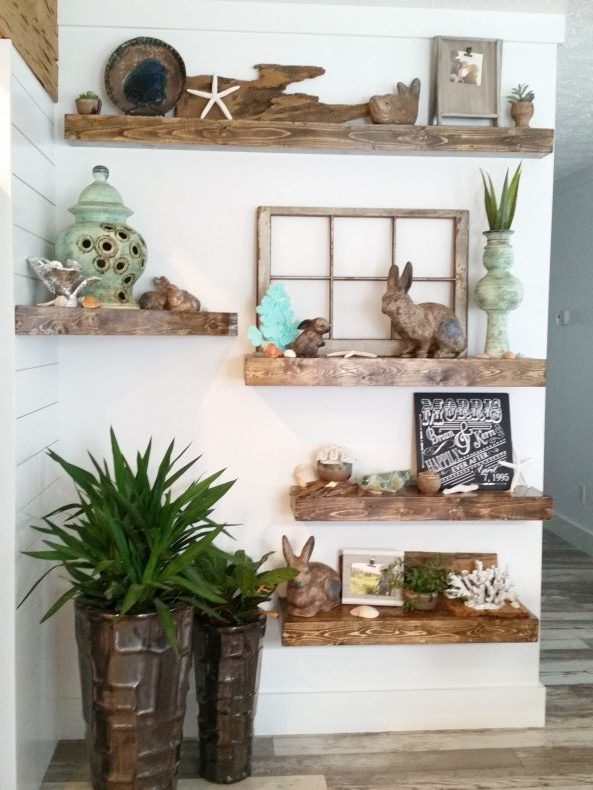
29. DIY Farmhouse Shelves
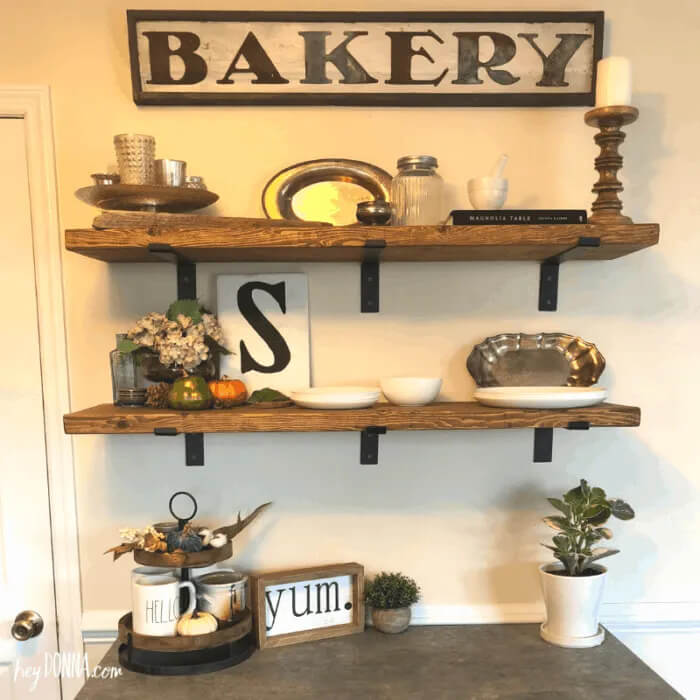
An individual shelf includes two main parts – three brackets and a shelf board of 64 inches.
You should mark the position of each stud first and use a level to ensure their straightness. Then, drill pilot holes to hang the brackets.
Screw the three brackets onto a blank wall and place the shelf above. Repeat the process to create three separate boards. You will want to calculate the distance between two shelves to have enough space for your stuff.
Project details: heydonna.com
30. DIY Necklace Shelves By Instructables
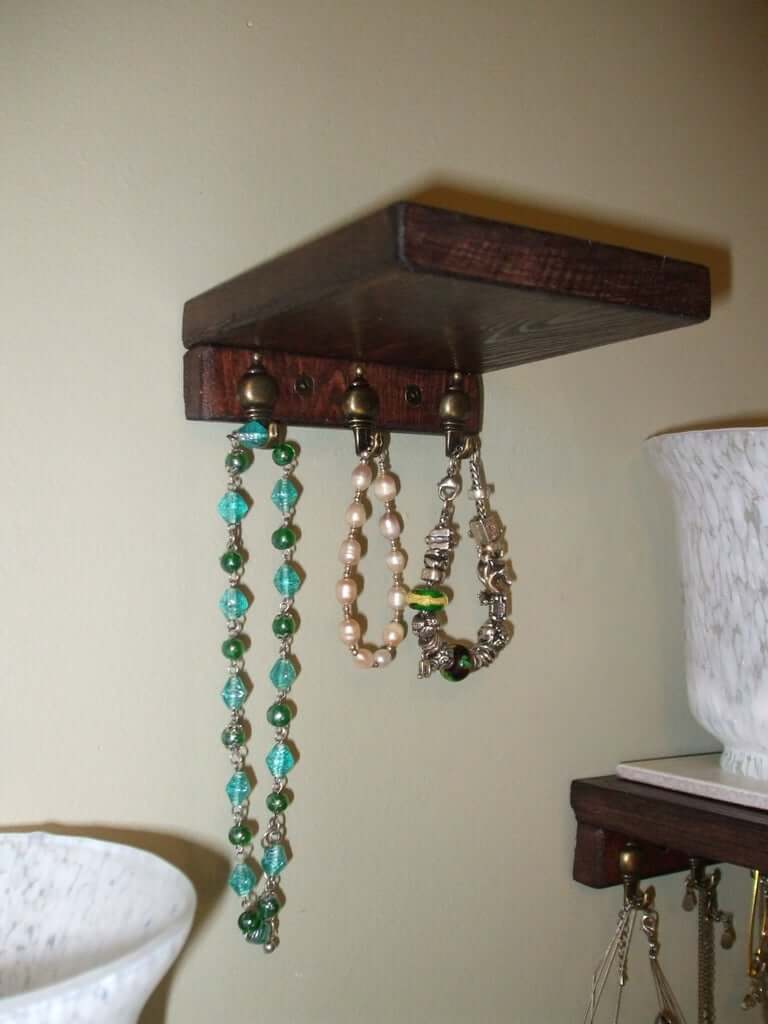
The small shelf of four inches wide and six inches long is ideal if you want to make use of the small space above or near your makeup table. Prepare another 1-inch piece where you will insert three push-pin hooks to hang your jewelry.
How to mount the unit onto the wall is based on your preference. You can use nails or wall anchors.
Project details: instructables.com
31. Kentwood Bookshelf By Ana White
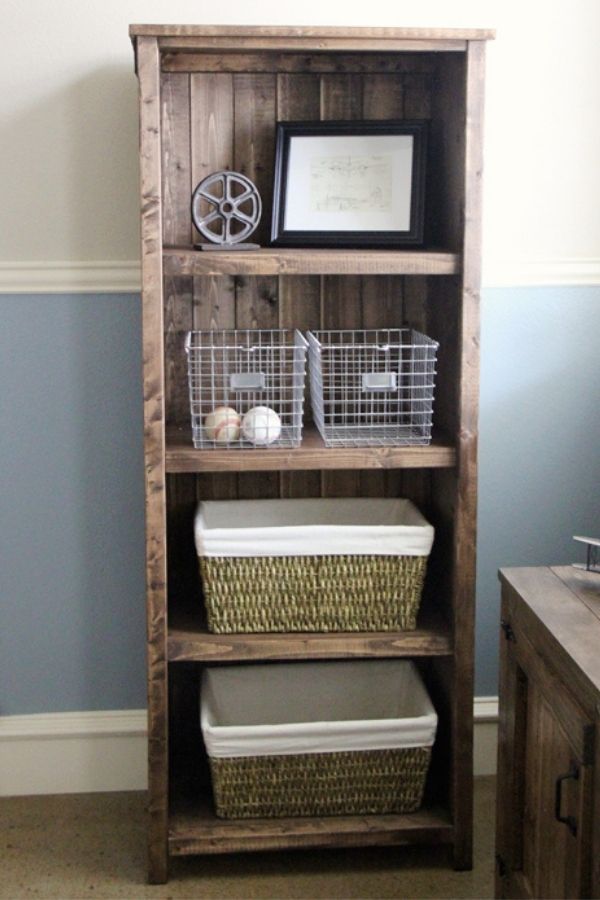
If you have many books and other stuff to store or variety of purpose uses, you can take a look at this bookcase – it is 26 ½ x 15 x 63 ½ inches with four storing blocks.
After cutting two side boards, you should drill ¾-inch pocket holes along their side edges, top edges, and bottom edges to attach the top and middle support boards. Then, build from the bottom shelf up.
Project details: ana-white.com
32. Industrial Bookcase By Rogue Engineer
Its name reveals its characters. This bookcase is big and sturdy, which can even be sold for money. The dimension is 38 ½ x 15 x 81 inches.
In this plan, you will build the four sides first and then the face frame and the back support. Cut the cedar planking grid to size, ready to glue and nail in place with the brad nails.
In the end, install the pipe supports and flanges on the two sides to improve the sturdy performance of the bookcase.
Project details: rogueengineer.com
33. DIY Bathroom Storage Shelves
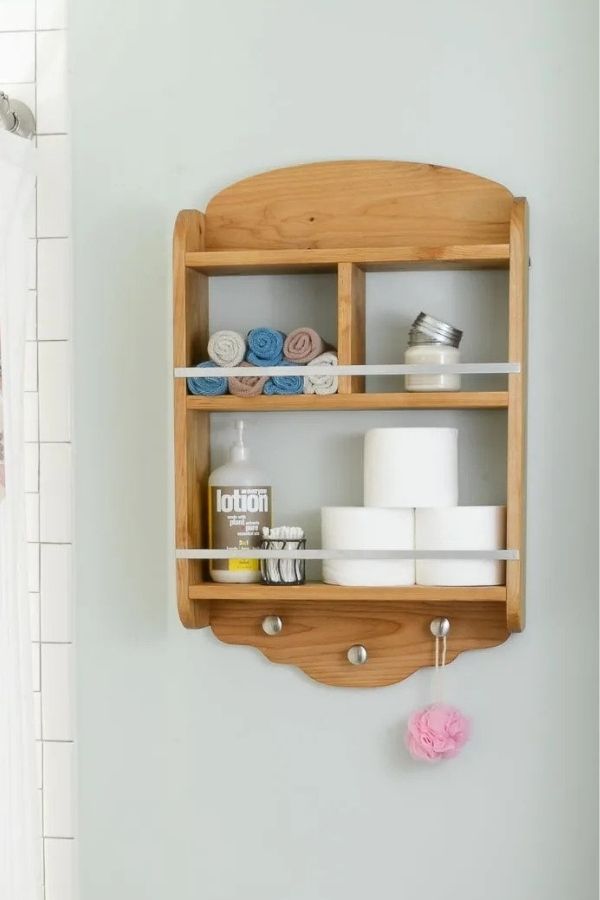
Partner with the Kreg Jig, and you will make a wood storage case for your bathroom is easier than ever.
If you have cutting tools like jigsaw, you can cut the bottom and the top shelves in equal wavy shapes to create something special. Otherwise, keep them as simple as rectangular shapes.
Then, the Kreg Jig is in place to assemble all parts and mount the case firmly on the wall. Finally, you add some knobs and hooks at the bottom.
Project details: housefulofhandmade.com
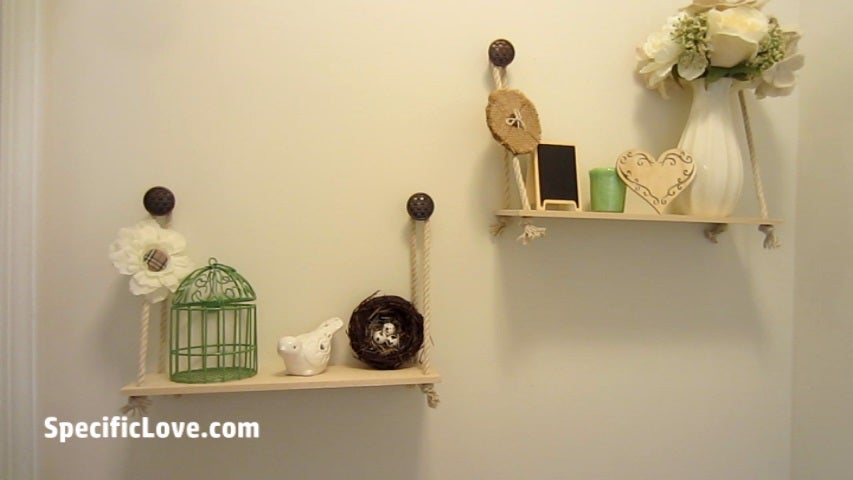
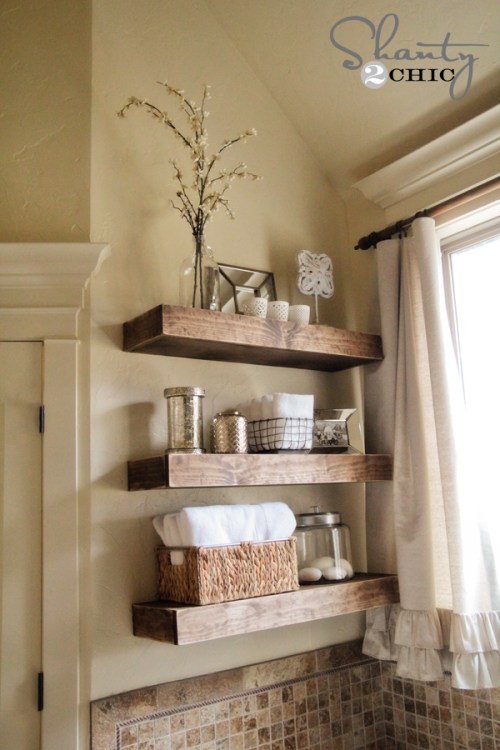
34. Bathroom Shelf By Shanty 2 Chic
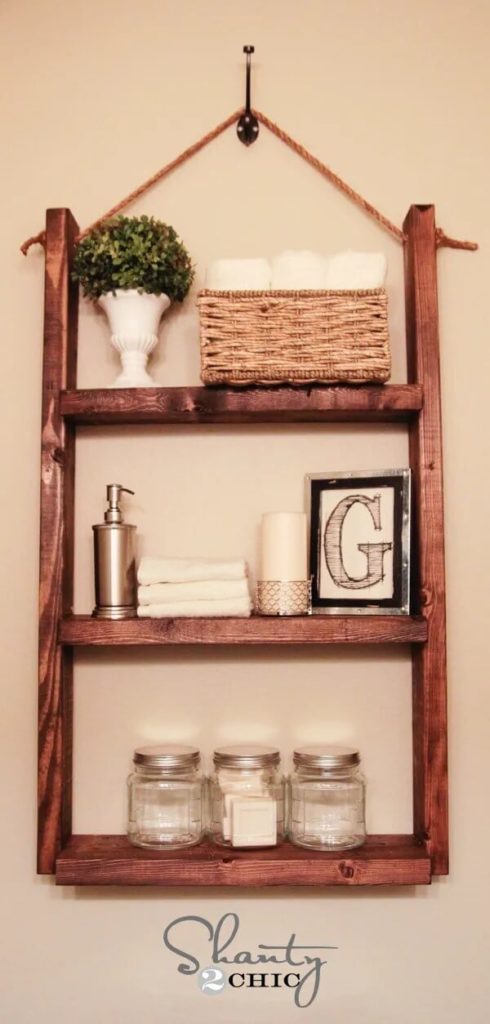
The most interesting part of this shelf is that you do not fix it onto the wall but hang it with a rope. That way, you can take it off and move around the house whenever you want.
To do so, you will need to drill two holes on both the topsides and string the rope over. Ensure that the hole is just as small as the rope so it will not slip away.
Moreover, all the parts must be installed firmly together since they are not secured onto the wall.
Project details: shanty-2-chic.com
35. Upcycled Floating Shelf
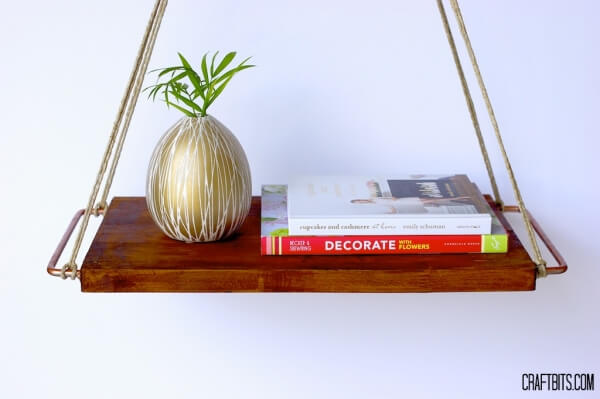
It’s very simple! If you have no woodworking tools available in your stores to drill holes and install the screws, then you can buy a cutting board and use it as a shelf.
Cut the rope into four equal pieces; each is around 48 inches. Attach one to each corner with a simple knot or pass it through a loop around the corner.
For the final step, connect those ropes into one knot and hang it over a ceiling book.
Project details: craftbits.com
36. DIY Garage Shelves Plans

Does your warehouse have many storage things? You can consider our recommendation. It will provide detailed instructions to build big wood shelves in your garage to organize all stuff tidily.
It comes with two shelving units 48 inches long, joined together to build corner shelves on each side of the furnace.
When all materials are ready, you can lay down the leg pieces parallel to each other and position the run pieces to create sturdy back shelves. Then, attach the cross braces and the corner storage shelves.
Project details: thehandymansdaughter.com
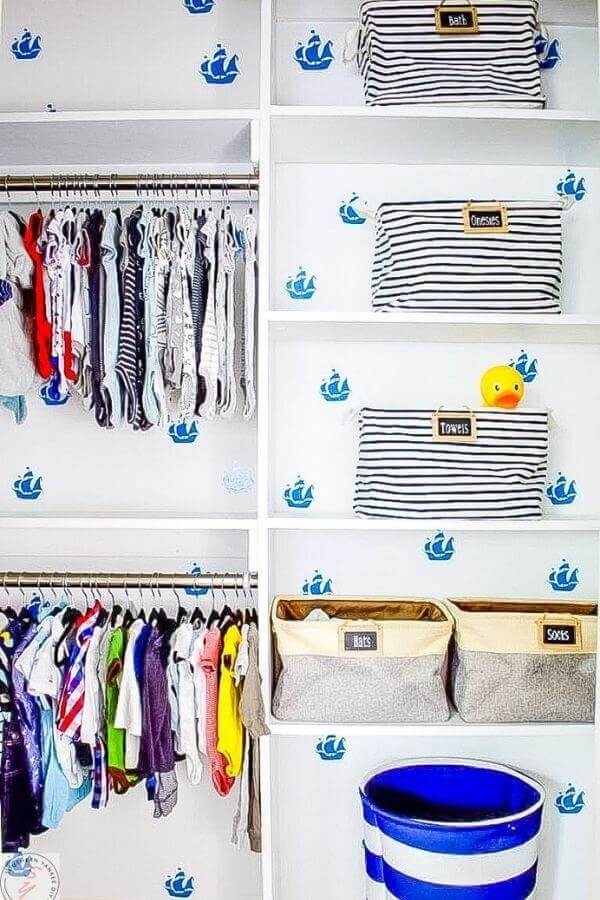
37. DIY Closet Shelving The Lazy Girl Way

Even a lazy person finds this one extremely easy to build. You can take advantage of the closet’s walls as the sides of the bookshelf, so the only thing to do is cut some desired-to-size shelves and attach them using nails or glue.
Accordingly, the plan features a closet of 32 inches wide so you can make use of three or four 12-inch-deep shelves.
The back piece is around 23-inch wide, and the two side pieces can be 13 inches.
Remember to calculate the distance between the shelves and their position on the wall to ensure that stuff is at hand.
Project details: southernyankeediy.com
38. Kee Klamp Shelving
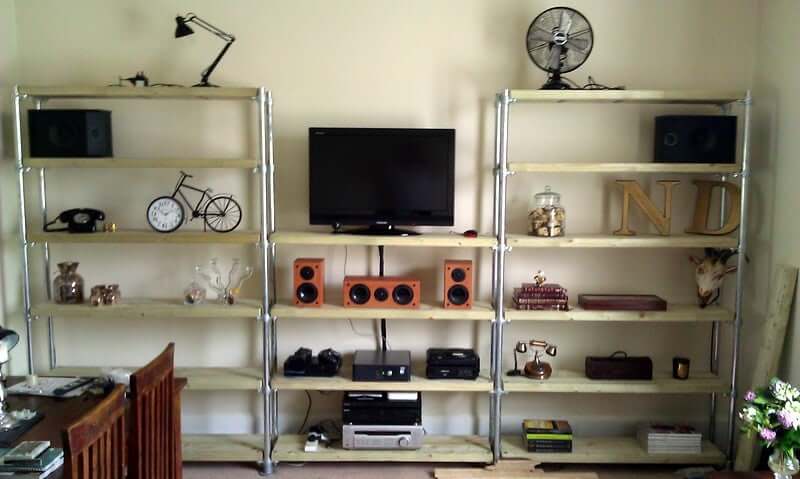
You do not need to build the shelves frame on your own, but you can save time by buying Kee Klamp scaffolding poles and preparing the wood pieces cut to the size of the distance between two legs.
This project has thirteen shelves, so you will need to more poles and screws.
You can screw two pieces together using a bracket to increase the shelf’s maximum load, then bolt the shelves onto the two sides of the clamps.
Project details: instructables.com
39. Easy Small Closet Shelves
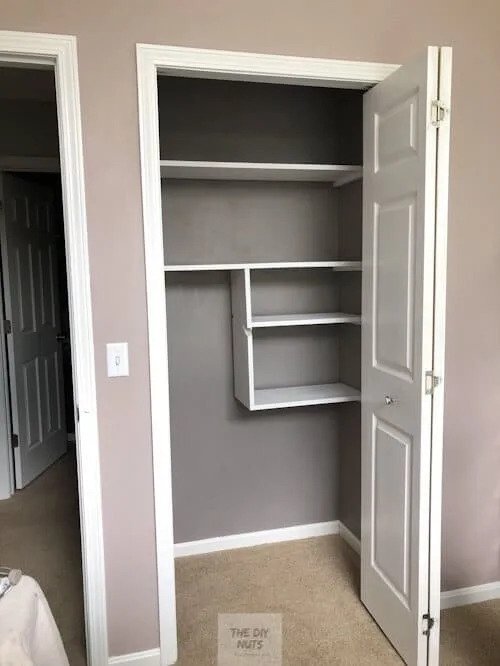
You can refresh the closet into well-organized shelves with several brackets and wood pieces to arrange your stuff.
For your reference, the closet of the project is 40 inches wide and 96 inches tall. You will want to go for 12-inch or 11 3/4-inch-deep shelves for maximum storage space.
If you have the space for it, you can create unlimited closet designs with this online closet design tool.
Paint your closet first in the color of your choice. You should paint the backside of the closet with a gray color to create more depth.
Cut 1×12-inch pine board equal to the width of the closet and attach it to the back corner of the board.
Find places to screw your first shelving brackets. The top-shelf is 24 inches down from the ceiling. The other shelves can be around 16 inches away.
Repeat the process to complete your new closet shelves.
Project details: thediynuts.com
40. DIY Hanging Rope Shelf with Driftwood
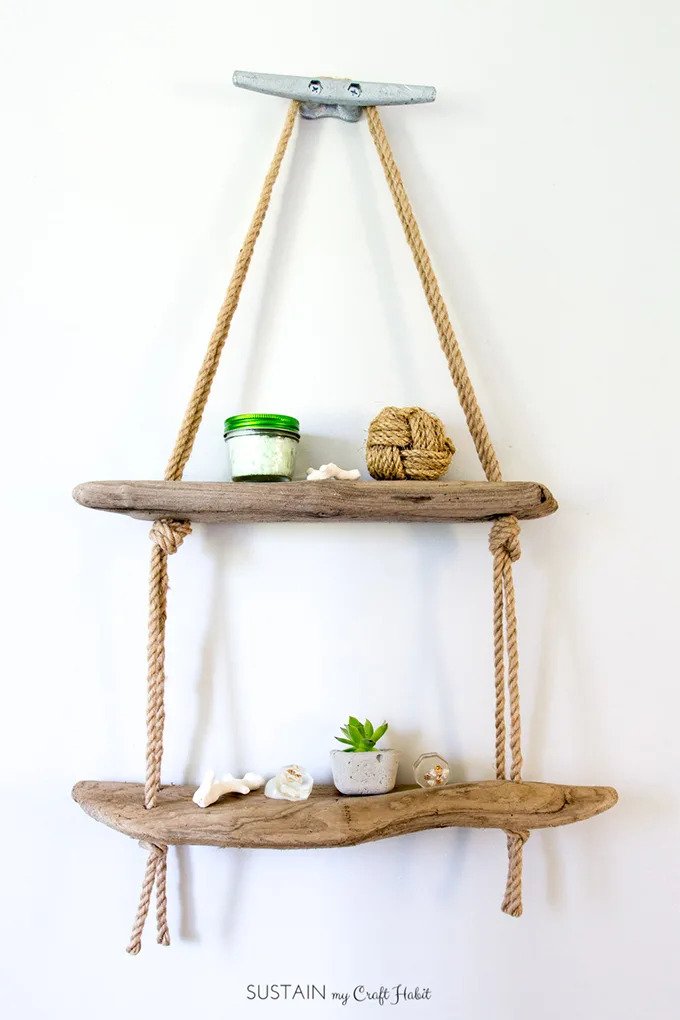
You can use two pieces of driftwood which are about 15-20 inches long and five inches wide. Otherwise, you can use regular planks or reclaimed wood pieces in any shape to make your shelves more interesting.
However, it is better to seal the sides of a polyurethane spray paint to prevent moisture.
Mark and drill two holes on the ends of each wood piece. The holes of the bigger shelf should be large enough for the two strands to go through one hole at a time.
Then you attach boat cleat on the wall and hang out rope loop over.
Project details: sustainmycrafthabit.com
41. Easy DIY Floating Shelves
Floating shelves are always a good choice to make use of a small wall. In this project, there are three shelves available.
Each shelf features a list of cuts: One 1x10x96-inch pipe board as the backboard, two 2x3x96 pipe sideboards, three 1x4x72-inch support boards, and ¼-inch hardwood plywood as the front board.
Add 1.5-inch pocket holes to one end of each bracket with the Kreg Jig pocket hole jig. Then, use 2.5-inch hole screws to secure the brackets.
There you have the frames! You can even add a stain to make the shelves match the room’s decors and prevent moisture.
Project details:shanty-2-chic.com
42. Rustic Pallet Shelf With Scrap Wood
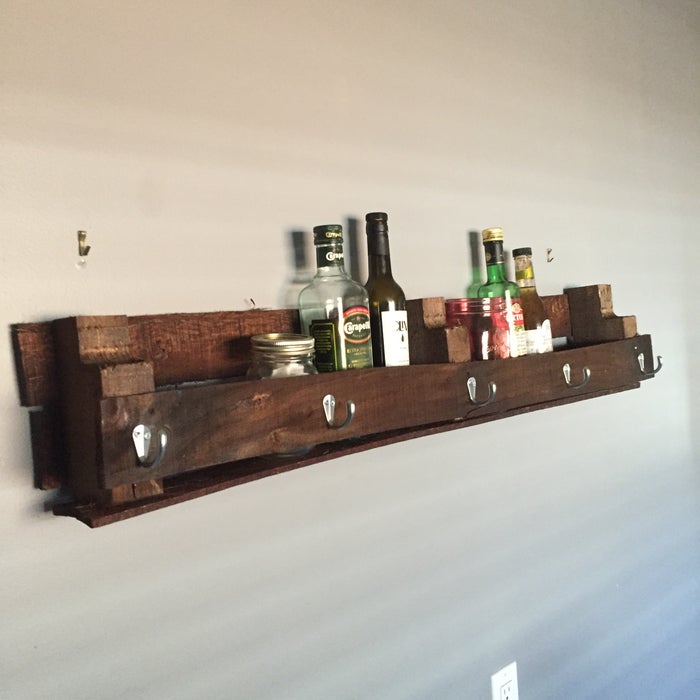
The idea of this plan is a pallet shelf attached to the wall with an outer board to secure the stuff from falling. On the board, you can attach some anchors to hang the cups and spices, etc.
Accordingly, find a pallet and cut its bottom, leaving one top board and another two shelves bottoms. A hammer knock will help to secure the board to the shelf.
It is also important to use several extra nails on the original pallet to make the bottom secure.
Project details: instructables.com
43. From A Tray To A Shelf

Rather than spending money on new lumbers, you can take advantage of the tray – if available.
Accordingly, cut the tray in half and saw off the right side of those parts. Then, glue them together without a rim. You will also want to sand and paint the tray with a color to fit with your room’s decor.
When mounting the piece to the wall, you should use strong wood glue rather than a screw since the tray is often thin and breakable.
Project details: nur-noch.com
44. Shutter Shelf DIY
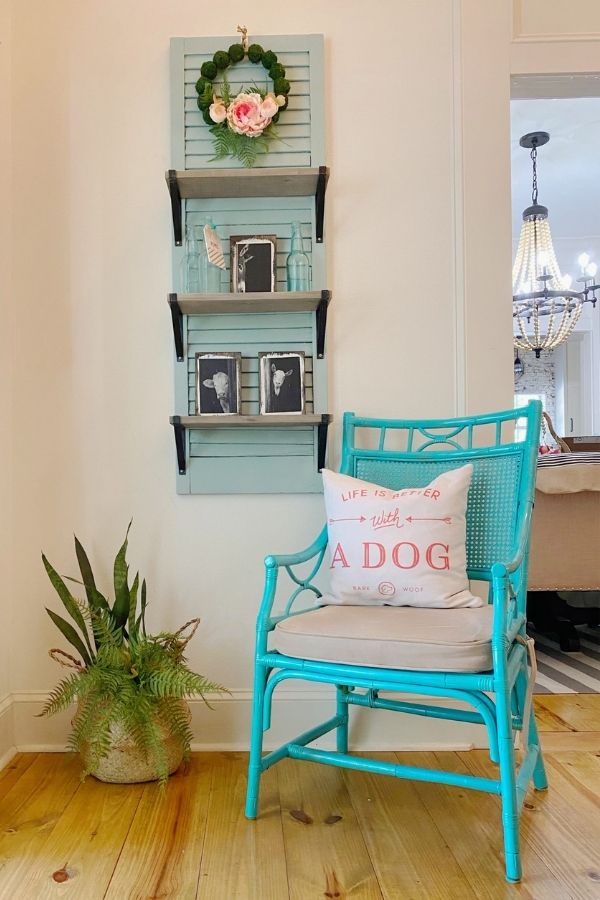
Based on the height of the shutter available, you can decide how many shelves to add and the number of brackets and shelves to prepare accordingly.
In this guide, there are three shelves, each about around 15 inches away from the other.
Use the tape to mark the spot of brackets and use the drill bit to attach the brackets in place. Attach brackets and cut several shelves to fit in between.
Project details: refreshrestyle.com
45. DIY Color Changing Raw Wood LED Shelf
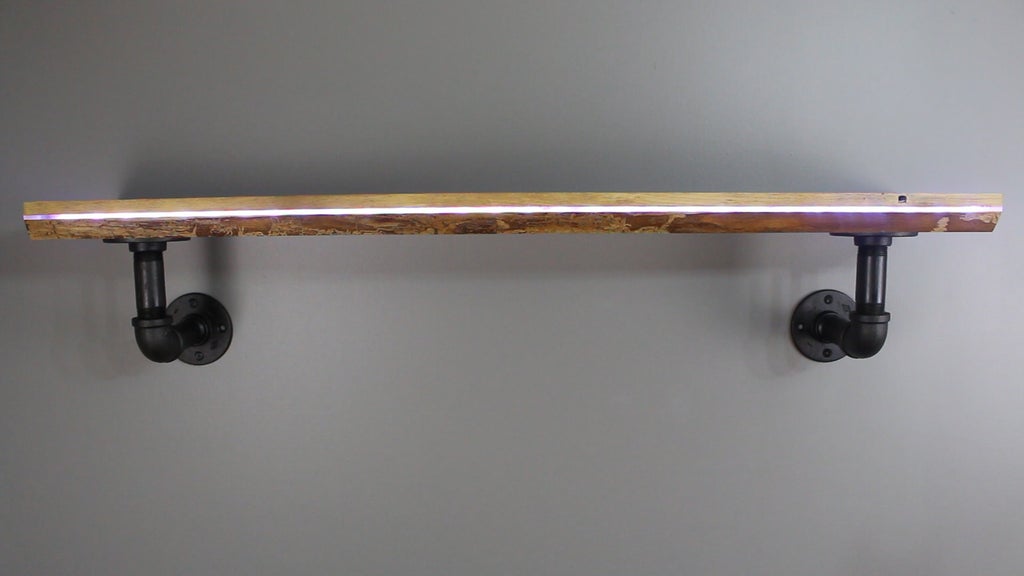
This shelf is great and unique with a change color inside the wood. The creation is the IR remote LED strip. You need to cut a groove wide enough to install the white wire into the pipe and a hole to store the power cable.
It would be helpful to have a LED strip attached to the shelf so that you can access the stuff at night without messing things up.
Project details: instructables.com
46. DIY Wood Shelving Wall
Instead of spending money on many lumbers, you can make use of the wall as the backsides for the shelves. You just simply cut different wood pieces to size and use scrap to connect every two boards.
The joining method is pocket hole joinery. You can clamp a jig on a less visible location and drill the hole at an angle into that place. Then, clamp the two wood pieces together to be screwed.
Choose the wood as straight as possible, and you will find the work much less time-consuming because you will not have to sand to cut out leftover parts too much.
This shelf is very wide and tall enough for a large space so you need to calculate suitable with your space.
Project details: abeautifulmess.com
47. DIY Closet Shelves & Rods
It is convenient to divide the closet into different shelves to store your stuff.
Take this plan, you have seven blocks available. Five of them are for small bags, and another two come with closet rods.
A tip is to screw furring strips to the walls so that the shelves will sit on top of the walls. Remember to nail the shelves one more time to improve the security.
Project details: southernyankeediy.com
48. DIY Honeycomb Hexagon Shelves
If you just want a small shelf to hold small decorative objects, you do not have to get involved with big lumber. A package of whitewood boards is enough.
The size and the number of boards are based on the size of templates you use for creating the shelf.
This plan uses four 1×4 10-foot boards. You can use the template and mark the sides, and cut the boards accordingly. The importance is to match the cuts of sides perfectly.
Project details: boxycolonial.com
49. Easy DIY Hanging Rope Shelf
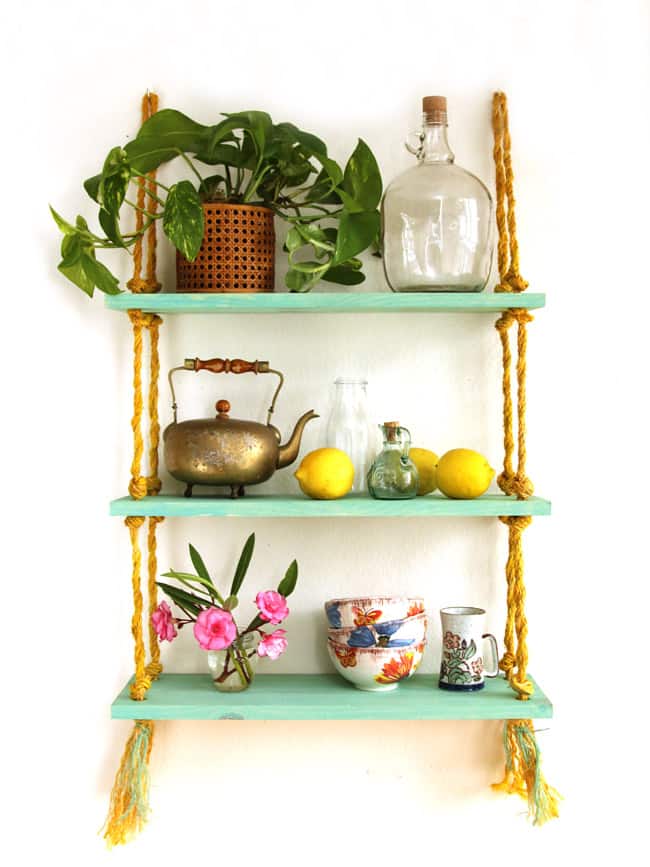
We would recommend jute, sisal, or cotton ropes to make your hanging shelves since they are quite durable and come up with different colors.
You can buy a rope of 25 feet and cut it into different pieces to string over your shelves.
To make the beautiful color as above, you can dye the rope with diluted yellow acrylic paint for a day and hang it to dry.
Prepare the shelf cut to your favorite size and drill holes to feed the strands over.
Project details: apieceofrainbow.com
50. DIY Floating Shelves By Scrappygeek
You can create this floating shelf from two 28×8-inch shelf boards, two 7×4-inch small pieces for the side, two 28×2-inch and four 5×2-inch furring boards for the frame.
Attach the small boards to the top and the bottom boards with finish nails and wood glue. Continue with the other 4-inch board to the front. Then, you will have an open-backside box.
Make the floating frame from the furring boards—two screws for each small 5-inch board.
Locate wall studs on the wall to connect the frame and the shelf together.
Project details: scrappygeek.com
51. DIY Outdoor Serving Station
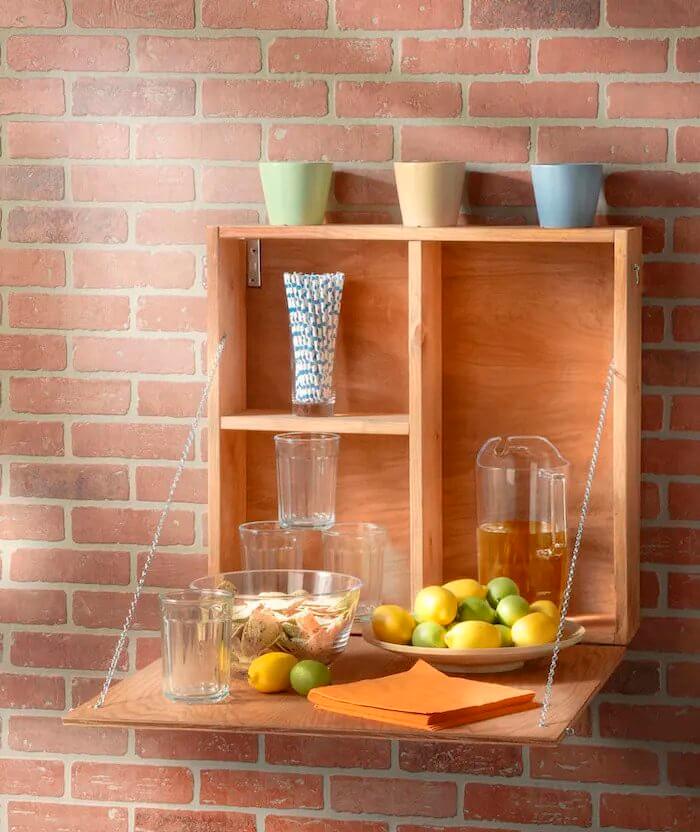
If you often spend time outside for grilling or drinks, the serving station shelf will be extremely cool and convenient.
Go prepare a cut list of two 18×43-inch pieces, two 22×1/2-inch pieces, one 10×7/8-inch piece, one 17×1/4-inch piece, and another 24×18-inch rectangle. Create a box from those cuts, using a nail gun and glue together.
More importantly, buy the hinges to attach the folding top into the box. You should leave at least a ⅛-inch gap so you can easily fold.
Project details: diycandy.com
52. DIY Industrial Pipe Shelves By The Design Twins

This one might take you around a couple of days to finish, but the result is 100% worth the effort.
Cut studs to 16 inches, and you will attach brackets in the center. That way, the frame is sturdy to load more stuff. Keep in mind that all brackets must be in line.
Hold the assembled unit against the wall and screw them in place. Prepare four long shelves boards and place them between the pipes.
Project details: thedesigntwins.com
53. DIY A Boat Shelf By Instructables
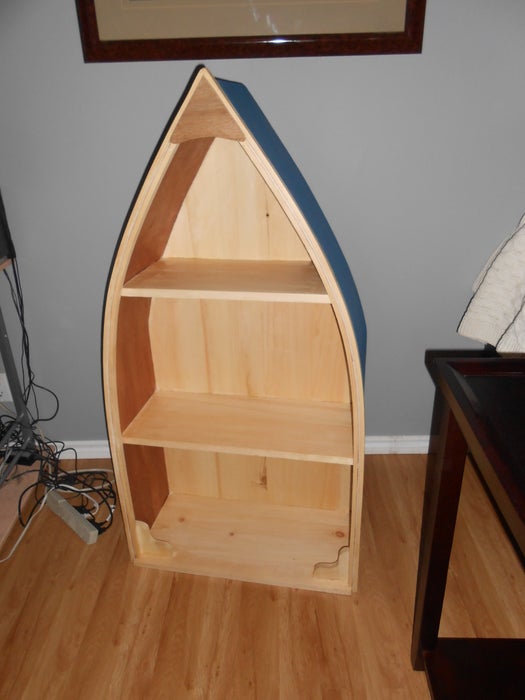
Shaping your shelf like a boat creates an interesting look to your room and also saves some space.
You will glue the backside first using four 12x72x48-inch pieces together with the 2-inch strip in the center. Move to another two 12-inch sections to form the three shelves.
Draw the curves in the shape of boats and cut them with a jigsaw. Complete the plan by attaching the side shelves with clamps and gluing the inside rails.
Project details: instructables.com
54. DIY Closet Shelves – Craft Closet Organization
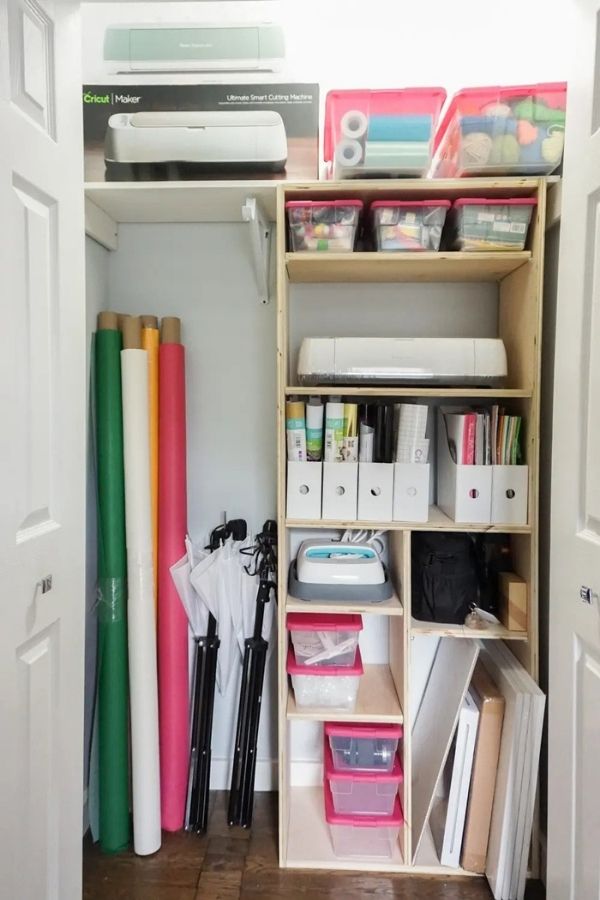
As you can see, this closet shelving unit has many shelves that you might find a bit complicated at first.
However, we have a tip for marking the closet center and dividing it into two parts with an “I” board. You can keep the left part blank or add a bracket to hang over something.
On the right, drill pocket holes and attach boards to form smaller shelves. You can apply the “I” method to divide the shelves equally with the five bottom shelves.
Project details: amber-oliver.com
55. DIY Industrial Shelves By Beneath My Heart
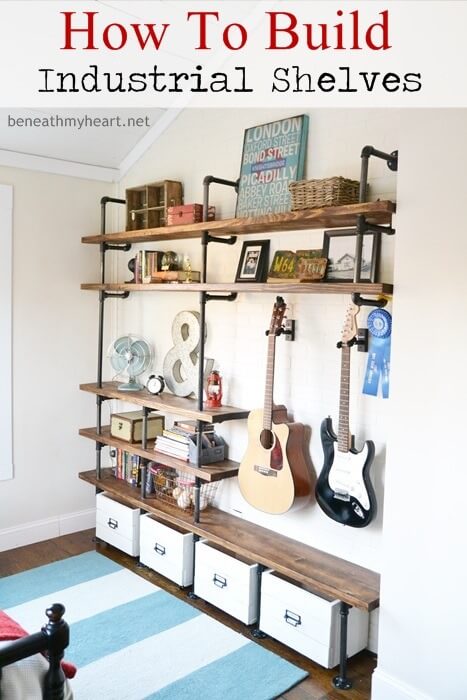
The main supplies for this project include ¾-inch black iron pipes coming in 1 inch or ½ inch according to a load of your shelves, as well as two wood pieces 2 inches thick – they can be available in different lengths.
Install the pipes onto the wall and from the floor up. It is important to line up the pipes to create a stable foundation for the shelves.
This cool industrial shelf will help you organize items clutters for succinct with more space amazing to store.
Project details: beneathmyheart.net
56. DIY Ladder Shelf By Lowes
To build this ladder shelf, you need to follow two main processes: building the legs and trays.
The two rear legs are cut to the same length and installed into an A shape. Mark the positions of shelf frames around 10 inches from the top ends. Then, clamp and glue the top of two rears together with flathead wood screws.
Next, build the shelf frame with flat boards from the bottom up and drill them between the legs and at the marked position.
Project details: lowes.com
57. Basement Closet Shelving Idea
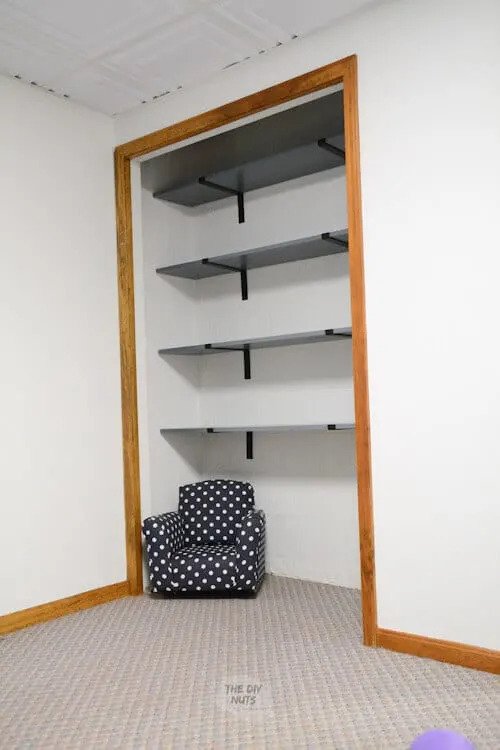
Get started by applying a new paint coat to freshen up your basement closet space.
Large farmhouse brackets are recommended as they will support the shelves better. Also, prepare a number of 1×12 wood pieces cut to size according to the available dimensions of your closet.
Then, we would suggest using a hammer drill and bit to create the bracket holes more easily and screw the brackets in place to hang the shelves over.
You will also want to remove the closet doors to have an open spacing to reach the items.
Project details: thediynuts.com
58. Reclaimed Wood Kitchen Shelves
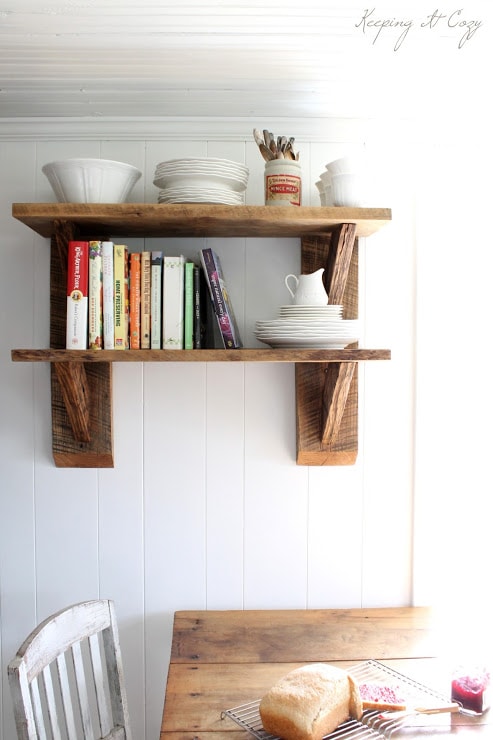
Do you want to add a chic, rustic look to your living space without breaking the bank?
These whole shelves are made of old barn wood pieces, so it offers a sturdy look and a strong performance.
Accordingly, you will need two thick and wide planks which are directly on the wall by big nailers.
Prepare 4 2×4-inch pieces with an angle of 45 degrees on the ends. You must sand the angles smoothly and glue one end onto the first two planks.
The other end will be glued with the shelving boards. Wait for the glue to dry before you load the books and other stuff.
Project details: keepingitcozy.blogspot.com
59. DIY Honeycomb Shelves
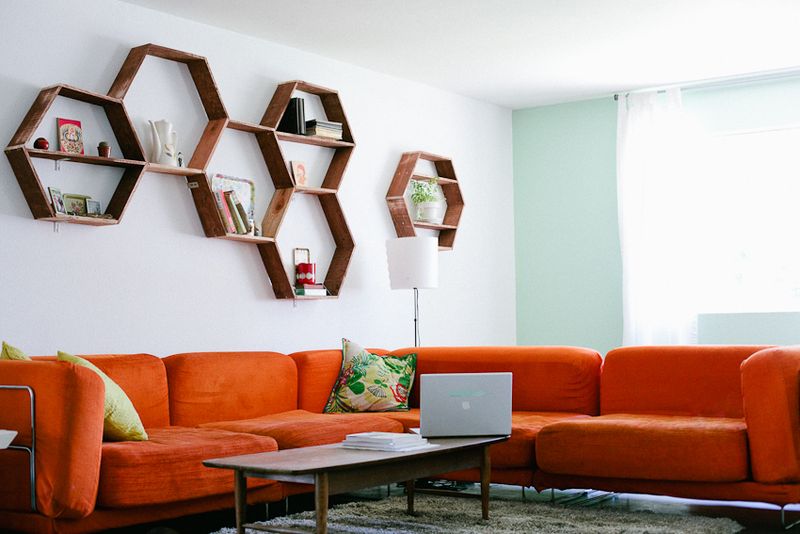
These are beautifully hexagonal wall shelves that bring elegance for your bedroom or living room.
You will prepare wood pieces or fencing planks with equal dimensions – normally 12 inches and then cut both ends at 30 degrees. Repeat the process to make as many honeycomb shelves.
Take six pieces and attach the ends together with the wood glue and nail gun to make the first hexagon pod. Stand it up, and you can glue other pieces to form the next hexagon.
Remember to press the sides for some seconds so that they will stick more firmly.
Project details: abeautifulmess.typepad.com
60. Simple Corner Wall Shelving
With three longboards and some minor cuts, you can build corner shelves to save your space. It is possible to cut three equal boards or make one shorter to create an exciting look.
Prepare two long pieces, and one short piece and eight rectangular pieces to build the form.
Once all wood is cut, drill holes into the wood to create pilot holes, so the screws are installed easier. Then attach the four round wood pieces into the frame, using glue, clamps and wall anchors.
You can also paint the shelves with white or other stains to freshen up the corner space.
Project details: removeandreplace.com
61. DIY Bookcase / Librero
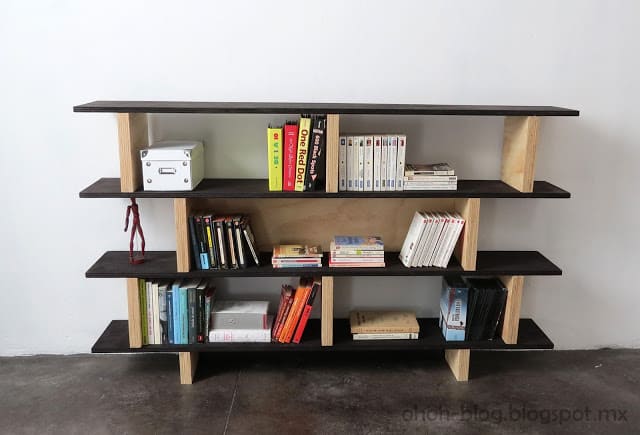
Suppose you are still new to making crafts; this one is the ideal project to try.
This bookcase is easy to recreate, and it has an interesting structure with many open shelves in different sizes to store your books.
These shelves include sixteen 10×10-inch pieces, four 10×63-inch pieces. And the base consists of four 5×10-inch pieces and one 5×36.5-inch piece.
The top and the third shelves will have the same structure. Meanwhile, the second and the bottom will be parallel to offer a stable foundation.
Project details: ohohdeco.com
62. Stylish and Easy Corner Bookshelf
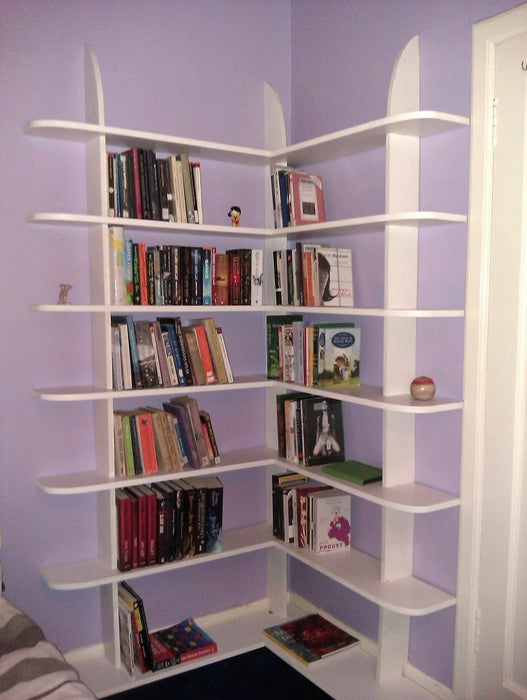
You want to take advantage of your spare corner? Go for this idea. This is a combination of corner floating shelves and some additional boards to divide the storing space into blocks.
No worries if the bookcase looks complicated at first. You only need three simple supplies: three wooden boards and one MDF board.
The project has seven levels, each having a round-cornered MDF on the bottom. They will then be installed on three vertical boards in their cuts. Each cut should be 2.4-inch deep and 0.7-inch wide.
Make the first cut and check to make sure the boards can go too easily. Otherwise, the shelf can be wobbly after a while. Paint the shelves in the color you prefer, and you have created new storage for yourself.
Project details: instructables.com
63. Open Shelving – DIY Wood Shelf
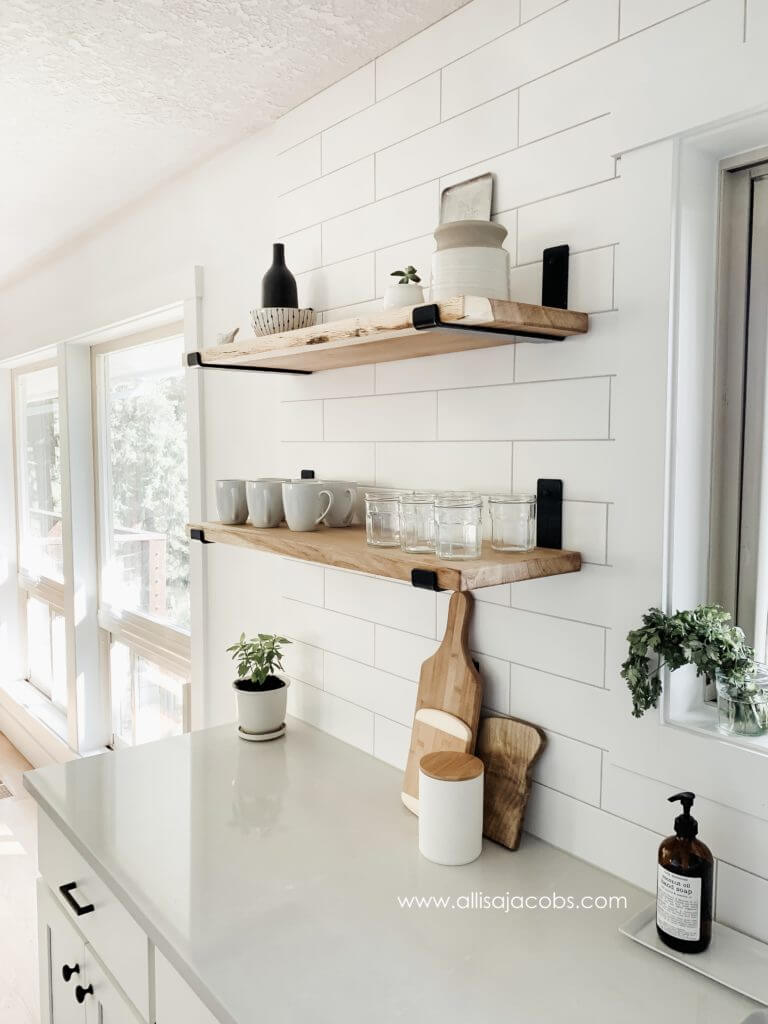
Open shelves provide a lot of space to store your belongings more comfortably and conveniently. However, you need extensive space on the wall.
For this plan, the tutorial made kitchen shelves of 11.25×12 inches deep attached to the wall by two brackets per shelf. If you build a shelf over 36 inches long, you might consider using three brackets.
Project details: allisajacobs.com
64. Modern Pegboard Shelving System

The idea is to plot out the hold placement across the plywood, where you can add dowels to hold the shelves.
The bigger board and plywood you have, the more holes and storing space you will have. For example, this project is a 24x36x3/4-inch thick board.
It is better to use the space bit and drill the marked holes upright and straight. This way, the dowels will be more even, and you can change the positions of dowels anytime.
Project details: apartmenttherapy.com
65. DIY Rustic Wood Shelves By At Home With The Baker
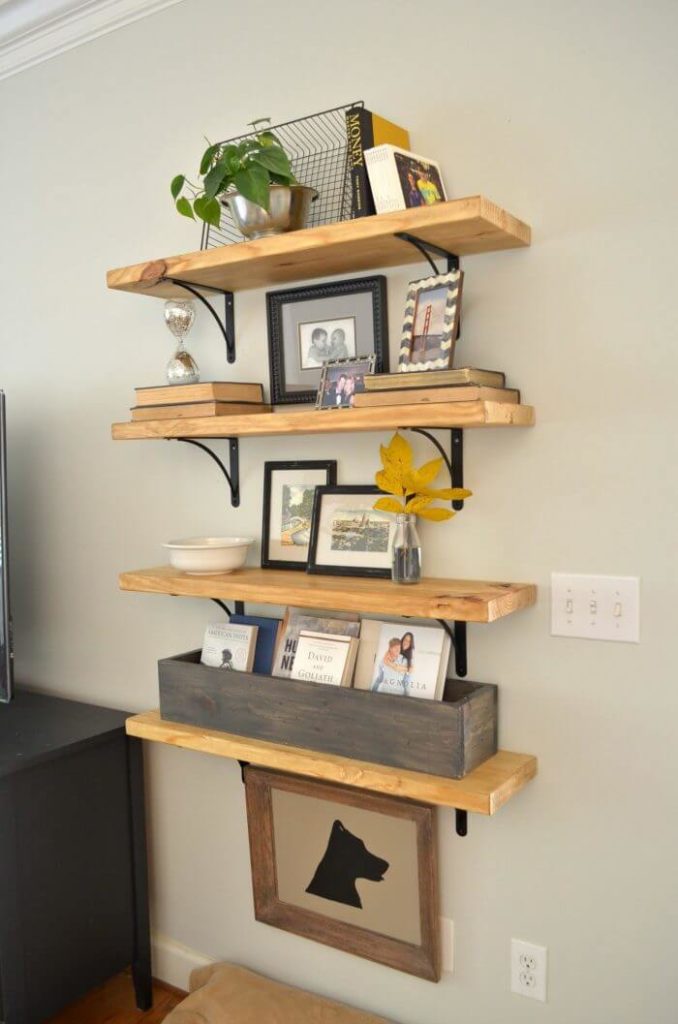
This is a sturdy wood shelf and rustic that you can showcase family photos or personal items.
Pin boards are great for making wood shelves with beautiful knots and a smooth surface.
Cut the boards to size and smoothen them with the sander. Drill the pilot holes and screw the boards into the brackets firmly. Finally, add the brackets on the wall with the holes.
You should square off the brackets to align the two holes on the two sides to balance the shelves.
Project details: athomewiththebarkers.com
Conclusion
DIY wood shelves are a great way to save storage space and organize your belongings. There are ideal options and simple for a narrow area.
For a larger living space, you need some skills, tools, and material suitable to perform with different styles of shelves. You will not have any difficulty making the right decision for your room or house.
We hope you can pick up some plans to try on your weekend to create lovely decor and uniqueness with your personal touch.


![How To Start A Woodworking Business [Ultimate Guide]](https://handykeen.b-cdn.net/wp-content/uploads/2021/10/woodworking-business-1-300x200.jpg "How To Start A Woodworking Business [Ultimate Guide]")
