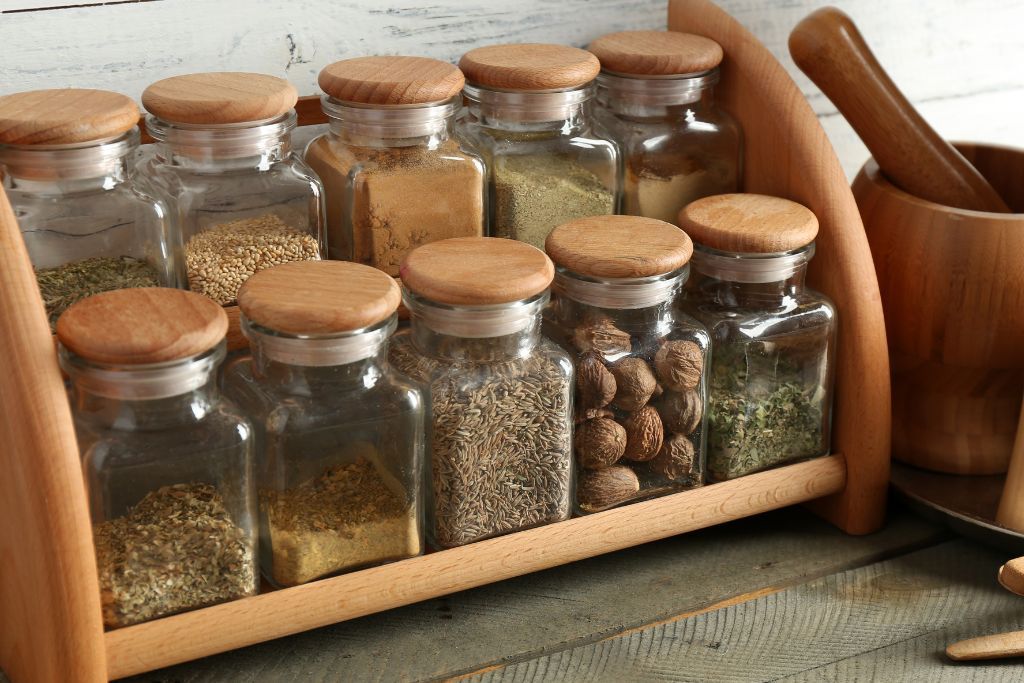
You might already know a messy kitchen causes stress and the most chaotic things such as spice bottles scattering here and there.
In this article, we have collected 23 great DIY spice rack plans to help you organize spices neatly and easily accessible while you are cooking.
Each plan has its interesting idea, check them out and pick up your favorites!
Table of Contents
- 1. DIY Test Tube Spice Rack
- 2. White Wall Spice Rack
- 3. Spice Rack Free Plans
- 4. Easy DIY Tiered Spice Organizer Rack
- 5. Wood Mounted Spice Rack Plans
- 6. Build A Big Pallet Spice Rack
- 7. DIY Floating Spice Rack
- 8. Wooden Criss-Cross Spice Rack Plan
- 9. DIY Spice Rack inside the wall
- 10. A Hanging Spice Rack
- 11. DIY Pallet Spice Rack
- 12. Chalkboard Spice Cabinet
- 13. Beautiful Tier Racks for Spices
- 14. DIY Spinning Spice Rack
- 15. Build A Countertop Spice Storage Bin
- 16. Magnetic Spice Rack
- 17. DIY Spice Rack For Organizing Spices In A Cabinet
- 18. 2-in-1 DIY Spice Rack
- 19. Framed Magnetic Chalkboard Spice Rack
- 20. DIY Copper Spice Rack
- 21. Make A Country Charm Spice Rack
- 22. Mini Mason Jar Spice Rack
- 23. Simple Stylish and Fun Spice Rack
- Conclusion
1. DIY Test Tube Spice Rack
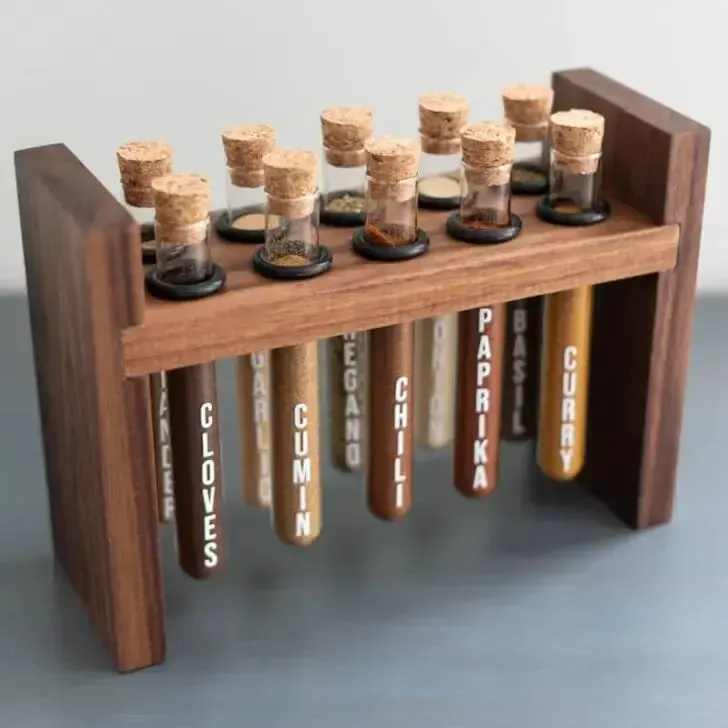
This spice rack might come from scientists or those in labs who like the idea that cooking itself is just chemistry.
You need one 1×4 hardwood board 2 feet long, a dozen 20mm test tubes with their cork stoppers, 18mm rubber O-rings, and woodworking tools.
Place the O-rings on the board, mark the centers, and drill the holes with a 21mm bit. Next, cut two identical side pieces and make dadoes to attach the sides to the board. Then, you put the test tubs in and lock them in place by the O-rings.
This construction allows the rack to stand and does not take up a lot of space on your kitchen counter.
Project details: thehandymansdaughter.com
2. White Wall Spice Rack
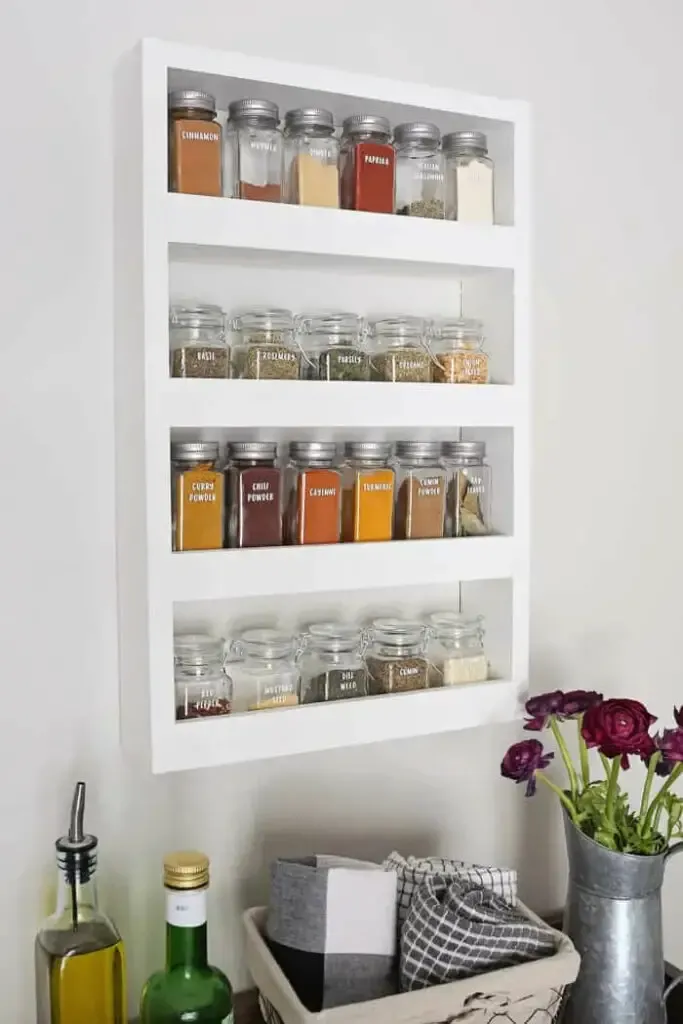
We give our thumbs up for the wall rack as it saves space and looks neat in your little kitchen.It’s also easy to access.
The rack includes four spice rack shelves attached by pocket holes, brad nails, and wood glue; each is four inches tall, three inches wide, 13 inches long, and 5.5 inches apart from one other.
Such dimensions allow each shelf to accommodate six 4-ounce square bottles and five 3-ounce glass jars with airtight lids.
Project details: angelamariemade.com
3. Spice Rack Free Plans
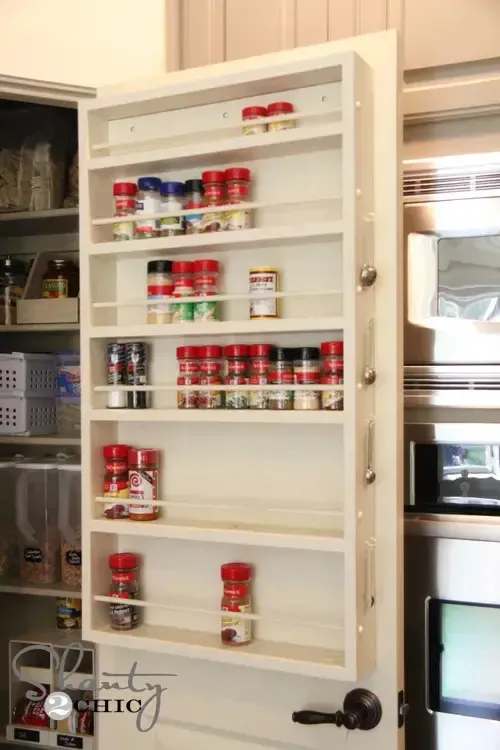
What about making all spices accessible right at your entrance to the pantry?
This rack is built right on the door. It is a rectangular frame of 39 inches high drilled directly into the door. The rack has six shelves so you can easily store a lot of your spice at once.
On both side pieces, you drill holes for your dowels and pocket holes for shelf placements parallelly. The shelves are to hang the spices, and the dowels help prevent them from falling.
Also, you should adjust the dimension and paint of the racks according to your door.
Project details: shanty-2-chic.com
4. Easy DIY Tiered Spice Organizer Rack

With this plan, it’s very simple and easy to do. You need three 2×4 wood pieces, a miter saw, sandpaper, wood glue, drillers, and paint.
Although the pre-cut pieces are quite smooth, you should sand them again before assembly.
Besides screwing, you should also apply wood glue to the attachment parts to enhance their durability.
Once the three 2×4 boards turn into one, you can put it into the corner of your cabinet or any open space, ready to hold up spices!
Project details: remodelaholic.com
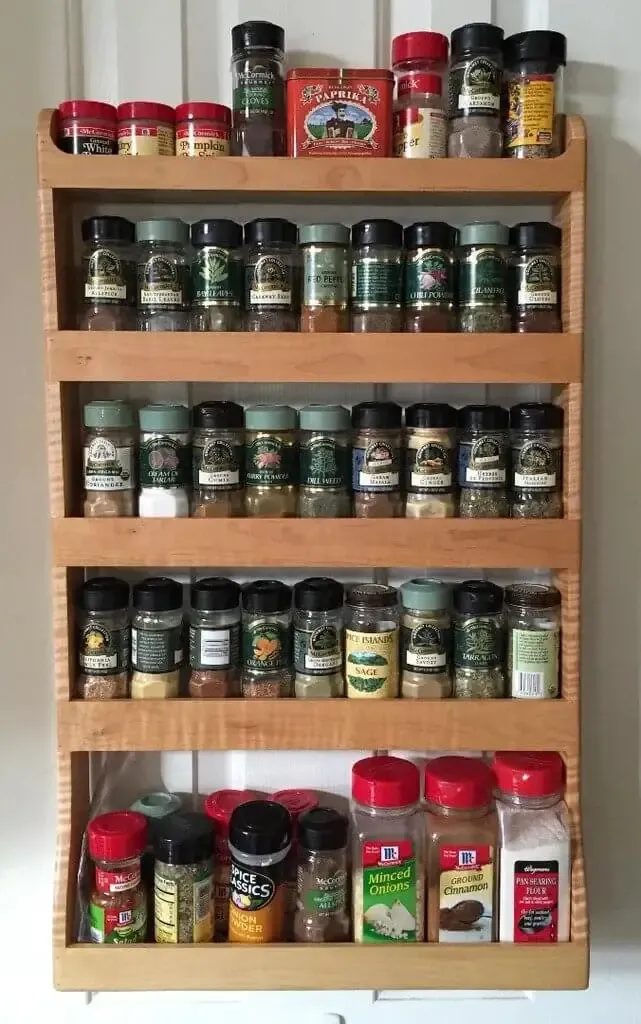
5. Wood Mounted Spice Rack Plans
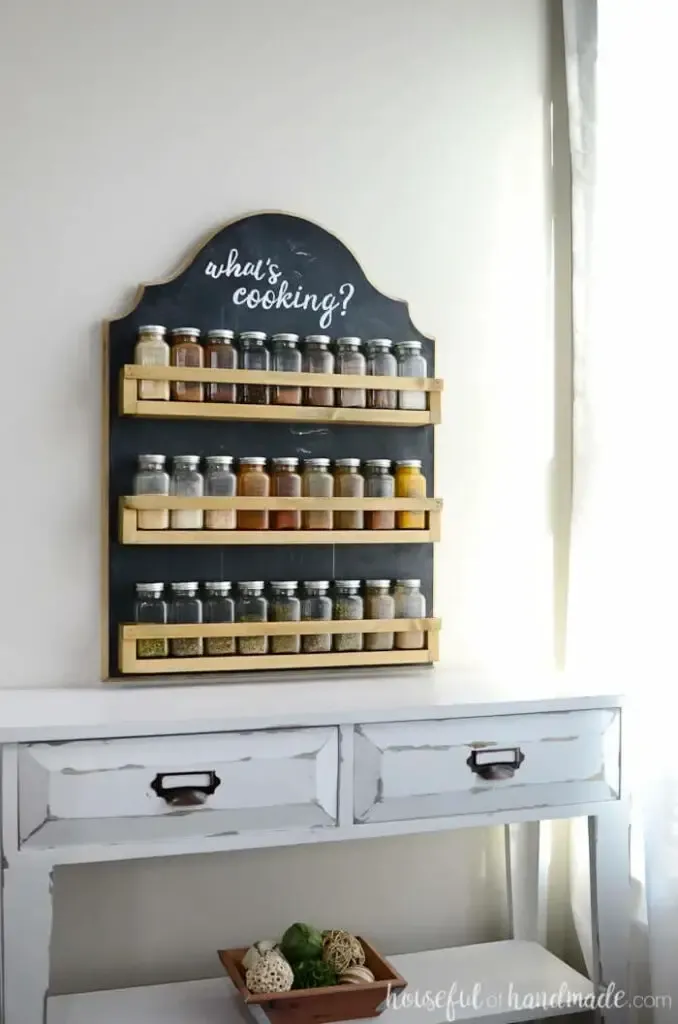
This chalkboard rack Not only helps organize your spices neatly, but it adds golden-and-black beauty to the surrounding decoration as well. With mounted chalkboard design also helps save space in your kitchen.
You will need to have some experience with woodworking since the plan features a curved headboard on the top. The cuts must be smooth, precise, and parallel on the two sides.
With the shelves, although attaching them externally helps increase the room for spice jars, the drill holes are too visible. So, you will want to apply additional paint to conceal them.
Project details: housefulofhandmade.com
6. Build A Big Pallet Spice Rack
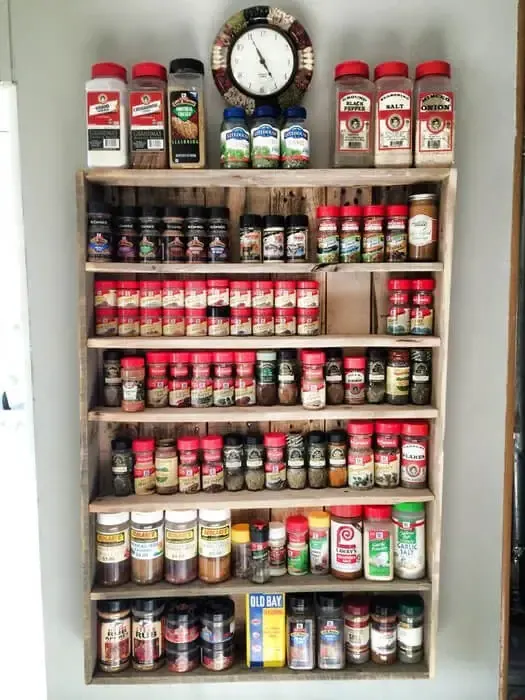
Imagine you have a huge collection of spices; you will love to build this big rack plan with leftover pallets.
Since it is huge, you need to split the boards as little as possible.
You should sand the pallets on the side and through the nails on each side during the dismantling.
Plus, you should use full-length pallets for the sides instead of nailing pieces together. Utilize boards of the same width for the outside and shelf boards, as well.
In terms of attachment, you should mainly borrow wood glue so that you will not need to break much into the wood body. Nails are just additional stability support while pallets are drying and when finished.
Project details: instructables.com
7. DIY Floating Spice Rack
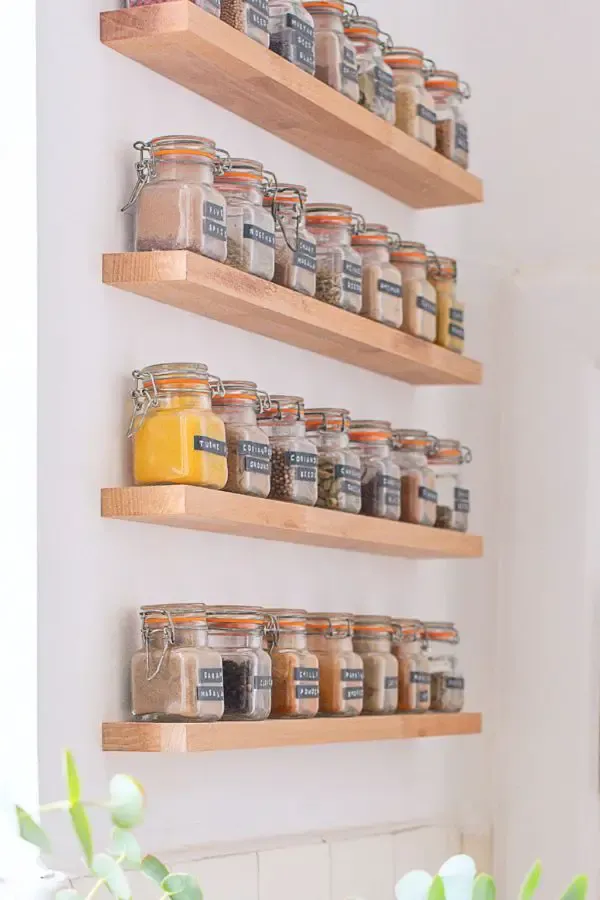
Less is more. You will love the modernly simple look of this floating spice rack.
The construction is straightforward with basic steps: you will cut four timber wood boards, drill holes in the boards, and screw them onto the blank wall.
However, the complexity is how you make everything firmly, perfectly straight and lined up. You will need to borrow the help of rulers and laser level.
Project details: littlehouseonthecorner.com
8. Wooden Criss-Cross Spice Rack Plan
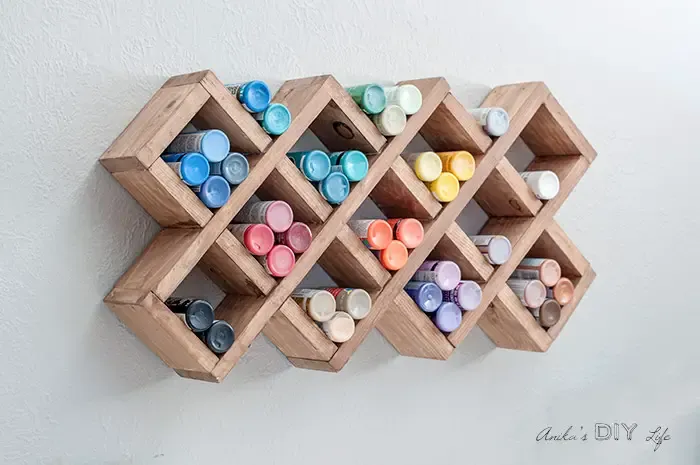
Here’s a criss-cross spice rack that has a couple of benefits for your reference.
It creates an interesting look in any space. The rack can free-stand on a surface or float on the wall horizontally and vertically. More importantly, the criss-cross construction opens up for the maximum of spices and other stuff.
The rack, on the other hand, is a little complex to build, and it is hard to make up what spices to take out since they lie stackable.
You will use two types of cuts. Eight boards are equal in length: four pieces are longer. There are also half-lap joints on each board: three on the longer pieces and two on the others. Then, attach the boards right to the joints.
Project details: anikasdiylife.com
9. DIY Spice Rack inside the wall
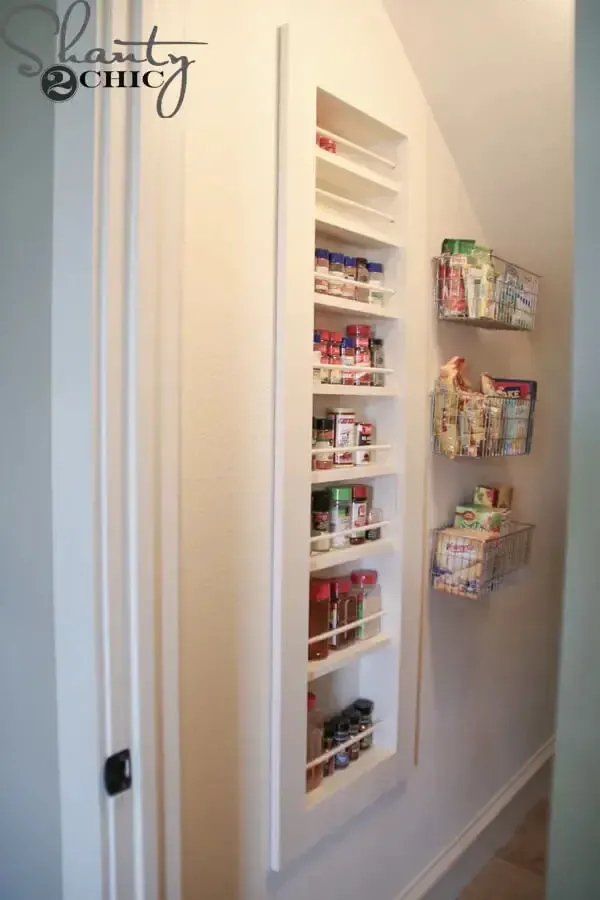
Now, let’s take inspiration from a recessed wardrobe. You can try this built-in spice rack inside the wall if you do not mind drilling directly on your wall.
Concealing all the shelves and spice bottles inside the wall, it helps save your kitchen space as much as possible. Yet first, ensure there is nothing behind the wall, such as electrical wiring and plumbing pipes.
Next, you decide on the dimension of the rack: its height, width, and number of shelves. It depends on your wall.
With this project, the rack is 57 x 14 ¾ inches overall. You will easily measure the space on the wall and build the wood frame.
Lastly, you should apply coats of paint on the spice rack to prevent penetration and damage from humidity as well as match the color of your wall.
Project details: shanty-2-chic.com
10. A Hanging Spice Rack
This project is good for holding plastic spice bottles, given that its main material is plywood.
Moreover, you will directly drill the top, sides, and shelves rather than the common pocket holes. There is also a bar and curtain hooks under the bottom shelf.
This way, the spice rack is easier to use and usable to hang more stuff. It is, unfortunately, less durable under pressure.
You had better use thicker wood pieces or remove the bar if you have all heavy glass jars.
Project details: grillo-designs.com
11. DIY Pallet Spice Rack

Woodworkers hardly get rid of their pallets since they can recycle them for some DIY plans. Supposing you also have spare pallets at home, it is time to create this pallet spice rack.
You will cut the pallets into pieces: four 20×3½ pieces as shelf backs; four 19×3½ pieces for shelf bottoms; four 20×2 pieces for shelf fronts, and another two 26×3½ for rack sides. You nail those pieces, and the rack is ready to use. It’s simple!
The three first shelves are close to each other, where you can place small jars or lie down one by one. Meanwhile, for tall bottles, you should leave a significant height above the bottom shelf.
Project details: makeit-loveit.com
12. Chalkboard Spice Cabinet
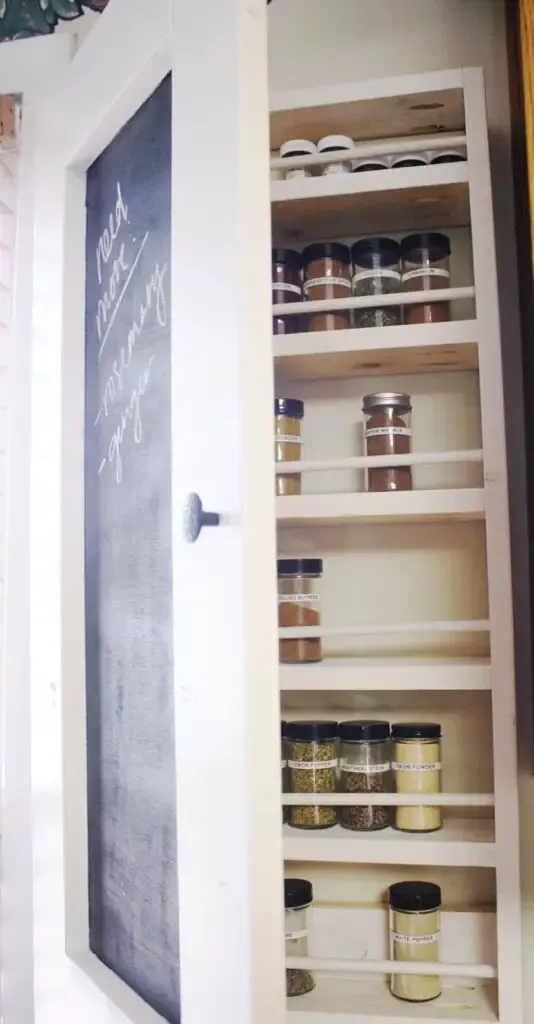
Although installing a door makes it less accessible to your spices, it helps secure them from direct light and even out of your curious kids’ reach.
Onto the build, there are two parts – the rack and the door.
Regarding the rack, you will cut pieces to build a 14” x 32” frame and install the shelves on the two sides of the structure 5 ½ inches apart. The dowels lie a little above the shelves to secure jars from falling.
Using wood glue and pocket holes, you continue with the door frame, then nail a scrap plywood panel. It’s best to paint the panel with chalkboard paint and turn it into a notice or decorating board.
Ultimately, it is time to hang the rack up using D-ring hangers!
Project details: jenwoodhouse.com
13. Beautiful Tier Racks for Spices
At a glance, you can see three tiers connected by a piece. As such, you have three shelves to store the spice jars and boxes.
You will build the bottom shelf from three pieces, having the back higher than the front so that it will not hide the label of the spices.
Then, use decorative nails instead of screws, and your rack will look more beautiful. Nonetheless, the nails are not as strong as screws.
Nail a piece at the back of the first tier. It will work like a bridge, with the second tier consisting of the shelf and the supporting portion.
It sounds easy, yet pay attention to the rack levelness, ensuring that it is not tilting back and forth. Straightness and balance are important here to keep the overall balance of the construction.
Project details: diy.dunnlumber.com
14. DIY Spinning Spice Rack
With this project, the circle construction will maximize the storage within your limited space, such as on the small kitchen countertop or inside the cabinet. What’s more, you can spin to find your preferred spices quickly.
First, let’s begin to build a spinning model. There are a lot of circle cuts needed; thus, you will want to print the free plan on the instruction to guide your cutting.
Stick the plan onto your wood piece and cut it around with a circular saw. We need three big 10½ circles and drill holes of 1¾ inches for jars. This dimension would be helpful if all spice jars had the same diameter. Otherwise, customize the spots based on your kitchenware.
In the center and between the top racks and the others, there is a round tube screwed in a bearing so that the shelves are spinnable.
15. Build A Countertop Spice Storage Bin
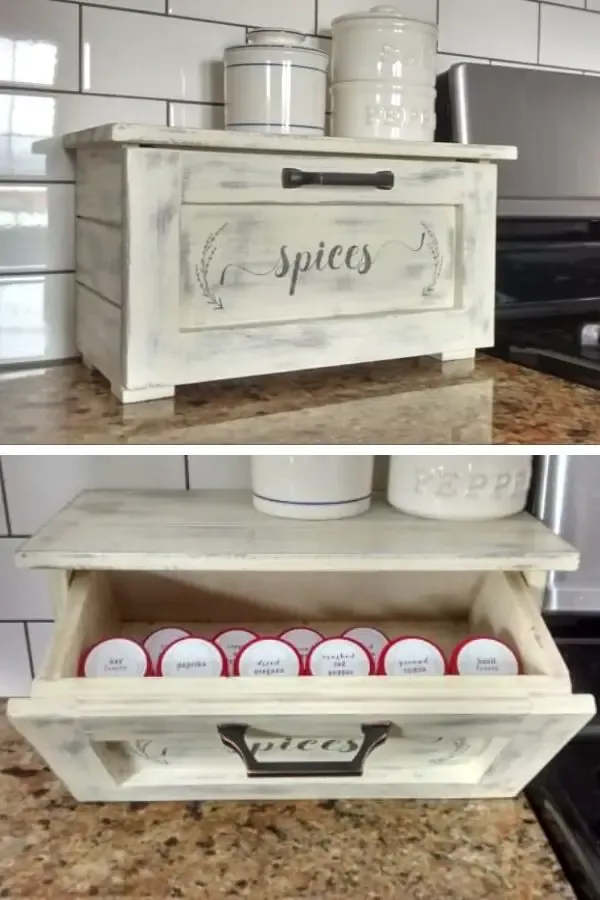
Building a spice cabinet takes extra time than mounting shelves or racks. Nonetheless, it is worth it when you want to store spices from direct light, mice, and humidity.
In addition, the top countertop works as an additional storage space for species you want to keep at hand all the time.
Speaking of construction, you can keep the drawer and the frame completely separate. However, it can be a little heavy to handle. Otherwise, you can attach a slider to pull the drawer in and out more easily.
Project details: remodelaholic.com
16. Magnetic Spice Rack
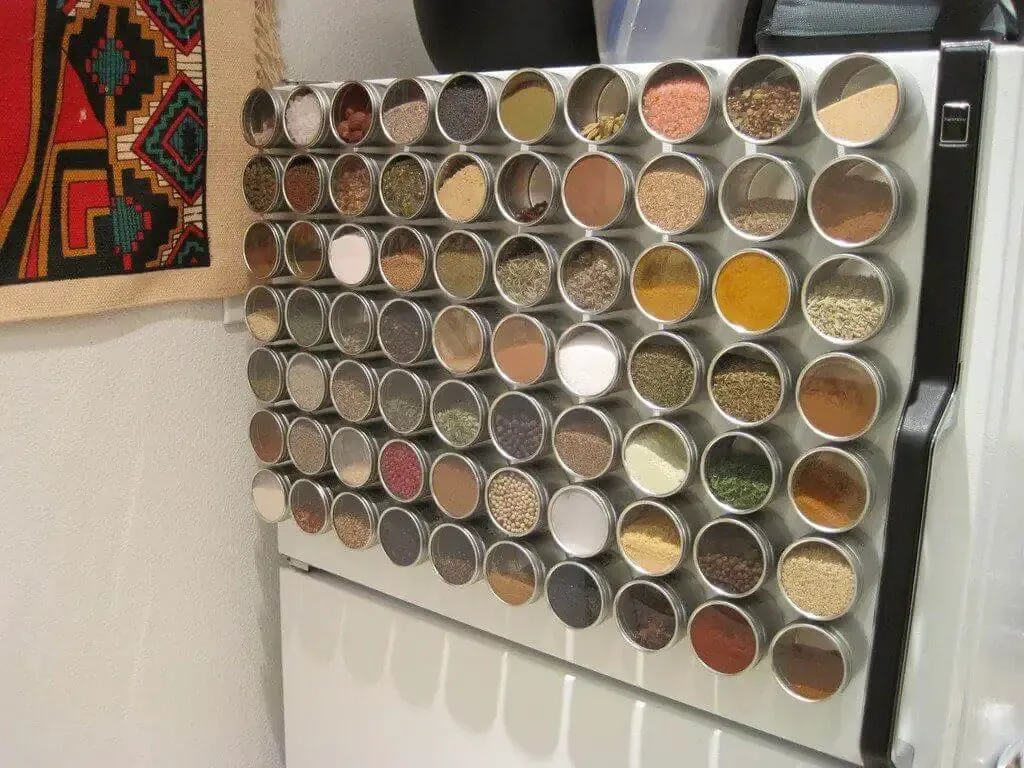
This magnetic spice rack is inspired by some commercial frames. It allows users to stick all spices directly on metal surfaces, e.g., fridge, oven, etc., and make them at hand when cooking.
Necessities include some 4-oz round clear top tins, three ¼x1/16 neodymium magnets per tin, epoxy, paper, sandpaper, a damp towel, label makers, and tweezers.
The first task is to prep the tins by cleaning and sanding their back.
Then, affix the magnets. Mix them up until you get a consistent paste so that you can apply three dabs the size of sesame seeds on the back of the tins and apply the magnet to those dabs.
Project details: instructables.com
17. DIY Spice Rack For Organizing Spices In A Cabinet
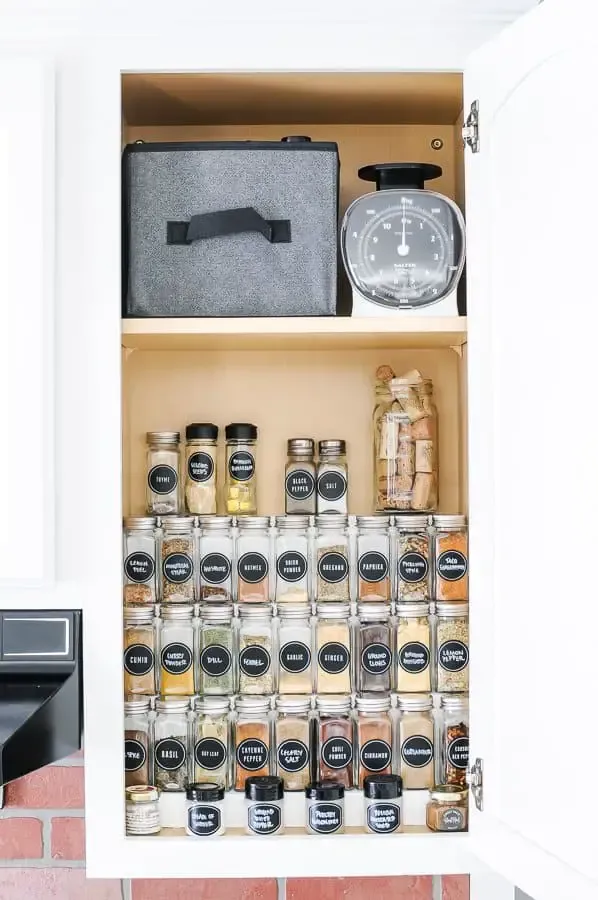
Let’s try renovating your cabinet into these ladder shelves sitting on one another If you have many spices in a narrow kitchen.
.
It depends on the actual dimension of your cabinet to decide the number of shelves inside. The height of each shelf is equivalent to the height of spice bottles, so they will not cover the ones above.
What’s more, you had better leave a little space in the front of the first shelf where you can place small bottles.
Project details: joyfulderivatives.com
18. 2-in-1 DIY Spice Rack
We call this next spice rack a 2-in-1 solution since it can stand alone at the corner of your kitchen or be mountable on the door/wall – up to your available space.
To achieve this design, you do not install the braces normally but recess them in the back to mount them on the wall. This way, even when you let it stand in the corner, there will be no protruding parts.
This is not something for novices, though, as you need to router all the edges and cut grooves and joints. And in the end, don’t forget to use brads at the jointing parts, two brads per joint, to avoid splitting the wood.
Project details: instructables.com
19. Framed Magnetic Chalkboard Spice Rack
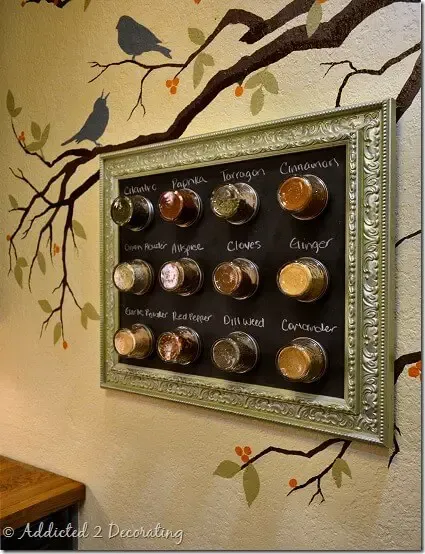
If you have a message board in the storage room, take it out for this simple magnetic chalkboard spice rack. The best thing is that you can change the name (write it on the board using chalks) when you replace those spices.
You need to buy jars, magnetic metals, and a decorative frame. Of course, the frame is optional, but covering the chalkboard with it will turn your rack into a decorative item, just like a picture.
Furthermore, you should use epoxy adhesive rather than hot glue since it holds super strong magnets soon.
Project details: addicted2decorating.com
20. DIY Copper Spice Rack
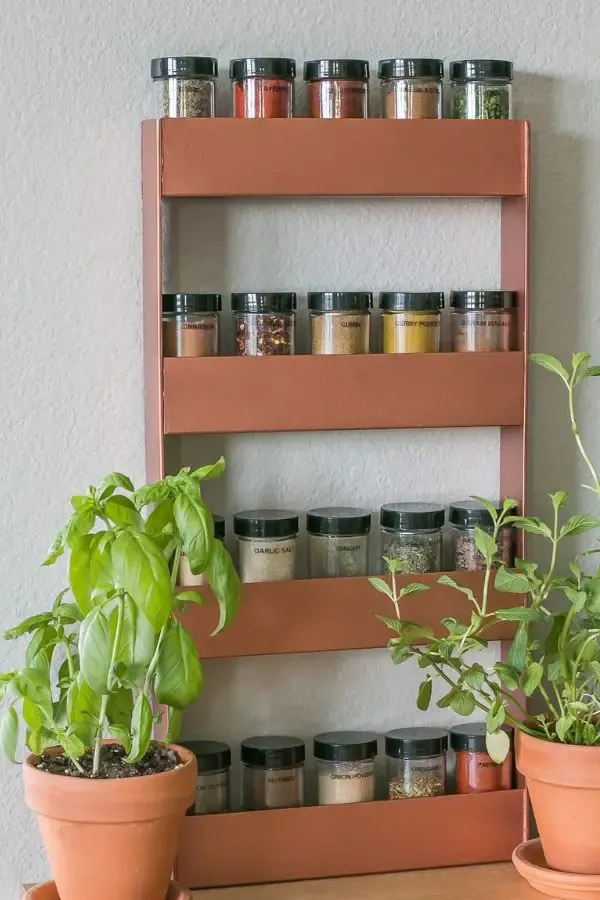
We have many wooden spice racks; thus, we get a new idea – the copper spice rack.
Compared to its wooden counterparts, copper is stronger and more durable. In contrast, it is harder to deal with since you need experience in metalwork such as cutting, brazing, welding, etc.
You will cut the pieces and weld them in the corner to form the frame and shelves. In addition, you should apply paint all over the copper to match the overall decor while preventing rustiness.
Project details: jenwoodhouse.com
21. Make A Country Charm Spice Rack
Here’s a functional and compact spice rack with some pallets. The instructor use rabbit joints and dadoes to assemble the pallet cuts into a mundane rack.
Those joints enable pieces to fit securely and firmly on each other. You can stick a sketch onto the parts for the wavy designs and cut accordingly using a jigsaw. Sanding would make perfect.
Then dry fit, clamp and paint the pieces to add an extra rusty and vintage look. Ta-da, the rack is ready for spices and hung over the wall.
If there is an improvement, we suggest adding extra glue or brad nails to enhance the jointing between pieces.
22. Mini Mason Jar Spice Rack
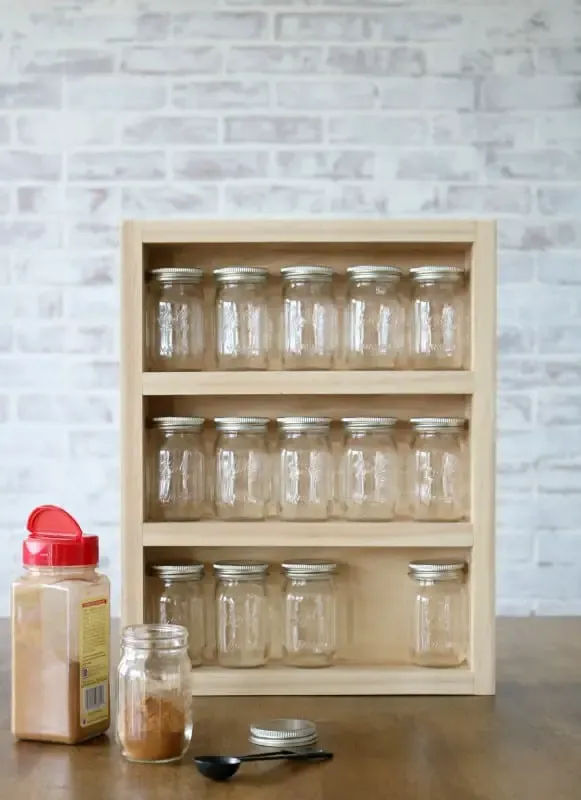
Simplicity and neatness are our first impressions of the mini mason jar spice rack. Here is the cut list: two 15¾-inch sideboards, four 11-inch shelves, and a backboard of 12½x15¾ inches.
Your main task is to ensure identical measurements and marks for cuts, sand the surface smoothly and apply enough glue to attach the pieces on their end.
To make it even more perfect, you should use the same clear jars to hold your spices. Keep them from one another like in the image, because you might have difficulty taking a preferred pot out.
Project details: remodelaholic.com
23. Simple Stylish and Fun Spice Rack
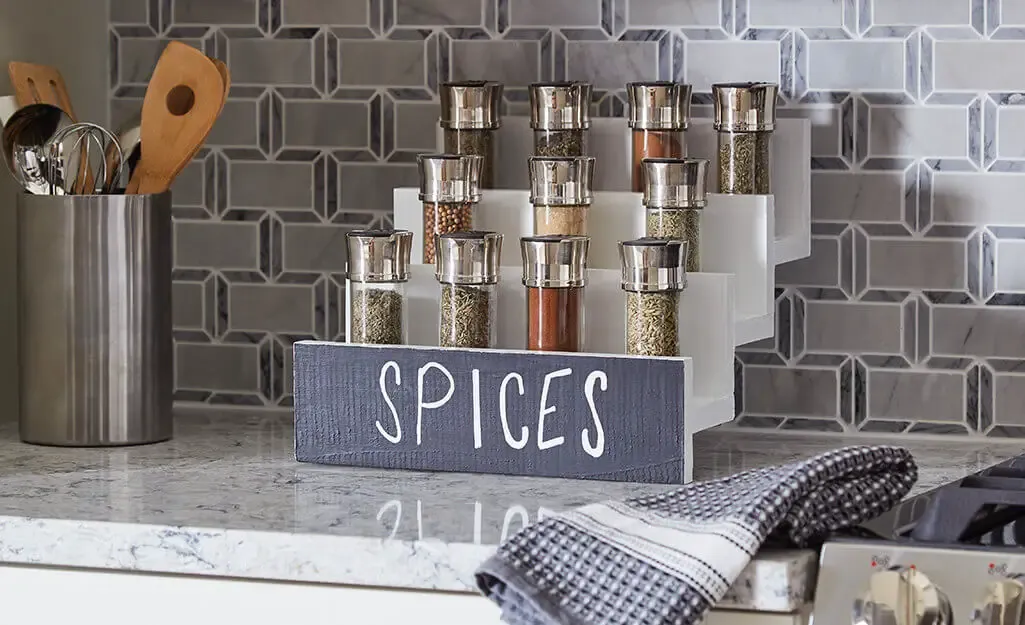
This spice rack can not hold many spice canisters, and the canisters themselves are small. Nonetheless, we cannot deny how stylish and cool the rack will be in your kitchen.
We love how the plan’s white color with its stair-like design. The white stains cover the shelves, and you can pour spices in different colors to add a decorating accent to your kitchen.
The build is simple, from seven 12-inch (for the stairs), one 3½-inch, one 1⅜-inch, and five 5⅝-inch pieces (for the support) then attach pieces together with the brad nailer.
Project details: homedepot.com
Conclusion
There are many ways that you can incorporate a spice rack into your kitchen. By taking the time to build your own DIY spice rack, you can save money and have a beautiful addition to your kitchen décor.
With 23 of these DIY spice rack plans, you can easily build a beautiful and functional spice rack in no time.
Whether you want a wall-mounted, countertop, compact, or renovation spice rack, we hope there’s a plan here for you.
So get cooking…and building!


![9 Best Pole Saws of 2023 [Ultimate Guide]](https://handykeen.b-cdn.net/wp-content/uploads/2021/03/best-pole-saw-300x200.jpg "9 Best Pole Saws of 2023 [Ultimate Guide]")

