In the prohibition era, people used to have hidden cellarette to store their liquor. Nowadays, you can proudly present your collection in your home.
Modern liquor cabinets take all shapes and sizes, depending on their purposes and your interior.
However, it can quite be expensive when buying a new one. Because of that, we prepare these DIY liquor cabinet plans for you to build one for your own.
This list has everything from space-saving wall-mounted cabinets, portable to full-blown ones with dozens of slots to store easily your bottles of wine.
Scroll down to find out which project is the one for your home!
Table of Contents
- 1. DIY Wine Cabinet By Addicted 2 DIY
- 2. DIY Bar Cabinet
- 3. DIY Pallet Wood Liquor Cabinet
- 4. Speaker Mini Liquor Cabinet
- 5. DIY Vintage-Inspired Liquor Cabinet
- 6. Build A Wine Barrel Cabinet
- 7. Modular Bar Wine Grid Hutch
- 8. Build A Custom Wine & Liquor Cabinet
- 9. DIY Wall-Mounted Bar Cabinet
- 10. DIY Repurposed Hutch To A Bar Cabinet
- 11. DIY Bubbly Bar Cabinet
- 12. Ammo Crate Liquor Cabinet
- 13. Single Bottle Liquor Cabinet With Tambour Door
- 14. Yukon Bar Cabinet
- 15. DIY A Mini Bar From Jerry Can
- 16. DIY Wall Mounted Drop Down Pallet Bar
- 17. DIY Convert A Sewing Table Into A Liquor Cabinet
- 18. DIY Repurpose A Piano into A Liquor Cabinet
- 19. Build A Wine Barrel Liquor Cabinet
- 20. Contemporary Cherry Liquor Cabinet
- Conclusion
1. DIY Wine Cabinet By Addicted 2 DIY
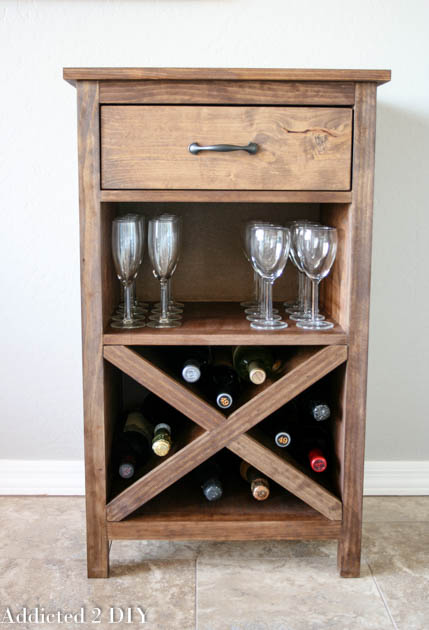
This plan provides you with not just a stand but a whole cabinet divided into three compartments. As a result, it is much easier for you to categorize the things stored there.
The lowest compartment is for its main use, wine storage. You will build an X-shape piece that goes into the middle to add in some spice. This design is very helpful, as it allows you to separate the different bottles of wine.
The middle compartment is left hollow so that you can put it in your wine glass collection.
Finally, the highest compartment features a drawer to store corkscrews and other accessories.
Project details: addicted2diy.com
2. DIY Bar Cabinet
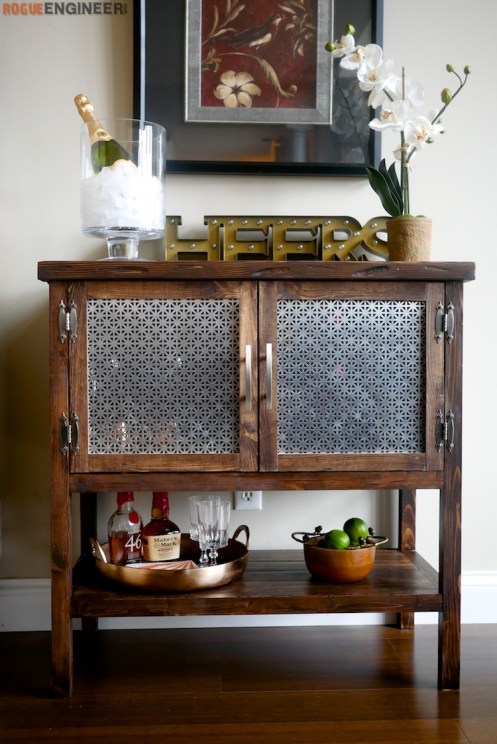
This bar cabinet is not just a place to hold liquor but also a great addition to a wine lover’s rustic home décor.
It has some sheet metal inserts decorating the doors. These add a much-needed contrast with the chunky, distressed wooden top.
Within the protection of the door is an inserted compartment with a grid of 6 equally spaced spaces. Each of them can fit one bottle of any size with no difficulty.
You also get a small drawer to put the accessories in. Next to this insert is a space with some wine glass racks attached to the top.
Project details: rogueengineer.com
3. DIY Pallet Wood Liquor Cabinet

If you are struggling with budgets, you will love this idea. Pallets are among the most cost-effective materials. You can sometimes get them for free.
With just 1 pallet, you can make 2 cabinets. Each cabinet has 2 parts, a lower shelf where you can store bottles and an upper one to store glassware.
You will need to widen the lower shelf, as the pallet stringer’s natural depth can only fit 750 ml bottles.
As for the upper shelf, it doesn’t incorporate the usual hanging style. Instead, you will put a plank in its front to keep the rock glasses from falling.
Project details: homeconstructionimprovement.com
4. Speaker Mini Liquor Cabinet
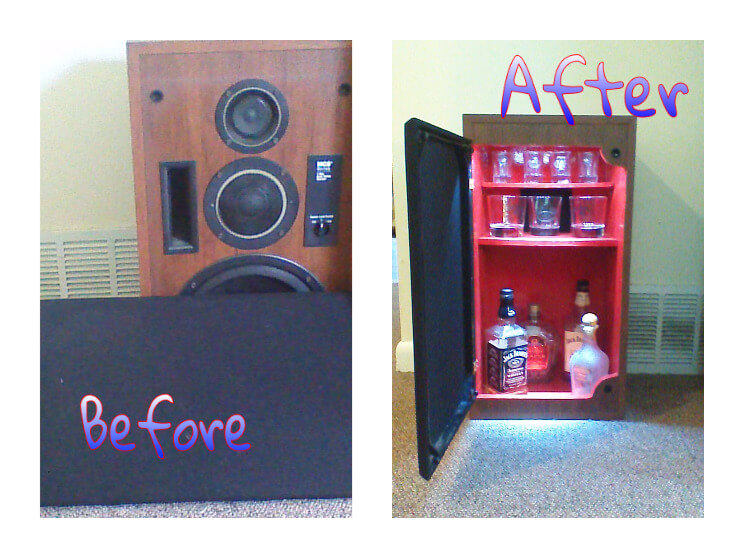
This idea is among the most creative and saves your cost. You can spend nothing on material if you happen to have an unused speaker lying around. Then convert it to a liquor cabinet.
Another great thing is that the speaker still looks the same after changing its internal structure completely. No one can tell what’s different until opening it.
The plan also involves lighting, with 2 packs of LED stuck on top of the cabinet. Whenever you open the door, you will see a gentle light illuminating your prized wine collection.
Project details: instructables.com
5. DIY Vintage-Inspired Liquor Cabinet
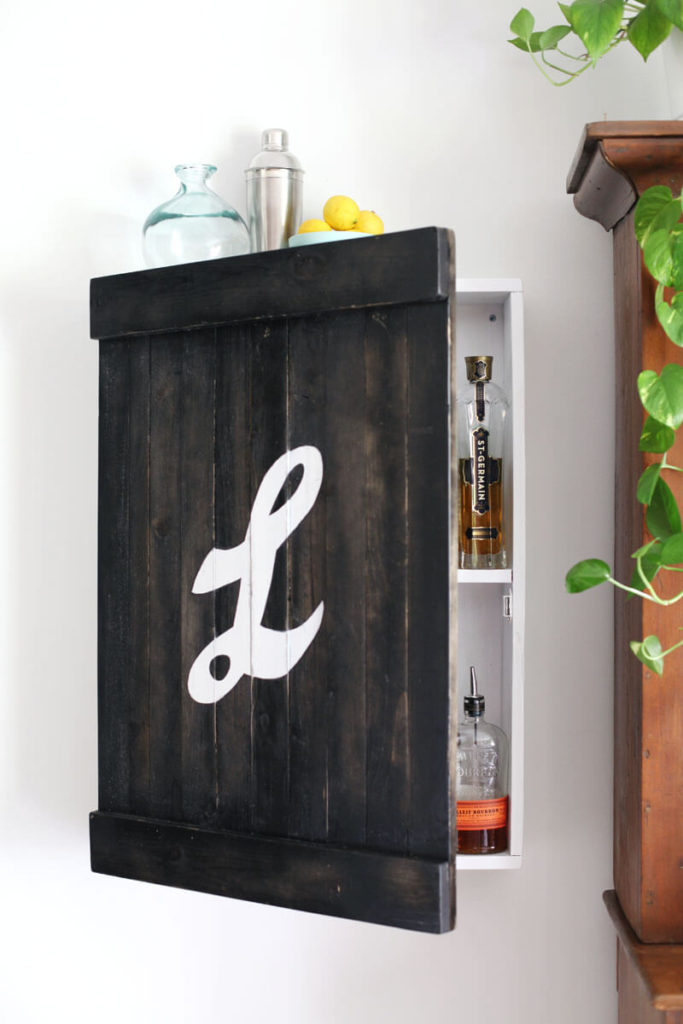
This project offers a great combination of vintage signage and a kitchen cupboard to serve as a little wall-mounted liquor cabinet.
Many will mistake it for a normal vintage sign when it’s not open.
The interior is fairly simple, with 2 shelves at the same height. The plank separating them is stuck there with glue.
You do need to make sure that it’s completely level before hammering, though.
The door has supporting planks on the outside, not inside. This choice provides the whole thing with a special antique look.
You can improve this look further with the stencil added later.
Project details: abeautifulmess.com
6. Build A Wine Barrel Cabinet
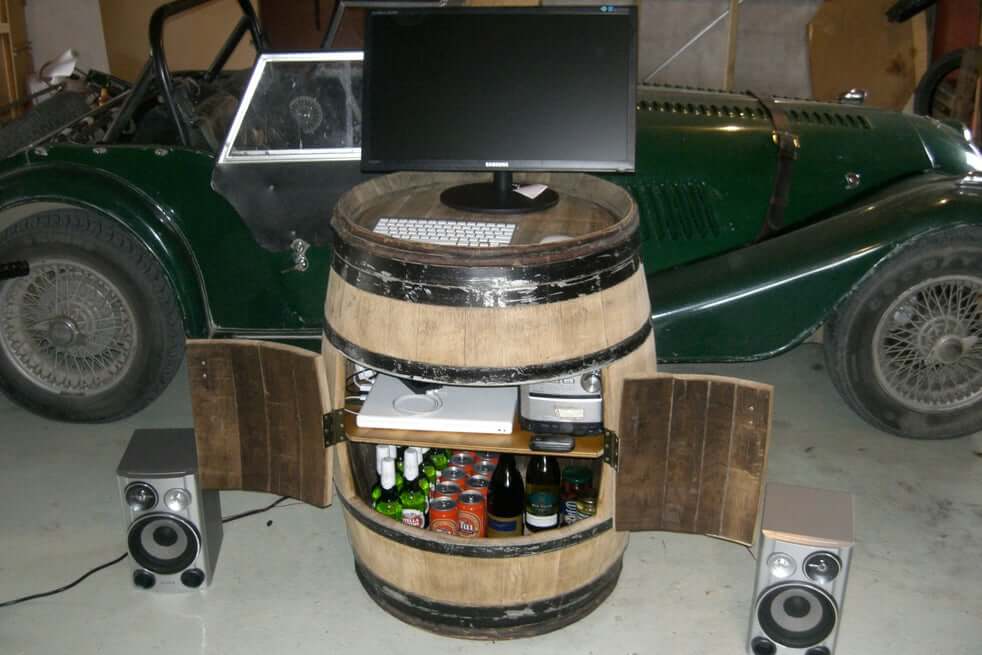
There is no denying that this project is among the most interesting. It’s not every day that one can come across a wine barrel, much less turn it into a fully functional wine cabinet.
Don’t be intimidated, as the steps are fairly simple to follow. All you need to do is cut out a portion in the center, clean out the inside, and attach the door back in with hinges. Next, proceed to attach the shelve.
You can number of compartments to categorize your collection if you want to be fancy.
The hardest part of the whole thing is to ensure the doors move efficiently. The best way to do so is by cutting completely straight lines.
If you happen to mess up, the plan provides a quick fix by gluing an extra wood sliver to the door’s bottom.
Project details: instructables.com
7. Modular Bar Wine Grid Hutch
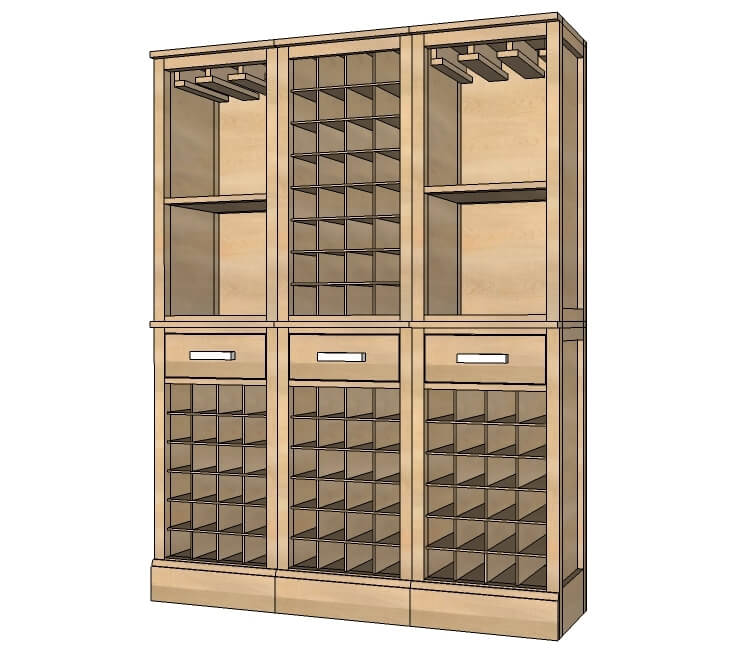
The above projects until now have been on the easier side. A downside of this easiness is that they don’t have that connoisseur look.
That is not the case with this one, as it’s not just a wine cabinet but more like a full wall of wine storage.
Of course, such a large-scale project means you will face many challenges. That is why you won’t build everything in succession. Instead, you build complete parts first and attach them together.
Project details: ana-white.com
8. Build A Custom Wine & Liquor Cabinet
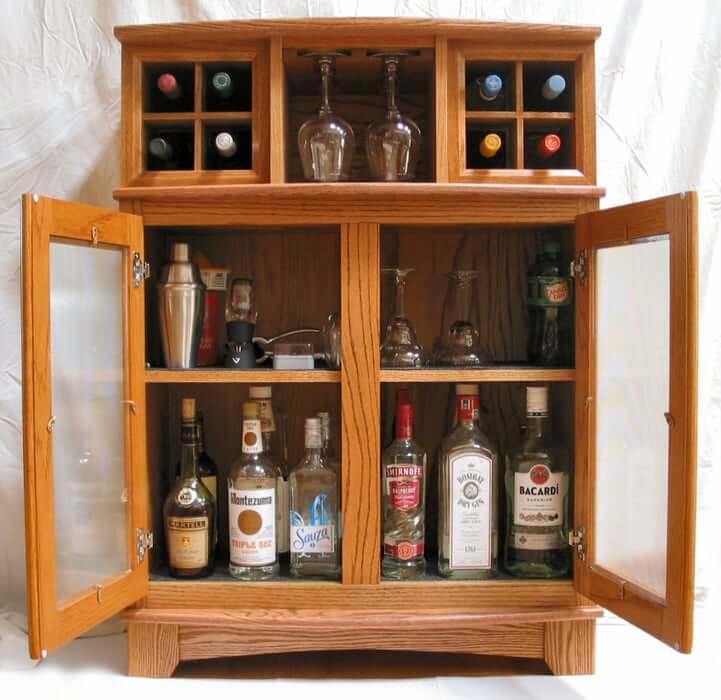
This project provides you with a special custom cabinet. It protects your more delicate bottles of wine behind a door while displaying the more impressive ones in the open.
To be exact, you can display a total of 8 wine bottles through 2 grids on the sides and 6 wine glasses through the rack in the center.
You can divide build the workload into 3 parts: the display module for wine and glasses, the storage cabinet and the base then combine them together.
Project details: instructables.com
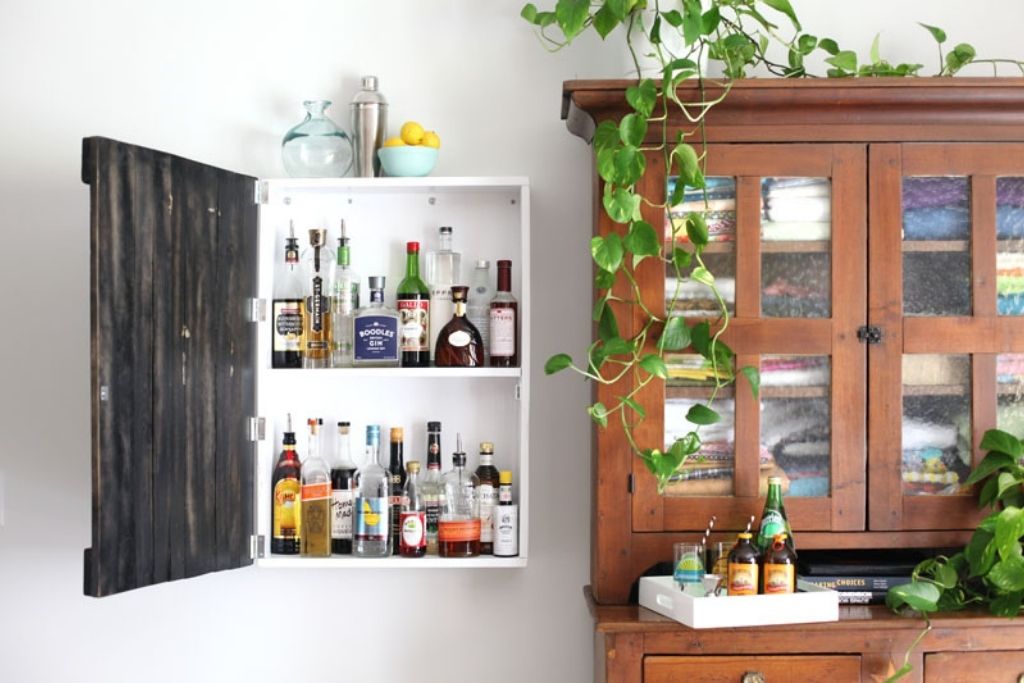
9. DIY Wall-Mounted Bar Cabinet
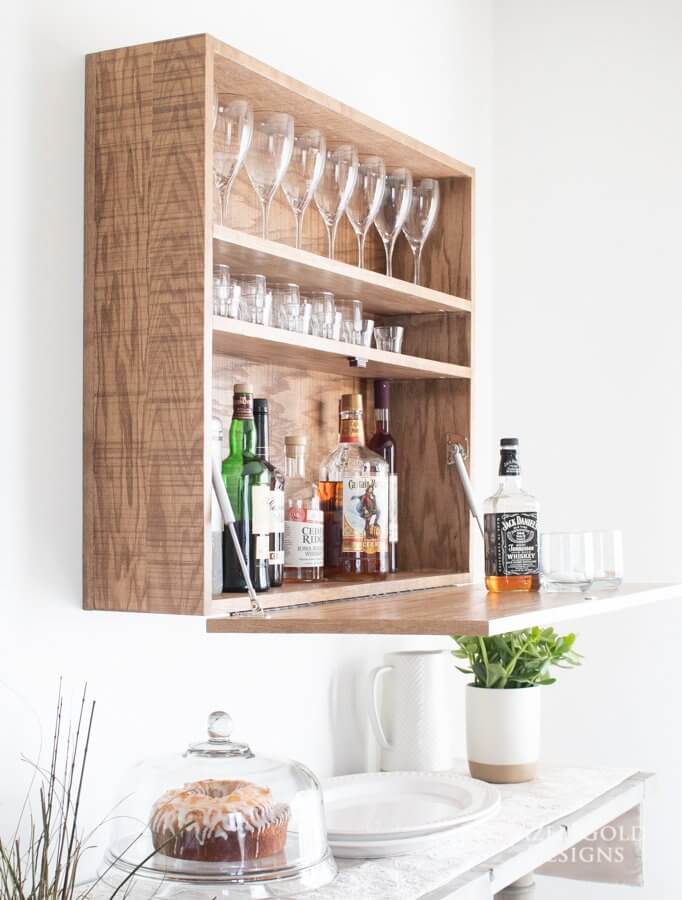
As you can clearly see from the image, the project offers you a wall-mounted cabinet. This is especially helpful for people living in a constrained place. After all, a standing cabinet can take up lots of space.
It has 3 platforms of varying heights. The tallest is for bottle keeping, the shortest is for rock glasses, and the middle is for tall wine glasses.
The bottle storage has a cabinet door to hide the bottles when not in use. This door is fixed in place with piano hinges, which are surprisingly strong given their size.
Project details: hazelandgolddesigns.com
10. DIY Repurposed Hutch To A Bar Cabinet
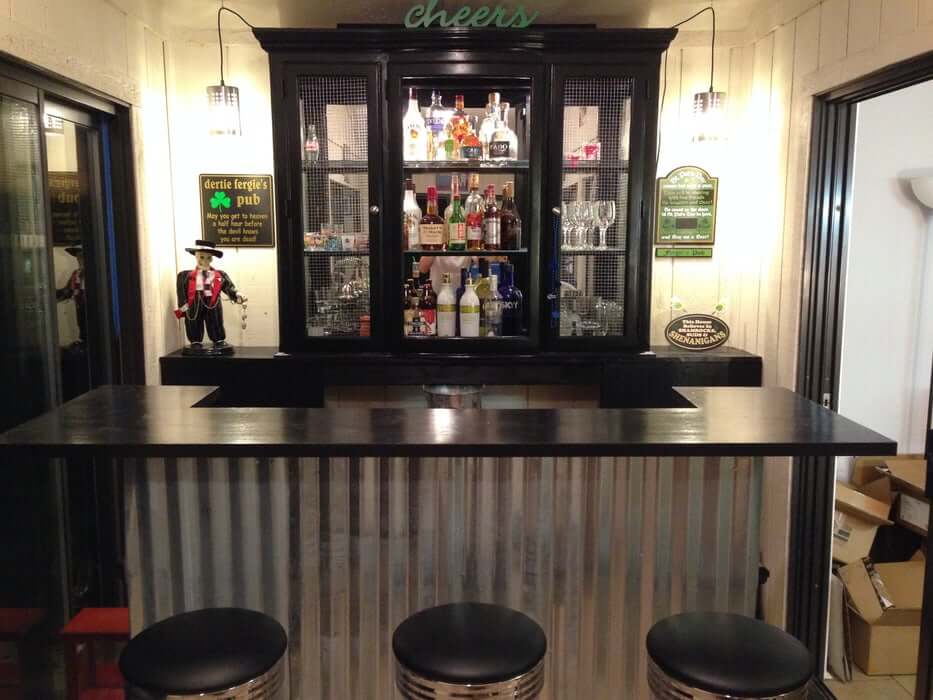
As this project is more on the repurposing side. You don’t need much help from power tools and skills woodworking.
The hutch already provides the space to store your drinks, you only need to build the bar top.
This plan uses a combo of plywood and corrugated roofing sheets. This combination improves support and adds a personal touch.
Also, the hutch’s glass is quite boring, so you get it out and replace it with chicken wires. This choice gives the bar an overall more industrial style and quite unique.
Project details: instructables.com
11. DIY Bubbly Bar Cabinet
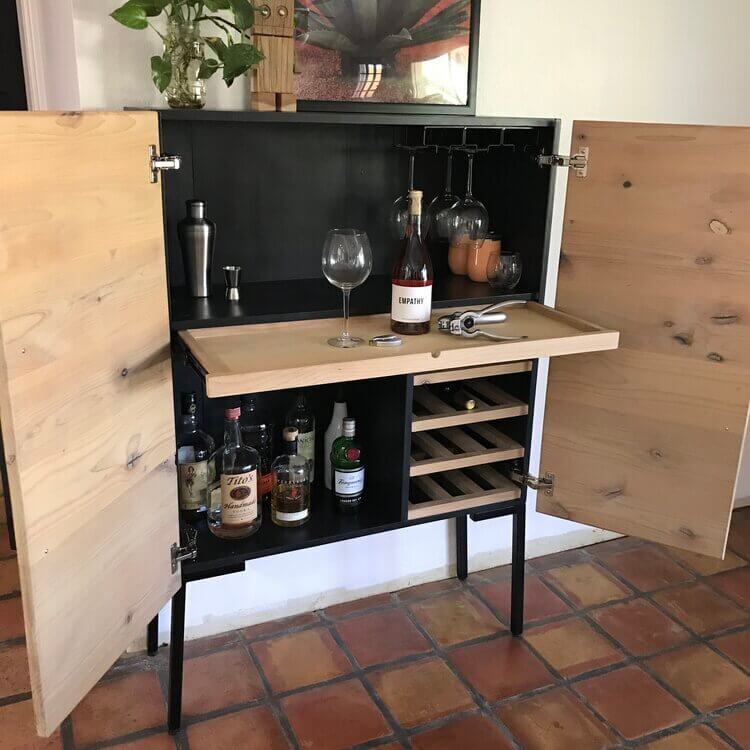
With this bar cabinet, it can store a lot of drinks and provide enough space to serve them.
So the plan utilizes a smart design of pull-out shelf to provide a separate area for drink preparation. As a result, it does not take up as much space as it should, as the shelf hides away when not in use.
It maximizes the limited depth even more by forgoing hardware on the front. Instead, you will drill a finger pull to open it.
The legs are built from metal, allowing them to be less thick without losing much strength as wine bottles are heavier than they look. These legs also elevate the cabinet away from the ground prevents contact with dirt.
The door also has some very unique bubble decorations, which you can create with power carving. As a result, you can add in a touch of personality and try something new.
Project details: theawesomeorange.com
12. Ammo Crate Liquor Cabinet
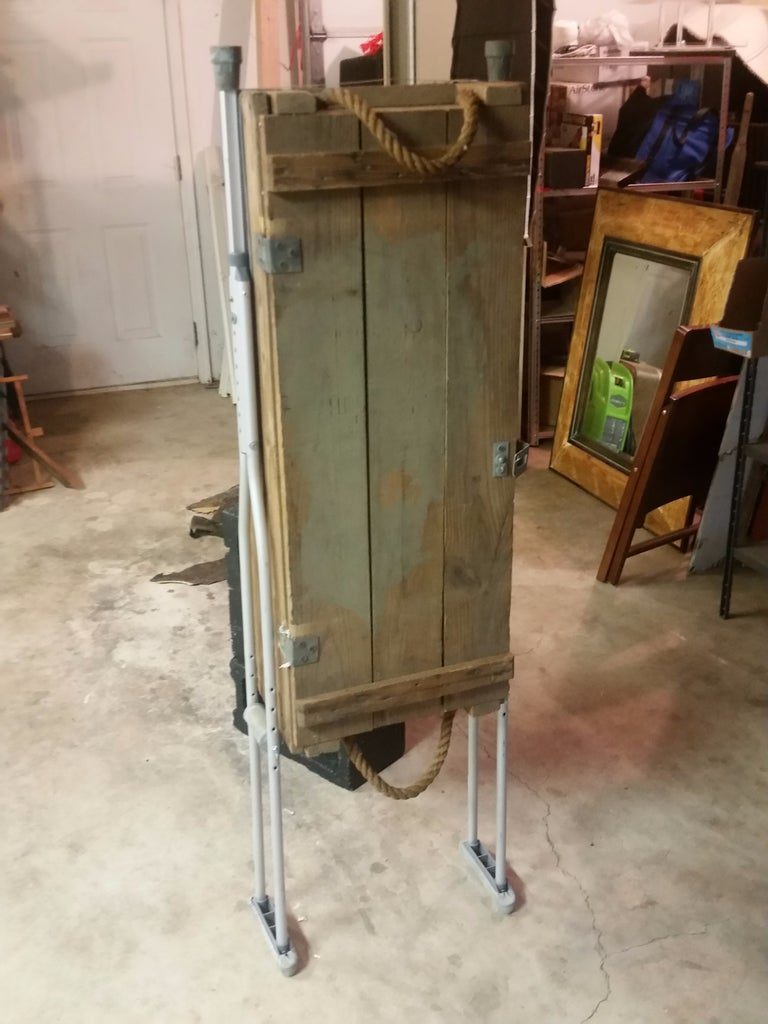
The interesting part of this project is the fact that almost all types of ammo crates can be suitable for it. You don’t need to change much other than the screw sizes.
Moreover, this project doesn’t utilize normal wooden legs. Instead, it makes use of crutches to act as legs. They are surprisingly stable and strong.
After finishing with the legs, the only thing left to do is add to the shelves. Depending on your ammo box, you can add 1, 2, or even 3 shelves to store more bottles of liquor.
Project details: instructables.com
13. Single Bottle Liquor Cabinet With Tambour Door
Some of us don’t have many bottles to store, so the idea of this plan is to make a fancy case for your most treasured wine bottle.
It is a mix of Danish modern and mid-century modern style cabinet, capable of housing a bottle of wine and two low ball glasses.
Its frame is held together with hand cut dovetails, while the two interior shelves connect with regular dado joints. These dado joints allow the shelves to double as two individual coasters.
You need screws to attach the bent lamination legs. Each leg is a pile of 1/16″ white oak strips. To achieve the bent shape, you can soak them overnight and bend them around a form with clamps.
With the sliding tambour door – you will need twelve mahogany strips. These strips are equally stuck on a canvas so they can roll up. In this way, you can have the sliding door effect.
Otherwise, this project also can use as a great gift for your friends who are wine lovers.
14. Yukon Bar Cabinet
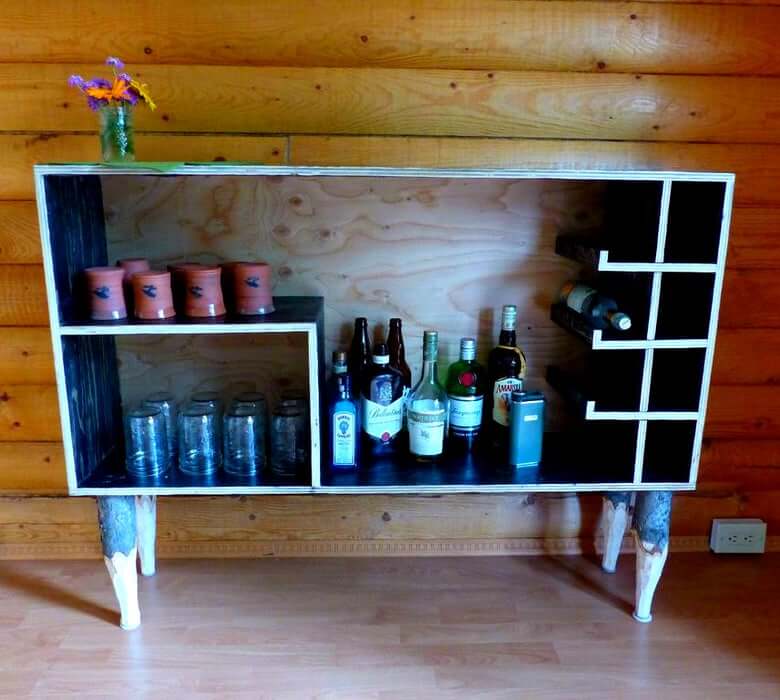
The main idea of this plan is to be as open as possible, so it will involve no door. Everything is laid bare out in the open.
The space is intelligently distributed, with specific areas for bottles and glasses.
Also, you need a failsafe method to keep the bottles safe on the shelf without being fully enclosed, and that method is to glue in an edge.
The cabinet frame features another smaller shelf to store glasses. This one is fixed in place with screws and glue. It can risk the little shelf losing its shape, so remember to use corner clamps.
The legs are also special. They aren’t processed lumber but straight spruce trees de-limbed.
As such, your cabinet will have that unique Yukon aesthetic. To ensure the cabinet’s stability, you should add a bracket for each leg.
Project details: instructables.com
15. DIY A Mini Bar From Jerry Can
This innovative plan provides you with a portable mini-bar that you can carry around easily. After all, it is repurposed from a 20-liter petrol canister, which is surprisingly lightweight thanks to its material.
Of course, the material of these canisters makes the edges very sharp after you cut them out. You will use rubber edge seals, which can easily bend around these edges.
Then, you attach the door by hinges and install the draw latches, allowing it to act as a door.
The last step, you will build small shelves and attach them to the canister. The shelf makes out three sections with a bottle of wine, glasses and soda cans.
These should be made from 1 cm thick plywoods, as they are strong enough, yet still lightweight.
16. DIY Wall Mounted Drop Down Pallet Bar
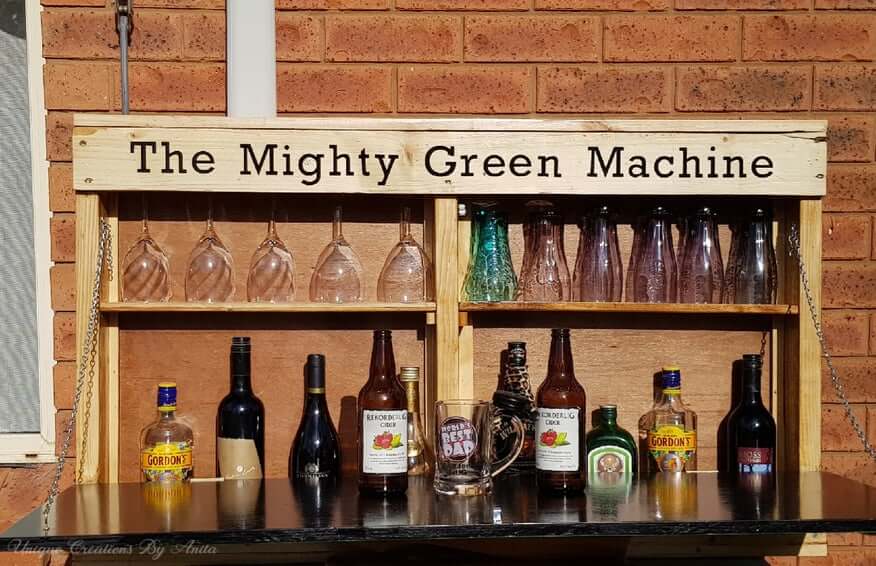
The selling point of this project is its drop-down counter.
This counter is kept up by a roller latch when not in use to act as a barrier between the cabinet’s contents and the outside world.
When you want to use it, it can be lowered and attached to a combo of hooks and stay firm throughout the preparation process.
You may decorate the underside of the counter to express your character too.
This wall-mounting design is also quite efficient in space-saving. It utilizes vertical storing spaces with two glasses shelves right above the bottles.
It’s great to put it outside your home as a space to relax.
Project details: instructables.com
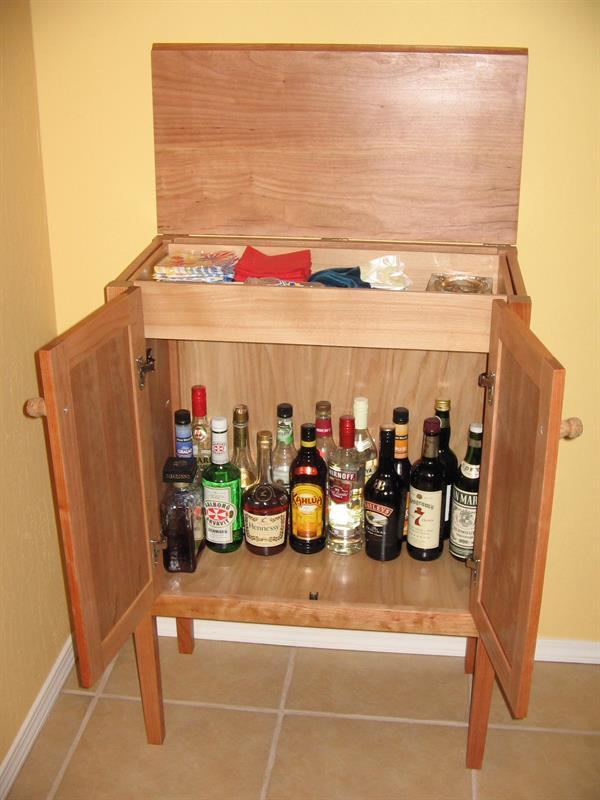
17. DIY Convert A Sewing Table Into A Liquor Cabinet
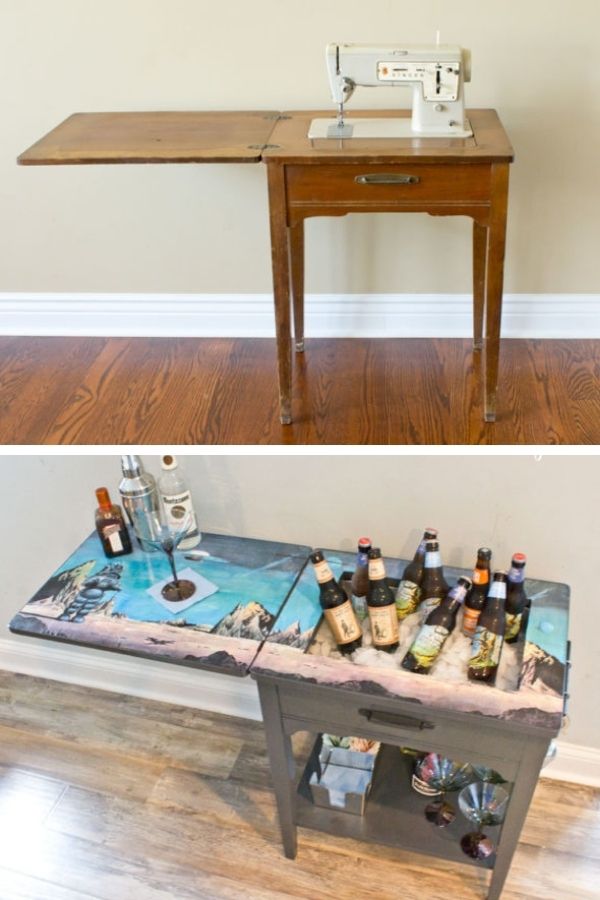
This is not a building-from-scratch project but a repurposing from the sewing table to the liquor cabinet.
As such, it allows you to keep your vintage sewing table, which is among quite rare these days, and breath a new life into it.
It makes use of the sewing table’s folding down mechanism, which provides a natural space for a wine pan once the machine is removed.
That’s not all. It also utilizes the tabletop’s folding capability to hide the pan when it’s not in use.
As a result, you get a bar cart that can masquerade as a normal table.
Moreover, you need to add a shelf at the bottom to extra storage bottles and glasses. It also helps stabilize the entire.
Project details: chicaandjo.com
18. DIY Repurpose A Piano into A Liquor Cabinet
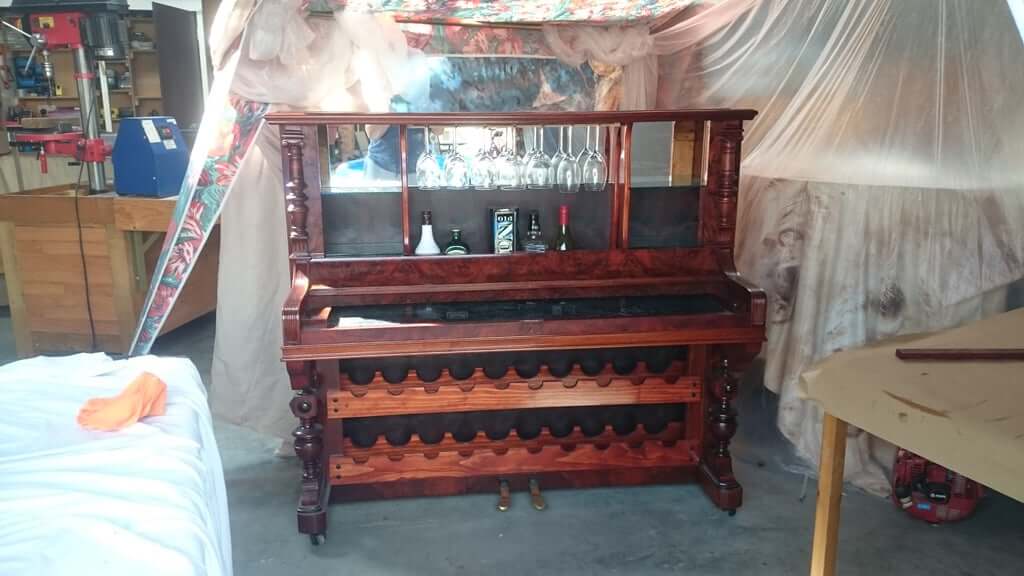
With this project, it is not suitable for those looking for a quick experience. It takes a lot of time to finish, but the result will be undeniably satisfactory.
As you are looking to turn a piano into a cabinet, the hardest part is to remove the unnecessary components.
The panels, keys, strings, and harp are all very stubborn and hard to remove properly. That is why over half the time will be dedicated to them.
Once you finish, though, the piano’s construction itself is suitable to keep your wine bottles and glassware.
All you need to do now is add in the racks, which are just long planks with holes, to display your prized collection.
Project details: instructables.com
19. Build A Wine Barrel Liquor Cabinet
This liquor cabinet plan is extremely simple, involving no fancy tool other than a drill, a hacksaw, and a circular saw.
The biggest thing to keep in mind is the fact that old barrels tend to be rickety because of wood shrinking.
You need to tighten the hoops by using a rubber mallet to hit them and remove 2 inner hoops. Doing, so both reinforces the barrel and makes it secure for wine storage.
The plan employs a shelf to divide the internal space into 2 layers.
As you will be placing heavy bottles on this shelf, it requires you to use corner braces. These will hold strong no matter what you put onto the shelf.
Project details: craftedworkshop.com
20. Contemporary Cherry Liquor Cabinet
This DIY cabinet follows the classic contemporary design. Thus, it can fit in most décor styles without feeling out of place. It’s great to store your liquor.
The plan uses the taper method on the legs, which makes them slimmer but still very strong.
To ensure that this cabinet can open and close fluidly, you require that you cut a cove in the top’s front edge. This design will work together with the 2-inch hinges in the back to allow a smoother operation.
The trays also are built by using box corners, which are more advanced but ensure sturdier. This method also ensures that there are no screw holes.
You can easily follow to build cabinet from image and figures detail from this plan
Project details: learn.kregtool.com
Conclusion
There is no denying that building a liquor cabinet for your own can bring great satisfaction with your style. You will have something to show off your woodworking skills.
The extra nice thing is those feelings only get amplified. Because when reaching for the liquor cabinet, you are probably about to have a good time when enjoying your result.
What are you waiting for? Pick a suitable plan from the above list and start building today!


![9 Best Pole Saws of 2023 [Ultimate Guide]](https://handykeen.b-cdn.net/wp-content/uploads/2021/03/best-pole-saw-300x200.jpg "9 Best Pole Saws of 2023 [Ultimate Guide]")


